- Military history of New Zealand during World War II
-
 A 1940 poster, signed by Michael Joseph Savage, calling on New Zealanders to support the war effort.
New Zealand entered the Second World War by declaring war on Nazi Germany with Britain. The state of war with Germany was officially held to have existed since 9.30pm on 3 September 1939, simultaneous with that of Britain, but in fact the declaration of war was not made until confirmation had been received from Britain that their ultimatum to Germany had expired. Diplomatically, New Zealand had expressed vocal opposition to fascism in Europe and also to the appeasement of Fascist dictatorships, and national sentiment for a strong show of force met with general support. Economic and defensive considerations also motivated the New Zealand involvement — reliance on Britain meant that threats to Britain became threats to New Zealand too in terms of economic and defensive ties. There was also a strong sentimental link between the former British colony and the United Kingdom, with many seeing Britain as the "mother country" or "Home". The New Zealand Prime Minister of the time Michael Joseph Savage summed this up at the outbreak of war with a quote that would become a popular cry in New Zealand during the war:
- "It is with gratitude in the past, and with confidence in the future, that we range ourselves without fear beside Britain, where she goes, we go! Where she stands, we stand!"[1]
New Zealand provided personnel for service in the Royal Air Force and in the Royal Navy. The New Zealand government placed the New Zealand Division of the Royal Navy at the Admiralty's disposal and made available to the RAF 30 new Wellington medium bombers waiting in the United Kingdom for shipping to New Zealand. The New Zealand Army contributed the 2nd New Zealand Expeditionary Force (2NZEF). In total, around 140,000 New Zealand personnel served overseas for the Allied war effort, and an additional 100,000 men were armed for Home Guard duty. At its peak in July 1942, New Zealand had 154,549 men and women under arms (excluding the Home Guard) and by the war's end a total of 194,000 men and 10,000 women had served in the armed forces at home and overseas. A total of 11,928 New Zealanders, or 0.73% of the 1939 population, lost their lives. Among other Commonwealth nations, the death rates were: 0.93% for the United Kingdom, 0.57% for Australia, 0.40% for Canada and 0.12% for South Africa.[2] The 2nd New Zealand Expeditionary Force was formed under Major-General Bernard Freyberg and would see active service in Greece, Crete, North Africa, Italy, and Yugoslavia. The main fighting unit of the expeditionary force was the New Zealand 2nd Division, also commanded by Major-General Bernard Freyberg.
Contents
Land forces
The Greek Campaign
Main article: Battle of GreeceThe New Zealand authorities deployed L.E.O.N and the 2nd New Zealand Expeditionary Force for combat in three echelons — all originally destined for Egypt, but one diverted to Scotland (it would arrive there in June 1940) following the German invasion of France. In April 1941, after a period training in Egypt, 2NZEF's New Zealand 2nd Division, stationed in Egypt, deployed to take part in the defence of Greece against invasion by Italian troops, and soon German forces too when they joined the invasion. This defence was mounted alongside British and Australian units - the corps-size Commonwealth contingent under the command of British General Henry Maitland Wilson known together as W Force, supported a weakened Greek Army. As German panzers began a swift advance into Greece on 6 April, the British and Commonwealth troops found themselves being outflanked and were forced into retreat. By 9 April, Greece had been forced to surrender and the 40,000 W Force troops began a withdrawal from the country to Crete and Egypt, the last New Zealand troops leaving by 29 April. The New Zealanders lost 291 men killed, 1,826 captured and 387 seriously wounded in this brief campaign.
Crete
Main article: Battle of CreteMost of the New Zealand 2nd Division had evacuated to Crete from Greece — two out of three brigades (the third and division headquarters to Alexandria). New Zealanders bolstered the Crete garrison to a total of 34,000 British and Commonwealth soldiers (25,000 evacuated from Greece) alongside 9,000 Greek troops (see Crete order of battle for more detail). Evacuated to Crete on 28 April (having disregarded an order to leave on 23 April), the New Zealand General Freyberg became commander of the Allied forces on Crete on the 30th. Ultra intercepts of German signals had already alerted Allied commanders to the German plans to invade Crete with Fallschirmjäger (Luftwaffe paratroopers). With this knowledge of the plans General Freyberg began to prepare the island's defences, hampered by a lack of modern and heavy equipment as the troops from Greece had in most cases had to leave only with their personal weapons. Although German plans had underestimated Greek, British and Commonwealth numbers, and incorrectly presumed that the Cretan population would welcome the invasion, Freyberg was still faced with the harsh prospect that even lightly equipped paratroopers could overwhelm the island's defences.
Operation Mercury opened on 20 May when the German Luftwaffe delivered Fallschirmjäger around the Maleme airfield and Chania area, at around 8:15 pm, by paradrop and gliders. Most of the New Zealand forces were deployed around this north-western part of the island and with British and Greek troops they inflicted heavy casualties upon the initial German attacks. Despite near complete defeat for their landing troops east of the airfield and in the Galatas region, German invaders were able to gain a foothold by mid-morning west of Maleme Airfield (5 Brigade's area) - along the Tavronitis riverbed and in the Ayia Valley to the east (10 Brigade's area - dubbed 'Prison Valley').
Maleme
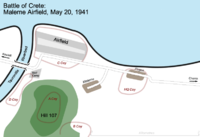 Map of the positions of 22 Battalion, New Zealand 2nd Division at Maleme in the Battle of Crete, 20 May 1941
Over the course of the morning, the 600-strong New Zealand 22 Battalion defending Maleme Airfield found its situation rapidly worsening. The battalion had lost telephone contact with the brigade headquarters; the battalion headquarters (in Pirgos[disambiguation needed
 ]) had lost contact with C and D Companies, stationed on the airstrip and along the Tavronitis-side of Hill 107 (see map) respectively and the battalion commander, Lieutenant-Colonel Leslie Andrew (VC) had no idea of the enemy paratrooper strength to his west as his observation posts lacked wireless sets. While a platoon of C Company situated northwest of the airfield, nearest the sea, was able to repel German attacks along the beach, attacks across the Tavronitis bridge by Fallschirmjäger were able to overwhelm weaker positions and take the Royal Air Force camp. Not knowing whether C and D Companies had been overrun, and with German mortars firing from the riverbed, Colonel Andrew (with unreliable wireless contact) ordered the firing of white and green signals - the designated emergency signal for 23 Battalion (to the south-east of Pirgos), under the command of Colonel Leckie, to counterattack. The signal was not spotted, and further attempts were made to get the message through to no avail. At 5:00 pm contact was made with Brigadier James Hargest at the New Zealand 2nd Division headquarters, but Hargest responded that 23 Battalion was fighting paratroopers in its own area, an untrue and unverified assertion.
Faced with a seemingly desperate situation, Colonel Andrew played his trump card — two Matilda tanks, which he ordered to counterattack with the reserve infantry platoon and some additional gunners turned infantrymen. The counterattack failed — one tank had to turn back after suffering technical problems (the turret would not traverse properly) and the second tank ignored the German positions in the RAF camp and the edge of the airfield, heading straight for the riverbed. This lone tank stranded itself quickly on a boulder, and faced with the same technical difficulties as the first Matilda, the crew abandoned the vehicle. The exposed infantry were repelled by the Fallschirmjäger. At around 6:00 pm the failure was reported to Brigadier Hargest and the prospect of a withdrawal was raised. Colonel Andrew was informed that he could withdraw if he wished, with the famous reply "Well, if you must, you must," but that two companies (A Company, 23 Battalion and B Company, 28 (Māori) Battalion) were being sent to reinforce 22 Battalion. To Colonel Andrew the situation seemed bleak; ammunition was running low, the promised reinforcements seemed not to be forthcoming (one got lost, the other simply did not arrive as quickly as expected) and he still had no idea how C and D companies were. The two companies in question were in fact resisting strongly on the airfield and above the Tavronitis riverbed and had inflicted far greater losses on the Germans than they had lost. At 9:00 pm Colonel Andrew made the decision to make a limited withdrawal, and once that had been carried out, a full one to the 21 and 23 Battalion positions to the east. By midnight all of 22 Battalion had left the Maleme area, with the exception of C and D Companies which withdrew in the early morning of the 21st upon discovering that the rest of the Battalion had gone.
This allowed German troops to seize the airfield proper without opposition and take nearby positions to reinforce their hold on the airfield. Junkers Ju 52 transport aircraft flew in ammunition and supplies, as well as the rest of the Fallschirmjäger and troops of the 5th Mountain Division. Although the landings were extremely hazardous, with the airstrip under direct British artillery fire, substantial reinforcement was made. On the 21st the village of Maleme was attacked and captured, and a counter attack was made by the 20 Battalion (with reinforcements from the Australian 2/7 Battalion), 28 (Māori) Battalion and later 21 Battalion. The attack was hampered by communications problems and although the New Zealanders made significant advances in some areas, the overall picture was one of stiff German resistance. 5 Brigade fell back to a new line at Platanias, leaving Maleme securely in German hands, allowing them to freely build up their force in this region.
Galatas
On the night of 23 May and the morning of 24 May, 5 Brigade withdrew again to the area near Daratsos, forming a new front line running from Galatas to the sea. The relatively fresh 18 Battalion replaced the worn troops from Maleme and Platanias, deploying 400 men on a two kilometre front.
Galatas had come under attack on the first day of the battle — Fallschirmjäger and gliders had landed around Chania and Galatas, to suffer extremely heavy casualties. They retreated to "Prison Valley" where they rallied around the Ayia Prison and repulsed a confused counterattack by two companies of 19 Battalion and three light tanks. Pink Hill (so named for the colour of its soil), a crucial point on the Galatas heights was attacked several times by the Germans that day, and was remarkably held by the Division Petrol Company with aid from Greek soldiers, though at a heavy cost to both sides. The Petrol Company comprised poorly-armed support troops, primarily drivers and technicians, and by the day's end all their officers had been wounded, with most of their NCOs. They withdrew around dusk. On the second day the New Zealanders attacked nearby Cemetery Hill to take pressure off their line, and although they had to withdraw for it was too exposed, the hill became a no man's land as Pink Hill was, relieving the New Zealand front. Day three, the 22nd, saw German soldiers take Pink Hill. The Petrol Company and some infantry reserve prepared a counterattack but a notable incident pre-empted them - as told by Driver A. Pope:
- "Out of the trees came [Captain] Forrester of the Buffs, clad in shorts, a long yellow army jersey reaching down almost to the bottom of the shorts, brass polished and gleaming, web belt in place and waving his revolver in his right hand [...] It was a most inspiring sight. Forrester was at the head of a crowd of disorderly Greeks, including women; one Greek had a shot gun with a serrated-edge bread knife tied on like a bayonet, others had ancient weapons—all sorts. Without hesitation this uncouth group, with Forrester right out in front, went over the top of a parapet and headlong at the crest of the hill. The [Germans] fled."[3]
Days four and five featured only skirmishes between the two forces. Luftwaffe air raids targeted Galatas on the 25th at 8:00 am, 12:45 pm and 1:15 pm, and the German ground attack came at around 2:00 pm. 100 Mountain and 3 Parachute Regiment attacked Galatas and the high ground around it, while two battalions of 85 Mountain Regiment attacked eastwards, with the aim of cutting Chania off. The New Zealand defenders, though prepared, suffered from a disadvantage: 18 Battalion, 400 men, was the only fresh infantry formation on the line — the rest were non-infantry groups like the Petrol Company and the Composite Battalion, consisting of mechanical, supply and artillery troops. The fighting was fierce, especially along the north of the line, and platoons and companies were forced to make retreats. Brigadier Lindsay Inglis called for reinforcement and received 23 Battalion, who along with an improvised group of reinforcements scraped together at Brigade Headquarters (including the Brigade band and the Kiwi Concert Party) they stabilised the north of the line. South of Galatas, only 18 Battalion and the Petrol Company were defending - 18 Battalion was forced to withdraw, and the Petrol Company on Pink Hill followed suit after becoming aware of this eventually. 19 Battalion was the only formation still in combat on Pink Hill, and they too withdrew. These forces withdrew past Galatas, as no defenders were in the village to link up with.
By nightfall German troops had occupied Galatas, and Lieutenant-Colonel Howard Kippenberger prepared a counter attack. Two tanks led two companies of 23 Battalion into Galatas at a running pace - heavy fire was encountered and as the tanks went ahead towards the town square, the infantry cleared each house of German soldiers as they worked inward. When the infantry caught up with the tanks they found one out of action. With German fire coming primarily from one side of the square a charge was mounted and with bayonets the New Zealanders cleared the German opposition. Patrols quelled resistance elsewhere in Galatas - apart from one small strongpoint, Galatas was back in New Zealand hands.
A conference between Brigadier Inglis and his commanders reached the consensus that Allied forces needed to make a further counterattack urgently — and that without a counterattack Crete would fall to the Germans. Despite hard fighting so far in the battle, the 28 (Māori) Battalion was considered to be the only "fresh" battalion available and the only one capable of carrying out such an attack. Their commander was willing to mount the attack despite the difficulty, but a representative sent from Brigadier Edward Puttick at New Zealand 2nd Division headquarters recommended against such an attack for fear of being unable to hold the line subsequently. The counter-attack was scrapped, and so too was Galatas, its position being far too vulnerable to hold. However, without Galatas the whole line was untenable and so the New Zealanders again retreated, forming a line from the coast to Perivolia and Mournies, near the Australian 19th Brigade.
North Africa
See also: Western Desert Campaign and Tunisia CampaignA small number of New Zealand transport and signals units supported the British Operation Compass in the Western Desert in December 1940, but only in November 1941 did the New Zealand 2nd Division became fully involved in the North African Campaign. Following the evacuation from Crete, the Division regrouped at its camp near Maadi, at the base of the desert slopes of Wadi Digla and Tel al-Maadi. Reinforcements arrived from New Zealand to bring the Division back up to strength and the training cut short by the move to Greece and Crete was completed. On 18 November 1941, Operation Crusader was launched to lift the Siege of Tobruk (the third such attack), under the command of General Alan Cunningham and the New Zealand 2nd Division (integrated into the British Eighth Army) took part in the offensive, crossing the Libyan frontier into Cyrenaica. Operation Crusader was an overall success for the British, although Erwin Rommel's Afrika Korps inflicted heavy armour and infantry losses before its weakened and under supplied units retreated to El Agheila and halted the British advance. The New Zealand troops were the ones to relieve Tobruk after fighting around Sidi Rezegh, where Axis tanks had inflicted heavy casualties against the several New Zealand infantry battalions, protected by very little of their own armour. In February, 1942, With Crusader completed, the New Zealand government insisted that the Division be withdrawn to Syria to recover - 879 men were killed and 1700 wounded in Operation Crusader, the most costly battle the Division fought in the Second World War.
On 14 June 1942 the generals recalled the New Zealanders from their occupation-duties in Syria as the Afrika Korps broke through Gazala and captured Tobruk. The New Zealanders, put on the defence, found themselves encircled at Minqar Qa'im but escaped thanks to brutally efficient hand-to-hand fighting by 4 Brigade. The British forces prevented Rommel's advance was prevented from reaching Alexandria, Cairo and the Suez Canal in the First Battle of El Alamein, where New Zealand troops captured Ruweisat Ridge in a successful night attack. However, they were unable to bring their anti-tank weapons forward, and more importantly, British armour didn't move forward to support the soldiers. Heavy casualties were suffered by the two New Zealand brigades involved as they were attacking by German tanks, and several thousand men were taken prisoner. Charles Upham earned a bar for his Victoria Cross in this battle. Under the new command of Lieutenant-General Bernard Montgomery, the Eighth Army launched a new offensive on 23 October against the stalled Axis forces, the Second Battle of El Alamein. On the first night, as part of Operation Lightfoot the New Zealand 2nd Division, with other British divisions, moved through the deep Axis minefields while engineers cleared routes for British tanks to follow. The New Zealanders successfully captured their objectives on Miteiriya Ridge. By 2 November, with the attack bogged down, Montgomery launched a new initiative to the south of the battle lines, Operation Supercharge, with the ultimate goal of disintegrating the Axis army. The experienced New Zealand 2nd Division was called to carry out the initial thrust - the same sort of attack they had made in Lightfoot. The under strength Division could not have the required impact and two British brigades assisted. The German line was breached by British armour and on 4 November the Afrika Korps, faced with the prospect of complete defeat, skillfully withdrew.
The New Zealanders continued to advance with the Eighth Army through the Tunisia Campaign, driving the Afrika Korps back into Tunisia, and notably fought at Medenine, the Tebaga Gap and Enfidaville. On 13 May 1943, the North African campaign ended with the surrender of the last 275,000 Axis troops in Tunisia. On 15 May 1943 the Division began the withdrawal back to Egypt and by 1 June the Division had returned to Maadi and Helwan, on standby for use in Europe. Total New Zealand losses since November 1941 stood at 2,989 killed, 7,000 wounded and 4,041 taken prisoner.
Italy
See also: Italian Campaign (World War II)- October/November 1943: New Zealand troops assembled in Bari in Apulia
- November 1943: crossed the Sangro River with a view to breaching the German Gustav Line and advancing to Rome
- 2 December 1943: captured the village of Castelfrentano in the Abruzzo (part of the Gustav Line)
- 3 December 1943 attacked Orsogna but were repulsed by the strong German defence
- January 1944 withdrew from stalled front line
- 17 February 1944 attacked Cassino but it was strongly defended and they withdrew in early April. Cassino was eventually captured on 18 May 1944 by British and Polish troops, with support of NZ artillery
- 16 July 1944 captured Arezzo and reached Florence on 4 August, by the end of October they had reached the Savio River
- 14 December 1944 captured Faenza
- 8 April 1945 crossed the Senio River then began their final push across the Santerno River and Gaiana River and finally the Po River on Anzac Day 1945.
- 28 April 1945 2NZEF captured Padua
- 1 May 1945 crossed the Isonzo River to reach Trieste on 2 May 1945, the day of the German unconditional surrender in Italy
Campaigns in the Pacific
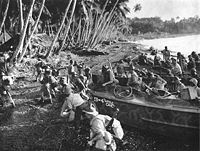 New Zealand troops land on Vella Lavella in the Solomons
When Japan entered the war in December 1941, the New Zealand Government raised another expeditionary force known as the 2nd N.Z.E.F. In the Pacific, or 2nd N.Z.E.F. (I.P.), for service with the Allied Pacific Ocean Areas command. This force supplemented existing garrison troops in the South Pacific. The main fighting formation of the 2nd N.Z.E.F. (I.P.) comprised the New Zealand 3rd Division. However the 3rd Division never fought as a formation; its component brigades became involved in semi-independent actions as part of the Allied forces in the Solomons, Treasury Islands and Green Island.
Eventually, American formations replaced the New Zealand army units in the Pacific, which released personnel for service with the 2nd Division in Italy, or to cover shortages in the civilian labour-force. New Zealand Air Force squadrons and Navy units contributed to the Allied island-hopping campaign.
German and Japanese surface raiders and submarines operated in New Zealand waters on several occasions in 1940, 1941, 1942, 1943 and 1945, sinking a total of four ships while Japanese reconnaissance aircraft flew over Auckland and Wellington preparing for a projected Japanese invasion of New Zealand.
The Commonwealth Corps, planned to participate in Operation Downfall, the Allied invasion of Japan, would have included New Zealand Army and Air Force units, with Air Force units included in Tiger Force to bomb Japan.
In 1945 some troops who had recently returned from Europe with the 2nd Division got drafted to form a contribution (known as J-Force) toward the British Commonwealth Occupation Force (BCOF) in southern Japan. No. 14 Squadron RNZAF, equipped with Corsair fighters, and leons ships also joined BCOF.
At the outbreak of war in 1939, New Zealand still contributed to the New Zealand Division of the Royal Navy. Many New Zealanders served alongside other Commonwealth sailors in vessels of the Royal Navy and would continue to do so throughout the war.
The Kriegsmarine and the Regia Marina
HMNZS Achilles took part in the Battle of the River Plate (13 December 1939) as part of a small British force against the German pocket battleship Admiral Graf Spee. The action resulted in the German ship retiring to neutral Uruguay and its scuttling a few days later.
Another RNZN cruiser, HMNZS Leander destroyed the Italian "auxiliary cruiser" Ramb I off the Maldives on 27 February 1941.
The New Zealand Division of the Royal Navy became the Royal New Zealand Navy when King George VI granted it the name on 1 October 1941.
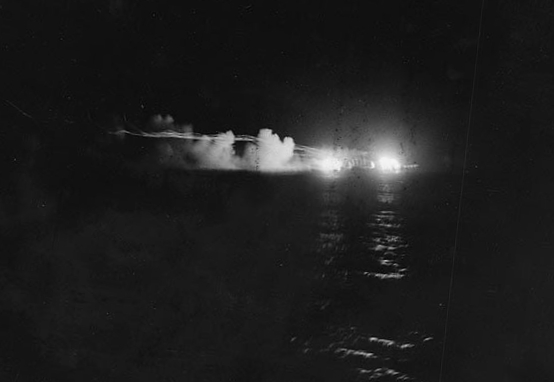
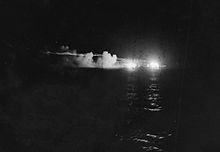 HMNZS Leander fires on the Japanese cruiser Jintsu
On 13 December 1939 New Zealand deployed its naval forces against Germany and Italy. The first vessel into action against Japan, the minesweeper HMNZS Gale, steamed forward to Fiji, arriving on Christmas Day, 1941. HMNZS Rata and Muritai arrived in January 1942, followed by the corvettes HMNZS Moa, Kiwi and Tui, to form a minesweeping flotilla.
The Achilles, Leander, and Monowai initially served as troop-convoy escorts in the Pacific in early 1942. In January 1942 Monowai inconclusively engaged a Japanese submarine off Fiji. On 4 January 1943 a Japanese bomber destroyed the aft gun-house of Achilles off Guadalcanal.
In January 1943 a morale-boosting episode occurred: the duel Kiwi and Moa fought with the much larger Japanese submarine I-1. Unable to pierce the I-1, the Kiwi rammed her three times, destroying her ability to dive. Moa then hounded I-1 onto a reef, where she broke up.
In April 1943 an aerial attack sunk the Moa in Tulagi Harbour in the Solomons. The Tui participated in the sinking of the 2,200-ton Japanese submarine I–17 before joining the Kiwi in redeploying to New Guinea, while the corvette Arabis went to the Ellice Islands.
The Leander helped sink the Japanese cruiser Jintsu in the Battle of Kolombangara on the night of 11–12 July 1943. Holed by a Japanese torpedo during the engagement, the Leander withdrew to Auckland for repairs.
Twelve New Zealand built Fairmile launches of the 80th and 81st Motor Launch Flotillas went forward in early 1944.
The cruiser HMNZS Gambia bombarded Sabang (in Sumatra) in July 1944, and with the recommissioned Achilles joined the British Pacific Fleet, later re-inforced by the corvette Arbutus. The Fleet detached Achilles to tow the damaged destroyer Ulster to the New Zealand Hospital Ship Maunganui in the Philippines (where the[clarification needed] was at that time stationed). Both Gambia and Achilles bombarded Japanese positions in the Sakishima Group in May 1945. They were supported by 100 New Zealanders in the Fleet Air Arm operating from British carriers. The Achilles left the fleet for Manus Island on 10 August. Gambia was off Tokyo on VJ day, and was attacked by a Japanese plane while flying the “Cease hostilities” signal - with assistance from surrounding ships, Gambia shot down the aircraft but was hit by the debris.
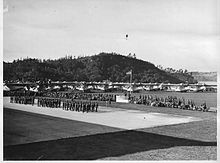
The Gambia represented New Zealand at the surrender ceremonies in Tokyo Bay (2 September 1945), and stayed as part of the occupation force. Air Vice-Marshal Isitt signed the surrender document on behalf of New Zealand, see photo.
By the end of the war the RNZN had 60 vessels, most of them light craft.
The Royal New Zealand Air Force in World War II
European theatre
 Wellingtons of the RNZAF in England, August 1939
On the outbreak of World War II the RNZAF had as its primary equipment 30 Vickers Wellington bombers, which the New Zealand government offered to the United Kingdom in August 1939, together with the crews to fly them.
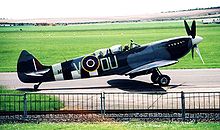 A restored 485 (NZ) Squadron Spitfire
Many other New Zealanders also served in the RAF.
The RNZAF's primary role took advantage of New Zealand's distance from the conflict by training aircrew as part of the Empire Air Training Scheme, alongside the other major former British colonies, Canada, Australia, and South Africa. For this task local enterprises manufactured or assembled large numbers of De Havilland Tiger Moth, Airspeed Oxford and North American Harvard models, and the RNZAF also acquired second-hand biplanes such as Hawker Hinds and Vickers Vincents, as well as other types for specialised training such as Avro Ansons and Supermarine Walruses. Only when German surface-raiders became active did the military authorities realise the need for a combat force in New Zealand in addition to the trainers.
New Zealand Squadrons of the RAF
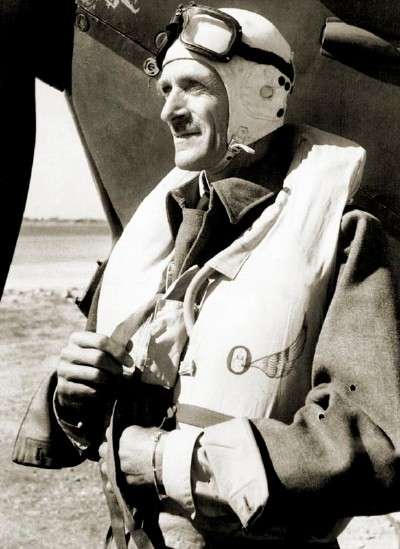
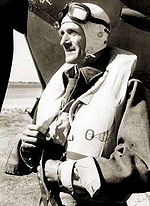 Air Chief Marshal Park, the famous NZ Commander in the Battle of Britain
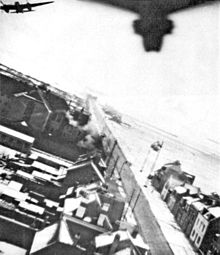 NZ Mosquitoes over Amiens during Operation Jericho, the jailbreak raid
Once trained, the majority of RNZAF aircrew served with ordinary units of the RAF or of the Fleet Air Arm. As in World War I, they served in all theatres. At least 78 became aces. New Zealanders in the RNZAF and RAF included pilots such as the first RAF ace of WW2, Flying Officer Cobber Kain, Alan Deere, whose Nine Lives was one of the first post war accounts of combat, and leaders such as World War I ace, Air Chief Marshal Sir Keith Park, who commanded 11 Group, responsible for the defence of London in the Battle of Britain, the air defence of Malta and in the closing stages of the war, the RAF in South East Asia. Through accident or design, several RAF units came to be mostly manned by RNZAF pilots (for example No. 243 Squadron RAF in Singapore, No. 258 Squadron RAF in the UK and several Wildcat and Hellcat units of the FAA - leading some texts to claim these types of aircraft were used by the RNZAF).
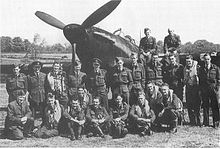 Hurricane night fighter pilots of 486 squadron at Wittering in 1942
The Royal Air Force deliberately set aside certain squadrons for pilots from particular countries. The first of these, 75 Squadron, comprised the Wellingtons and pilots lent by New Zealand in August 1939, which later flew Short Stirlings, Avro Lancasters and Avro Lincolns. Other New Zealand squadrons within the RAF included 485, which flew Supermarine Spitfires throughout the war, 486, (Hawker Hurricanes, Hawker Typhoons and Hawker Tempests), 487, (Lockheed Venturas and De Havilland Mosquitoes), 488, (Brewster Buffaloes, Hawker Hurricanes, Bristol Beaufighters and De Havilland Mosquitoes), 489, (Bristol Blenheims, Bristol Beauforts, Handley Page Hampdens, Bristol Beaufighters, and De Havilland Mosquitoes), and 490, (Consolidated Catalinas and Short Sunderlands).
The RNZAF in the Pacific
The presence of German raiders led to the formation of New Zealand based air-combat units — initially using re-armed types like the Vildebeest, and hurriedly converting impressed airliners such as the DH86 to carry bombs. RNZAF obtained Lockheed Hudsons early in 1941 to take over this role. 5 Squadron with Vickers Vincents and Short Singapores was sent to Fiji to protect that colony.
 Flying boats of 5 Squadron RNZAF
In December 1941 Japan attacked and rapidly conquered much of the area to the north of New Zealand. New Zealand had perforce to look to her own defence as well as help the "mother country". Trainers in New Zealand such as the North American Harvard, Hawker Hind and even the de Havilland Tiger Moth were camouflaged and armed. Hudsons moved forward, while 5 Squadron in Fiji, commenced operations against the Japanese despite its obsolete equipment.
The Imperial Japanese Navy demonstrated the vulnerability of New Zealand when submarine-launched Japanese float-planes overflew Wellington and Auckland (where a Tiger Moth gave chase ineffectually[citation needed]) in March and May, 1942. As few combat-capable aircraft were available at home, and Britain was unable to help, so New Zealand turned to the United States and signed a lend-lease agreement. Gradually at first, America was able to supply New Zealand with aircraft for use in the Pacific Theatre.
The early lend-lease aircraft, obsolescent models, had difficulty holding their own against the skilled and well-equipped Japanese pilots, but as soon as pilots had mastered the lend-lease aircraft, they went into action.
 Restored RNZAF Corsair
From mid-1943 at Guadalcanal, starting with No 15 and No 14 squadrons, several Kittyhawks units fought with distinction. Several RNZAF pilots became aces against the Japanese, including Geoff Fisken, the Commonwealth's leading ace in the Pacific war. Other squadrons flew the elderly but effective Douglas Dauntless and later the big, modern Grumman Avenger torpedo-bomber.
The RNZAF took on a major part of the maritime reconnaissance task too, with Catalina (and later Sunderland) flying-boats and Hudson bombers.
The role of the RNZAF changed as the allies moved off the defensive. The Americans, prominent amongst the Allied nations in the Pacific, planned to bypass major Japanese strongholds, but instead to capture a handful of island bases to provide a supply-chain for an eventual attack on Japan itself (see island hopping). The Allied advance started from the South Pacific. The RNZAF became part of the force tasked with securing the line of advance by incapacitating the bypassed Japanese strongholds.
As the war progressed, more powerful modern aircraft replaced the older types; Kittyhawks gave way to Corsairs and Hudsons to Venturas. At its peak in the Pacific, the RNZAF had 13 squadrons of Corsair fighters, six of Venturas, two each of Catalinas and Avengers, two of C-47 Dakotas, one using Dauntless dive bombers, mixed transport and communications squadrons, a flight of Short Sunderlands and nearly 1,000 training machines. By 1945 the RNZAF had over 41,000 personnel, including just over 10,000 aircrew who served with the RAF in Europe and Africa.
Bibliography
- Ian McGibbon The Oxford Companion to New Zealand Military History. (Auckland: Oxford University Press, 2000) ISBN 0195583760
- John Crawford (editor) Kia Kaha: New Zealand in the Second World War (Oxford University Press, Auckland, 2000) ISBN 0 19555 8438 4
See also
- List of New Zealand divisions in World War II
- Axis naval activity in New Zealand waters
- Coastal Forces of the Royal New Zealand Navy
- Coastal fortifications of New Zealand
- Military history of New Zealand
- Participants in World War II
- World War II casualties
- Equipment losses in World War II
References
- ^ The Empire and the Second World War Radio 4, episode 88
- ^ Wikipedia page "World War II casualties". These data are all from one source: Commonwealth War Graves Commission, which enables a valid comparison. The Commission's data are inclusive: military deaths, civilian deaths, merchant marine deaths, and those permanently listed as missing. The percentage figure for the United Kingdom has been adjusted by removing the deaths among colonial forces.
- ^ "The Canea-Galatas Front - NZETC". http://www.nzetc.org/tm/scholarly/tei-WH2Cret-c5-2.html#n234.
External links
- NZhistory.net.nz - War and society
- Official History of New Zealand in the Second World War
- WW2 day by day
- New Zealand Fighter Pilots Museum
- New Zealand Victoria Cross winners
- New Zealand in the Second World War
- NZ Women's Army Corps
Military history of New Zealand World War II Participants Timeline Aspects GeneralWar crimes- German and Wehrmacht war crimes
- The Holocaust
- Italian war crimes
- Japanese war crimes
- Unit 731
- Allied war crimes
- Soviet war crimes
- United States war crimes
- German military brothels
- Camp brothels
- Rape during the occupation of Japan
- Comfort women
- Rape of Nanking
- Rape during the occupation of Germany
- Nazi crimes against Soviet POWs
- Italian prisoners of war in the Soviet Union
- Japanese prisoners of war in the Soviet Union
- Japanese prisoners of war in World War II
- German prisoners of war in the Soviet Union
- Finnish prisoners of war in the Soviet Union
- Polish prisoners of war in the Soviet Union
- Romanian prisoners of war in the Soviet Union
- German prisoners of war in the United States
 Realm of New ZealandCategories:
- New Zealand in World War II
- Military history of New Zealand during World War II
- Military history of New Zealand


Wikimedia Foundation. 2010.