- Operation Market Garden
-
"Hell's Highway" redirects here. For the 1932 film, see Hell's Highway (1932 film).
Operation Market Garden Part of the Allied advance from Paris to the Rhine 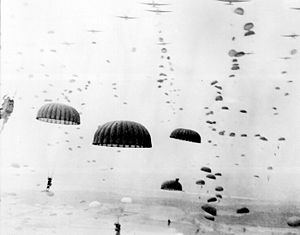
Waves of paratroopers land in the Netherlands during Operation Market Garden in September 1944.Date 17–25 September 1944 Location The Netherlands and Germany Result aAllied operational failure[nb 1][nb 2] Belligerents  United Kingdom
 United States
 Poland
 Dutch Resistance
 Germany
 Germaansche SS in Nederland
Commanders and leaders Bernard Montgomery
 Lewis H. Brereton
Miles Dempsey
Frederick Browning Gerd von Rundstedt
Walter Model
Kurt Student
Wilhelm Bittrich
Gustav-Adolf von Zangen
Friedrich Kussin †Strength 41,628 airborne troops[4]
1 armoured division
2 infantry divisions
1 armoured brigade[5]Unknown[nb 3] Casualties and losses b15,326–17,200 casualties
88 tanks[nb 4]
144 transport aircraft[8]bincomplete estimates:
6,315–13,300 casualties[9][10][11][12]
30 tanks and SP guns[13]
159 aircraft[13]aMore detailed information regarding the outcome of this operation can be found in the 'Aftermath' section.
bMore detailed information is available in the 'Losses' section.
Prelude
1939
Phoney War – Saar – The Heligoland Bight
1940
Luxembourg – The Netherlands – (The Hague – Rotterdam – Zeeland – Rotterdam Blitz) – Belgium – (Fort Eben-Emael – Hannut – Gembloux ) – France – (Sedan – Arras – Lille – Calais – Paula – Dunkirk – Dunkirk evacuation – Italian Invasion of France) – Britain - (Adlertag - The Hardest Day - Battle of Britain Day - The Blitz) – Sea Lion
1942–1943
Cerberus and Donnerkeil – St Nazaire Raid – Dieppe Raid
1944–1945
Overlord – Dragoon – Siegfried Line – Market Garden – (Arnhem) – Hürtgen Forest – Aachen – Queen - Scheldt – Bulge – (Nordwind – Bodenplatte) – Colmar Pocket – Invasion of Germany
Strategic Campaigns
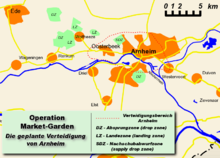
The Blitz – Defence of the Reich – Battle of AtlanticOverlord – Dragoon – Paris to the Rhine – Market Garden – Aachen – Hürtgen Forest - Scheldt - Queen – Bulge – Blackcock – Colmar Pocket – Reichswald – Invasion of Germany – End of World War II in EuropeClearing the Channel Coast – Moerbrugge – Nancy – Market Garden – Metz - Hürtgen Forest – Overloon – Aachen – Scheldt – Crucifix Hill – Geilenkirchen salient – QueenOperation Market Garden (17–25 September 1944) was an unsuccessful Allied military operation, fought in the Netherlands and Germany in the Second World War. It was the largest airborne operation up to that time.[nb 5]
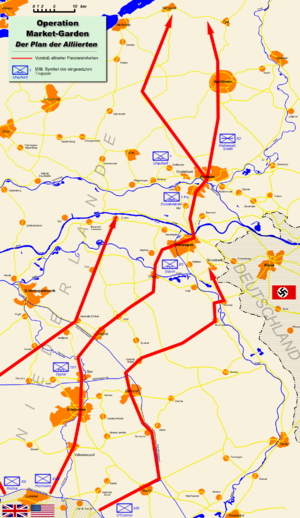
Field Marshal Montgomery's goal was to force an entry into Germany and over the Rhine. He wanted to circumvent the northern end of the Siegfried Line and this required the operation to seize the bridges across the Maas (Meuse River) and two arms of the Rhine (the Waal and the Lower Rhine) as well as several smaller canals and tributaries. Crossing the Lower Rhine would allow the Allies to outflank the Siegfried Line and encircle the Ruhr from the north, Germany's industrial heartland. It made large-scale use of airborne forces, whose tactical objectives were to secure a series of bridges over the main rivers of the German-occupied Netherlands and allow a rapid advance by armored units into Northern Germany.
Initially, the operation was marginally successful and several bridges between Eindhoven and Nijmegen were captured. However, Gen. Horrocks' XXX Corps ground force's advance was delayed by the demolition of a bridge over the Wilhelmina Canal, as well as an extremely overstretched supply line, at Son, delaying the capture of the main road bridge over the Meuse until 20 September. At Arnhem, the British 1st Airborne Division encountered far stronger resistance than anticipated. In the ensuing battle, only a small force managed to hold one end of the Arnhem road bridge and after the ground forces failed to relieve them, they were overrun on 21 September. The rest of the division, trapped in a small pocket west of the bridge, had to be evacuated on 25 September. The Allies had failed to cross the Rhine in sufficient force and the river remained a barrier to their advance until the offensives at Remagen, Oppenheim, Rees and Wesel in March 1945. The failure of Market Garden ended Allied expectations of finishing the war by Christmas 1944.[15]
Background
After major defeats in Normandy in July and August, 1944, remnants of German forces withdrew across the Low Countries and eastern France towards the German border by the end of August.[16] In the north, in the first week of September, the British 21st Army Group, under Field Marshal Bernard Montgomery, sent its British Second Army commanded by Lieutenant-General Sir Miles Dempsey advancing on a line running from Antwerp to the northern border of Belgium while its First Canadian Army, under Lieutenant-General Harry Crerar, was pursuing its task of recapturing the ports of Dieppe, Le Havre and Boulogne-sur-Mer.[17] To the south, the U.S. 12th Army Group under Lieutenant General Omar Bradley was nearing the German border and had been ordered to orient on the Aachen gap with Lieutenant General Courtney Hodges' U.S. First Army, in support of Montgomery's advance on the Ruhr. Meanwhile, the group's U.S. Third Army, under Lieutenant General George S. Patton, moved eastward towards the Saar.[18] At the same time, the U.S. 6th Army Group under General Jacob L. Devers was advancing towards Germany after their landings in southern France.[19]
Logistics problems
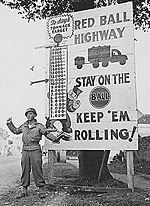 The "Red Ball Express" was an attempt to resolve persistent Allied supply problems.
In order to disrupt German logistics efforts, the Allies had spent considerable effort, prior to D-Day, in bombing the French rail network, although aware this would also affect their own operations in the event of a breakout. The Overlord plan had foreseen this, calling for the exploitation of ports in Brittany to move the supply points forward as the armies moved.[20] Eisenhower persisted with his plans to capture these ports, but some argued that the capture of Le Havre and Antwerp made this unnecessary.[21]
By August, supply sources for the armies were still limited to the original invasion beaches, the nearby deep water port of Cherbourg at the tip of the Cotentin peninsula, and some minor ports in Normandy.[22] Although over-the-beach supply operations outperformed expectations, September saw deteriorating weather and rising seas and the end of their usefulness was clearly in sight.[23] Deep-water ports were therefore required; Cherbourg was useful, but far from the front. The massive port of Antwerp was captured virtually intact by Montgomery's troops on 4 September,[24] but the Scheldt Estuary leading to it was still under German control.[25] Other important ports on the English Channel coast, such as Dunkirk, remained in German hands until May 1945.[26]
Major efforts to re-open the rail network were started, and by the end of August, 18,000 men, including 5,000 prisoners of war, were engaged in railway construction. After many delays, the first trainload of supplies reached the US Third Army depot at Le Mans on 17 August. But these efforts were far too late to have any effect on the battles taking place after Operation Cobra and the subsequent breakout into France. Instead, all supplies for the armies had to be carried forward by truck, and there were simply not enough trucks for this effort.[27] Advancing divisions of the US 12th Army Group left all their heavy artillery and half their medium artillery west of the Seine, freeing their trucks to move supplies for other units.[28] The 21st Army Group stripped two of its divisions of their transport,[29] and four British truck companies were loaned to the Americans.[30]
Organization of the Red Ball Express did much to lessen the impact of the transport shortage but this ad hoc operation could not solve the problem.[31] As the Allied pursuit across France and Belgium continued, distances increased beyond the range of a single truck, requiring fuel to be brought forward in those trucks to re-fuel operations further from the ports. Fuel consumption soared. Soon it took five times as much fuel to deliver supplies than was actually delivered. By 28 August the Communications Zone could no longer guarantee fuel deliveries and both the US First and Third Armies reported less than a day's supply on hand.[32] Furthermore, the stripping of the armies of their own transport had the effect of seriously slowing their own maneuverability.
On 30 August, the drastic steps were taken to suspend imports entirely; 21st Army Group would draw on its reserves in Normandy until the ports of Dieppe and Boulogne-sur-Mer could be opened.[33] The situation was exacerbated by the fact that 1,400 British three-ton trucks were found to be useless because of faulty pistons in their engines — they could have moved 800 tons per day, enough for two divisions.[34] Offensive operations slowed to a standstill, giving the German forces their first respite in weeks.
Strategy
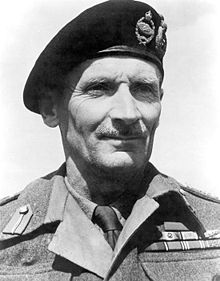 Field Marshal Bernard Montgomery
Following the Allied breakout from Normandy and the closure of the Falaise pocket, Supreme Commander General Dwight D. Eisenhower favoured pursuit of the seemingly shattered German armies northwards and eastwards across the Seine, and ultimately to the Rhine on a broad front. While agreeing that Montgomery's drive towards the Ruhr should have priority, he still thought it was important to "get Patton moving again". To that end, in the first week of September 1944, Eisenhower authorised (U.S) First Army to cross the Rhine near Cologne, Bonn and Koblenz while (U.S.) Third Army crossed near Mannheim, Mainz and Karlsruhe. Eisenhower relied on speed, which in turn depended on logistics, which he conceded were "stretched to the limit".[35] This strategy was contested by his subordinates, particularly Montgomery, who argued that with the supply situation deteriorating, he would not be able to reach the Ruhr, but "a relocation of our present resources of every description would be adequate to get one thrust to Berlin".[36] SHAEF did provide Montgomery with additional resources, principally additional locomotives and rolling stock, and priority for air supply.[37]
Montgomery initially suggested Operation Comet, a limited airborne coup de main operation that was to be launched on 2 September 1944. Comet envisioned using the 1st Airborne Division, along with the Polish 1st Independent Parachute Brigade, to secure several bridges over the River Rhine to aid the Allied advance into the North German Plain. The Divisional Headquarters for the 1st Airborne Division, with the 1st Airlanding Brigade and the Polish 1st Independent Parachute Brigade were to land at Nijmegen, 1st Parachute Brigade was to land at Arnhem, and 4th Parachute Brigade was to land at Grave.[38] However several days of poor weather and Montgomery's concerns over increasing levels of German resistance caused him to postpone the operation and then cancel it on 10 September.[39]
Comet was replaced by a more ambitious plan to bypass the Siegfried Line by hooking around its northern end, allowing the Allies to cross the Rhine with large forces and trap the German Fifteenth Army between Arnhem and the shores of the IJsselmeer: Operation Market Garden. On 10 September Dempsey told Montgomery that he had doubts about this plan and that he instead favoured an advance north-eastwards between the Reichswald forest and the Ruhr to Wesel. Montgomery replied that he had just received a signal from London that something needed to be done to neutralise the V-2 launch sites around the Hague (which were bombarding London) and that the plan must therefore proceed.[40] Montgomery flew to Brussels that afternoon to meet Eisenhower. Montgomery requested Eisenhower's Chief Administrative Officer to leave the meeting but insisted on his own remaining. He then tore a file of Eisenhower's messages to shreds in front of him and argued for a concentrated northern thrust, simultaneously demanding priority of supply.
Eisenhower, convinced that German forces faced imminent collapse, was equally adamant that advance on a broad front was correct. However, he consented to Operation Market Garden, giving it "limited priority" in terms of supplies but as part of his advance on a broad front.[41] Eisenhower promised that allied aircraft and American trucks would deliver 1,000 tons of supplies per day.[42] In vain, Montgomery complained about this to the Vice-Chief of the Imperial General Staff in London, Lieutenant-General Sir Archibald Nye.[43][nb 6]
For Market Garden, the U.S. 82nd and 101st Airborne Divisions would be maintained from British stocks for all common items such as food and fuel. Non-common items like ammunition, ordnance and signal and engineer stores were delivered by the Red Ball Express or by rail to No. 6 Army Roadhead at Grammont.[44] Three newly-arrived U.S. infantry divisions (the 26th, 95th, and 104th) were stripped of their transport, which was used to form provisional truck companies. These were assigned to the Red Ball Express, releasing eight companies to Red Lion, a special route to support Market-Garden. Red Lion convoys exceeded their target, delivering 650 tons per day instead of 500. Half of the tonnage hauled was supplies for the 82nd and 101st Airborne Divisions.[45]
Eisenhower's decision to launch Market Garden was influenced by his desire to keep the retreating Germans under pressure. However, he was also under pressure from the U.S. to use the Airborne Army as soon as possible.[46] After Normandy, the airborne forces had been withdrawn to reform in England, re-forming into the First Allied Airborne Army of two British and three U.S. airborne divisions and a Polish brigade.[47] In the following months, plans for eighteen airborne operations had been drafted but then cancelled at short notice, mostly when the rapidly moving Allied ground forces overran the intended drop zones.[39][nb 7]
Geography
Highway 69 (later nicknamed "Hell's Highway") leading through the planned route was two lanes wide, generally raised above the surrounding flat terrain of polder. The ground on either side of the highway was in places too soft to support tactical vehicle movement and there were numerous dykes and drainage ditches. Dykes tended to be topped by trees or large bushes and roads and paths were lined with trees. In early autumn this meant that observation would be seriously restricted.[49]
There were six major water obstacles between the XXX Corps' jumping-off point and the objective of the north bank of the Nederrijn: the Wilhelmina Canal at Son 100 feet (30 m); the Zuid-Willems Canal at Veghel 80 feet (20 m); the Maas River at Grave 800 feet (240 m); the Maas-Waal Canal 200 feet (60 m); the Waal River at Nijmegen 850 feet (260 m); and the Nederrijn at Arnhem 300 feet (90 m).[50] Plans were made to seize bridges across all these obstacles nearly simultaneously — any failure to do so could result in serious delay or even defeat. In case bridges were demolished by the Germans, XXX Corps had plans to rebuild them. To this end, a vast quantity of bridging material was collected, along with 2,300 vehicles to carry it and 9,000 sappers to assemble it.[50]
Although the area is generally flat and open with less than a 30 feet (9 m) variation in altitude, Horrocks, commander of XXX Corps recalled that "The country was wooded and rather marshy which made any outflanking operation impossible."[51] There were two important hills, 300 feet (90 m) high, that represented some of the highest ground in the Netherlands; one north and west of Arnhem and one in the 82nd Airborne Division's zone, Groesbeek ridge. Seizure and defence of this hill was considered vital to holding the highway bridges.[49]
Allied preparation
Further information: Operation Market Garden order of battleThe plan of action consisted of two operations:
- Market: airborne forces of Lieutenant General Lewis H. Brereton's First Allied Airborne Army to seize bridges and other terrain, under tactical command of I Airborne Corps under Lieutenant-General Frederick Browning, and
- Garden: ground forces of the Second Army to move north spearheaded by XXX Corps under Lieutenant-General Brian Horrocks.[52]
Market
 The Allied Plan
Market would employ four of the six divisions of the First Allied Airborne Army. The U.S. 101st Airborne Division, under Major General Maxwell D. Taylor, would drop in two locations just north of XXX Corps to take the bridges northwest of Eindhoven at Son and Veghel. The 82nd Airborne Division, under Brigadier General James M. Gavin, would drop northeast of them to take the bridges at Grave and Nijmegen and the British 1st Airborne Division, under Major-General Roy Urquhart, with the Polish 1st Independent Parachute Brigade, under Brigadier General Stanisław Sosabowski, attached would drop at the extreme north end of the route, capturing the road bridge at Arnhem and the rail bridge at Oosterbeek. The 52nd (Lowland) Infantry Division would be flown to the captured Deelen Airfield on D+5.[53]
The First Allied Airborne Army had been created on 16 August as the result of British requests for a coordinated headquarters for airborne operations, a concept approved by General Eisenhower on 20 June. The British had strongly hinted that a British officer—Browning in particular—be appointed its commander. Browning for his part decided to bring his entire staff with him on the operation to establish his field HQ using the much-needed 32 Horsa gliders for administrative personnel, and six Waco CG-4A gliders for U.S. Signals’ personnel. Since the bulk of both troops and aircraft were American, Brereton, a U.S. Army Air Forces officer, was named by Eisenhower on 16 July and appointed by SHAEF on 2 August. Brereton had no experience in airborne operations but had extensive command experience at the air force level in several theatres, most recently as commander of Ninth Air Force, which gave him a working knowledge of the operations of IX Troop Carrier Command.[54]
Market would be the largest airborne operation in history, delivering over 34,600 men of the 101st, 82nd and 1st Airborne Divisions and the Polish Brigade. 14,589 troops were landed by glider and 20,011 by parachute. Gliders also brought in 1,736 vehicles and 263 artillery pieces. 3,342 tons of ammunition and other supplies were brought by glider and parachute drop.[55]
To deliver its 36 battalions of airborne infantry and their support troops to the continent, the First Allied Airborne Army had under its operational control the 14 groups of IX Troop Carrier Command,[56][nb 8], and after 11 September the 16 squadrons of 38 Group (an organization of converted bombers providing support to resistance groups) and a transport formation, 46 Group.[57]
The combined force had 1,438 C-47/Dakota transports (1,274 USAAF and 164 RAF) and 321 converted RAF bombers. The Allied glider force had been rebuilt after Normandy until by 16 September it numbered 2,160 CG-4A Waco gliders, 916 Airspeed Horsas (812 RAF and 104 US Army) and 64 General Aircraft Hamilcars. The U.S. had only 2,060 glider pilots available, so that none of its gliders would have a co-pilot but would instead carry an extra passenger.[58]
 Infantry of 50th (Northumbrian) Division moving up past a knocked-out German 88mm gun near 'Joe's Bridge' over the Meuse-Escaut Canal in Belgium, 16 September 1944
Because the C-47s served as paratrooper transports and glider tugs and because IX Troop Carrier Command would provide all the transports for both British parachute brigades, this massive force could deliver only 60% of the ground forces in one lift. This limit was the reason for the decision to split the troop lift schedule into successive days. Ninety percent of the USAAF transports on the first day would drop parachute troops, with the same proportion towing gliders on the second day (the RAF transports were almost entirely used for glider operations).[nb 9] Brereton rejected having two airlifts on the first day, although this had been accomplished during Operation Dragoon, albeit with forty-five more minutes of daylight against negligible opposition.[60]
17 September was on a dark moon and in the days following it the new moon set before dark. Allied airborne doctrine prohibited big operations in the absence of all light, so the operation would have to be carried out in daylight. The risk of Luftwaffe interception was judged small, given the crushing air superiority of Allied fighters but there were concerns about the increasing number of flak units in the Netherlands, especially around Arnhem. Brereton's experience with tactical air operations judged that flak suppression would be sufficient to permit the troop carriers to operate without prohibitive loss. The invasion of Southern France had demonstrated that large scale daylight airborne operations were feasible.[61] Daylight operations, in contrast to those in Sicily and Normandy, would have much greater navigational accuracy and time-compression of succeeding waves of aircraft, tripling the number of troops that could be delivered per hour. The time required to assemble airborne units on the drop zone after landing would be reduced by two-thirds.[62]
IX Troop Carrier Command's transport aircraft had to tow gliders and drop paratroopers, duties that could not be performed simultaneously. Although every division commander requested two drops on the first day, Brereton's staff scheduled only one lift based on the need to prepare for the first drop by bombarding German flak positions for half a day and a weather forecast on the afternoon of 16 September (which soon proved erroneous) that the area would have clear conditions for four days, so allowing drops during them.[63]
After one week preparations were declared complete. The planning and training for the airborne drops at Sicily and Normandy had taken months. One United States Air Force historian noted that Market was the only large airborne operation of the Second World War in which the USAAF "had no training program, no rehearsals, almost no exercises, and a...low level of tactical training."[64]
Gavin, commanding the U.S. 82nd Airborne Division, was skeptical of the plan. In his diary he wrote, "It looks very rough. If I get through this one I will be very lucky." He was also highly critical of Browning, writing that he "...unquestionably lacks the standing, influence and judgment that comes from a proper troop experience... his staff was superficial... Why the British units fumble along... becomes more and more apparent. Their tops lack the know-how, never do they get down into the dirt and learn the hard way."[65]
These comments by Gavin indicate the lack of knowledge about British commanders from the U.S command's perspective. General Browning and many of the other British command had learnt the hard way in the battles of the First World War. Browning was commissioned a second lieutenant in the Grenadier Guards in 1915. During the First World War he fought on the Western Front, and was awarded the Distinguished Service Order for conspicuous gallantry during the Battle of Cambrai in November 1917. But this unfortunate them-versus-us attitude was becoming more of a problem with the Allied command structure as the war progressed, and this was not helped by pressure put on Eisenhower by President Roosevelt and the US Administration. The British also had misgivings about the US command, especially Gen. Eisenhower. The British knew that the supreme leader was a political leader, and had no tactical knowledge or experience.
Garden
Garden consisted primarily of XXX Corps and was initially spearheaded by the Guards Armoured Division, with the 43rd Wessex and 50th Northumbrian Infantry Divisions in reserve. They were expected to arrive at the south end of the 101st Airborne Division's area on the first day, the 82nd's by the second day and the 1st's by the fourth day at the latest. The airborne divisions would then join XXX Corps in the breakout from the Arnhem bridgehead.[66]
Four days was a long time for an airborne force to fight unsupported. In addition the Allied paratroopers lacked adequate anti-tank weapons. Even so, before Operation Market Garden started it seemed to the Allied high command that the German resistance had broken. Most of the German Fifteenth Army in the area appeared to be fleeing from the Canadians and they were known to have no Panzergruppen. It was thought that XXX Corps would face limited resistance on their route up Highway 69 and little armour. Meanwhile, the German defenders would be spread out over 100 kilometres (62 mi) trying to contain the pockets of airborne forces, from the Second Army in the south to Arnhem in the north .[67]
German preparation
The rout of the Wehrmacht during July and August led the Allies to believe that the German army was a spent force unable to reconstitute its shattered units. During those two months the Wehrmacht had suffered a string of defeats with heavy losses. Between 6 June and 14 August it had suffered 23,019 killed in action, 198,616 missing or taken prisoner and 67,240 wounded.[68] Many of the formations the Wehrmacht had possessed at the beginning of the Normandy campaign had been annihilated or had been reduced to skeleton formations by the end of August.[68] As the German armies retreated towards the German frontier, they were often harried by air attacks and bombing raids by aircraft of the Royal Air Force and United States Army Air Force, inflicting casualties and destroying vehicles.[69] Attempts to halt the Allied advance often seemed fruitless as hurried counter-attacks and blocking positions were brushed aside and at times there seemed to be too few German units to hold anywhere.[70] By early September the situation was beginning to change. The failure of the 21st Army Group to seal off the Scheldt Estuary area had allowed the 65,000 troops of the German Fifteenth Army to be extricated from the area with 225 guns and 750 trucks via a flotilla of commandeered freighters, barges and small boats. From there they moved to the Netherlands.[71]
Adolf Hitler began to take a personal interest in the apparent disintegration of Army Group B, which comprised the German armies in northern France, Belgium, and the Netherlands. On 4 September he recalled Generalfeldmarschall Gerd von Rundstedt from retirement, in which condition he had been since Hitler had dismissed him as Wehrmacht Commander-in-Chief West on 2 July, and reinstated him in his former command,[72] replacing Generalfeldmarschall Walter Model, who had taken command just 18 days previously and would henceforth command only Army Group B.[73] Rundstedt immediately began to plan a defence against what Wehrmacht intelligence judged to be 60 Allied divisions at full strength, although Eisenhower in fact possessed only 49 divisions.[74]
 German soldiers at Arnhem
Model set out to stop the Allied advance. The 719th Infantry Division, part of LXXXVIII Corps, was dispatched south to the Albert Canal and Model requested reinforcements from Germany, stating that he would require twenty-five infantry divisions and six armoured divisions to hold; he envisioned a line stretching from Antwerp via Maastricht to Metz and from there to follow the line of the Albert Canal to the Meuse and the Siegfried Line.[75] Meanwhile, Colonel General Kurt Student, commander of the Fallschirmjaeger, the German airborne forces, received orders from Alfred Jodl, Chief of the Operations Staff of the Oberkommando der Wehrmacht, to immediately move from Berlin and proceed to the Netherlands, where he would collect all available units and build a front near the Albert Canal, which was to be held at all costs.[76] This front was to be held by the new First Parachute Army, a euphemistic name for a paper formation. Its units were scattered throughout Germany and the Netherlands and consisted either of units in the process of being formed or remnants cadred by survivors of previous units.[76][77]
Though the situation seemed dire, the German front was beginning to form into what Robert Kershaw terms 'a crust'. Leadership (Field Marshal Gerd Von Rundstedt had been recalled by Adolf Hitler, to reassure the crumbling western front), initiative and a good staff system were beginning to create a defence out of chaos.[78] On 4 September the 719th infantry division began to dig in along the Albert Canal and was soon joined by forces under the command of Lieutenant General Kurt Chill.[79] Although Chill only officially commanded the 85th Infantry Division (which had suffered heavy casualties during the retreat from Normandy) he had assumed command of the remnants of the 84th and 89th Infantry Divisions en route. Initially ordered to take his command to the Rhineland for rest and reinforcements, Chill disregarded the order and moved his forces to the Albert Canal, linking up with the 719th; he also had 'reception centres' set up at the bridges crossing the Albert Canal, where small groups of retreating troops were picked up and turned into 'ad hoc' units.[78][79] By 7 September the 176th Infantry Division (a Kranken division composed of elderly men and men with various medical complaints) had arrived from the Siegfried Line and elements of the First Parachute Army began to appear. At this stage the Army consisted of approximately seven Fallschirmjaeger regiments composed of some 20,000 airborne troops along with a collection of anti-aircraft batteries and a mix of 25 self-propelled guns and tank destroyers.[80] Kriegsmarine and SS units were also allocated to Student's command, and Hitler had promised Model 200 Panther tanks would be sent straight from the production lines; he also ordered all Tiger tanks, Jagdpanther self-propelled guns and 88 mm guns that were available in Germany be transferred to the West.[81]
On 5 September, Model's forces were bolstered by the arrival of the II SS Panzer Corps, which consisted of the 9th SS and 10th SS Panzer Divisions under the command of Lieutenant General Wilhelm Bittrich. The Corps had been reduced to approximately 6,000–7,000 men, 20–30% of its original strength in the course of continuous action since late June including in the Falaise pocket; losses in officers and NCOs had been especially high.[82] Model ordered the two divisions to rest and refit in 'safe' areas behind the new German line; these areas coincidentally were to be Eindhoven and Arnhem.[83] The 10th SS Panzer Division was to be restored to full strength in order to provide an armoured reserve and thus the 9th SS Panzer Division was ordered to transfer all of its heavy equipment to its sister division; it was intended that the 9th would then be transported to Germany for replenishment.[82] At the time of Operation Market-Garden, the 10th SS Panzer Division had an approximate strength of 3,000 men; an armoured infantry regiment, divisional reconnaissance battalion, two artillery battalions and an engineer battalion, all partially motorized.[84] Other formations were appearing to strengthen the German defences. Between 16 and 17 September two infantry divisions from Fifteenth Army assembled in Brabant, understrength but well-equipped and able to act as a reserve.[85] Near Eindhoven and Arnhem a number of scratch formations were being assembled. Several SS units, including an NCO training battalion and a panzergrenadier reserve battalion, were being prepared to enter combat and Luftwaffe and Kriegsmarine personnel were being grouped into Fliegerhorst and Schiffstammabteilung formations. There were also a number of training battalions that were being equipped, several depot battalions from the Hermann Goering Panzer Division and various artillery, anti-aircraft and field police units scattered throughout the north of the Netherlands.[86]
Intelligence
German
Von Rundstedt and Model deemed a big Allied offensive to be imminent, having received many intelligence reports that described a 'constant stream' of reinforcements to the right wing of the British Second Army.[87] The senior intelligence officer of Army Group B believed the Second Army would launch an offensive in the direction of Nijmegen, Arnhem and Wesel with a primary objective of reaching the industrial area along the Ruhr river. He was convinced that airborne troops would be used in this offensive but was unsure where they would be deployed, suspecting areas along the Siegfried Line north of Aachen or possibly even near the Saar.[88] Second Army would assemble its units at the Maas-Scheldt and Albert Canals. The right wing of the Army would be the assault force, composed primarily of armoured units, which would force a crossing of the Maas and attempt to break through to the Ruhr industrial area near Roermond. The left wing would cover the Army's northern flank by moving up to the Waal near Nijmegen and isolating the German 15th Army situated on the Dutch coast.[88][89]
Allied
A number of reports about German troop movements reached Allied high command, including details about the identity and location of German armoured formations. Station X at Bletchley Park monitored and decrypted German Ultra intelligence reports and sent them to senior Allied commanders but they only reached army headquarters level and were not passed down any lower.[90] On 16 September ULTRA decrypts revealed the movement of 9th and 10th SS Panzer Divisions to Nijmegen and Arnhem, creating enough concern for Eisenhower to send his Chief of Staff, Lieutenant General Walter Bedell Smith, to raise the issue with Montgomery on 10 September; however, Montgomery dismissed Smith's concerns and refused to alter the plans for the landing of 1st Airborne Division at Arnhem.[91] Further information about the location of the German Panzer Divisions at Arnhem was revealed by aerial photographs of Arnhem taken by a photo-reconnaissance Spitfire IX from RAF's No. 16 Squadron,[92] as well as information from members of the Dutch resistance.[93] Fearing that 1st Airborne Division might be in grave danger if it landed at Arnhem the chief intelligence officer of the division, Major Brian Urquhart, arranged a meeting with Browning and informed him of the armour present at Arnhem. Browning dismissed his claims and ordered the division's senior medical officer to send Urquhart on sick leave on account of 'nervous strain and exhaustion.'[94]
Battle
Further information: Battle of ArnhemDay 1: Sunday, 17 September 1944
Early successes
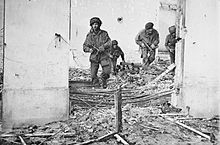
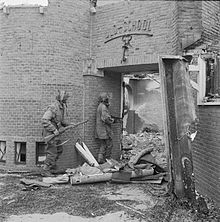
 Allied Landings near Nijmegen
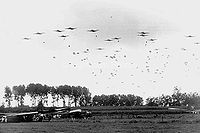 The 82nd Airborne Division drops near Grave (National Archives)
Operation Market Garden opened with Allied success all round. In the first landing, almost all troops arrived on top of their drop zones without incident. In the 82nd Airborne Division, 89% of troops landed on or within 1,000 metres (3,300 ft) of their drop zones and 84% of gliders landed on or within 1,000 metres (3,300 ft) of their landing zones. This contrasted with previous operations where night drops had resulted in units being scattered by up to 19 kilometres (12 mi). Losses to enemy aircraft and flak were light; German flak was described in reports as "heavy but inaccurate"[citation needed].
In the south the 101st met little resistance and captured four of five bridges. The bridge at Son was blown up as they approached it, after being delayed by a short engagement with a German Flak 88 mm Anti-aircraft gun and a machine gun. Later that day several small attacks by the German 59th Infantry Division (a 15th Army unit that had escaped across the South Beveland isthmus) were beaten off, while small units of the 101st had moved south of Son.
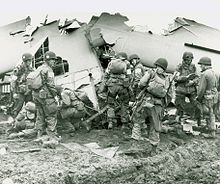 101st Airborne Paratroopers inspect a broken glider.
That same day it contacted, and was given as attachment the 44th Royal Tank Regiment elements of which were advancing in the VIII Corps sector.[95]
To their north the 82nd arrived and the small group dropped near Grave took the bridge in a rush. They also succeeded in capturing one of the vitally important bridges over the Maas-Waal canal, the lock-bridge at Heumen. The main effort of the 82nd was to seize the Groesbeek Heights and set up a blocking position there to prevent a German attack out of the nearby Reichswald and to deny the heights to German artillery observers. Gavin and Browning, who established his HQ at Nijmegen, felt this must be the Division's priority. The 508th Parachute Infantry Regiment was tasked with taking the 600-metre (2,000 ft) long Nijmegen highway bridge if possible but because of miscommunication they did not start until late in the day. Had they attacked earlier they would have faced only a dozen Germans. By the time the 508th attacked, troops of the 9th SS Reconnaissance Battalion were arriving. The attack failed, leaving the Nijmegen bridge in German hands.
This was vital; unlike some of the bridges to the south which were over smaller rivers and canals that could be bridged by engineering units, the Nijmegen and Arnhem bridges crossed two arms of the Rhine that could not be bridged easily. If either of the Nijmegen or Arnhem bridges were not captured and held, the advance of XXX Corps would be blocked and Operation Market Garden would fail.
British landings
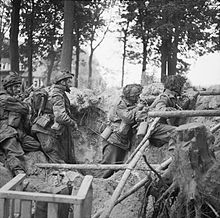 British 1st Parachute Battalion at Arnhem 17 September 1944
 Burning British Horsa glider
The 1st Airborne Division landed at 13:30 without serious incident but problems associated with the poor plan began soon after. Only half of the Division arrived with the First Lift and only half of these (1st Parachute Brigade) could advance on the bridge. The remaining troops had to defend the drop zones overnight for the arrival of the Second Lift on the following day. Thus the Division's primary objective had to be tackled by less than half a brigade. While the paratroopers marched eastwards to Arnhem, the Reconnaissance Squadron was to race to the bridge in their jeeps and hold it until the rest of the Brigade arrived. The unit set off to the bridge late and having travelled only a short distance the vanguard was halted by a strong German defensive position; the squadron could make no further progress.
This had grave consequences. Five hours after the initial landing, feeling that the British were tied down in Arnhem, the Reconnaissance Battalion of the 9th SS Panzer Division was able to cross the Arnhem bridge and drive to Nijmegen and the bridge over the Waal branch of the Rhine. No British airborne unit was at the bridge.
Two of the three battalions of the 1st Parachute Brigade were slowed down by small German units of a training battalion which had quickly established a thin blocking line covering the obvious routes into Arnhem. Lieutenant-Colonel John Frost's 2nd Battalion, advancing eastwards along the southernmost road into Arnhem near the Rhine, found its route largely undefended. They arrived at the bridge in the evening and set up defensive positions at the north end. Two attempts to capture the arched steel bridge and its southern approach failed. Of the other battalions, the 3rd had only covered half the distance to the bridge when they halted for the night, the rear of their column being under attack and needing time to catch up. The 1st Battalion was similarly fragmented, yet pushed on around the flank of the German line throughout the night. Frequent skirmishes resulted in their making little more progress. The 3rd Battalion under Captain James Cleminson {KBE MC} ambushed a German Staff car and found that the Arnhem Garrison Commander Major-General Friedrich Kussin, his aide and his driver were killed
Communication breakdown
 John Frost leading officer of the Bruneval Raid (operation Biting) on 27 February 1942. Photo: Photographed after receiving the Military Cross for his part in the Bruneval Raid, 1942. At this time the Parachute Regiment did not have its own insignia or uniform, and so members wore the uniforms of their previous Regiment, in Frost's case, the Cameronians.
Some loss of communication between the bridge and Divisional Headquarters in one of the drop zones was expected, because 13 km (8.1 mi) separated them and the main radio used throughout the Division was the Type 22 set designed to have an effective range of 5 km (3.1 mi).[96] The British radios did not function at any range; some had difficulty receiving signals from just a few hundred metres and others received nothing at all. It was found after landing that the radios had been set to different frequencies, two of which coincided with those of German and British public broadcasting stations.[96] Other theories have been advanced to explain the greatly reduced range of the 1st Airborne Division's radio sets. Thus communication between 1st Airborne units was poor while German defences were being coordinated and reinforced. John Greenacre's study points out that radio communications failures were experienced by the Division before, were warned about prior to the operation, and provisioned for by bringing extra field telephone wire. The more powerful WS19HP set was used by 1st Brigade on D+1.[97]
The only means of calling for close air support was through two special American units dropped with the 1st Airborne Division. These units were equipped with "Veeps": jeeps having Very High Frequency SCR-193 crystal sets. It was found impossible to communicate with aircraft on the higher of two frequencies for this and the sets could not be tuned to the lower frequency.[98] Despite efforts to re-tune them, one set was soon destroyed by mortar fire and the other abandoned the next day, cutting the 1st Airborne's only possible link with RAF fighter-bombers. The pilots were under orders not to attack on their own initiative since from the air there was no easy way to distinguish friend from foe; together with poor weather, this led to a critical lack of air support.
After the war it was identified that the Royal Corps of Signals was either unaware, or did not make aware Divisional Signals of the communication problems identified in November 1943 due to sun spots by the Scientific Advisor's Office to the 21st Army Group. Consequently Urquhart ordered the 4m antennae to be used, which were useless due to physics of radio propagation. The wrong frequencies were part of the same problem due to Signals personnel not being aware of the scientific considerations behind radio communications.[99]
XXX Corps advance
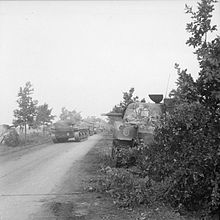 Irish Guards Sherman tanks advance past previously destroyed ones 17 September 1944
On the morning of 17 September Lieutenant-General Brian Horrocks was given confirmation that the operation was to take place that day.[100] At 12:30 hours Horrocks received a signal that the first wave of the airborne forces had left their bases within the United Kingdom and set the time for the ground attack to start at 14:35 hours.[100] At 14:15 hours[101] 300 guns of the Corps artillery opened fire, firing a rolling barrage in front of XXX Corps start line[100][102] that was 1 mile (1.6 km) wide and 5 miles (8.0 km) in depth.[103] The barrage was supported by seven squadrons of RAF Hawker Typhoons firing rockets at all known German positions along the road to Valkenswaard.[100][102]
The advance was led by tanks and infantry of the Irish Guards[100] and started on time when Lieutenant Keith Heathcote, commanding the lead tank, ordered his driver to advance.[103] The lead units of the Irish Guards Group had broken out of XXX Corps bridgehead on the Meuse-Escaut canal and crossed into the Netherlands by 15:00 hours.[100][103] After crossing the border the Irish Guards were ambushed by infantry and anti-tank guns dug in on both sides of the main road.[100][103] Portions of the artillery barrage was refired and fresh waves of Hawker Typhoons were called in.[100] The Guardsmen moved forward to clear the German positions, manned by elements from two German parachute battalions and two battalions of the 9th SS Division,[100] and soon routed the German forces flanking the road.[104] Interrogation of captured German soldiers led to some of them willingly,[102] others after being threatened,[105] pointing out the remaining German positions.[102][106] The fighting soon died down and the advance resumed. By last light the town of Valkenswaard had been reached and occupied by the Irish Guards Group.[100][107][108]
Horrocks had expected that the Irish Guards would have been able to advance the 13 miles (21 km) to Eindhoven within two-three hours, however they had only covered 7 miles (11 km). The operation was already starting to fall behind schedule.[108] In Valkenswaard engineers were moved up to construct a 190 foot (58 m) Class 40 Bailey bridge over a stream, which was completed within 12 hours.[107]
German reactions
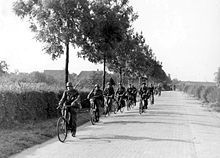 SS troops advancing on bicycles
On the German side, it was soon clear what was happening. Field Marshal Walter Model was staying at the Tafelberg Hotel in Oosterbeek, a village to the west of Arnhem, when the British began to land in the countryside to the west of Oosterbeek. He rapidly deduced the likely focus of the attack and after evacuating his now threatened headquarters set about organising a defence. Meanwhile, Wilhelm Bittrich, commanding the 2nd SS Panzer Corps, immediately sent a reconnaissance company of the 9th SS Panzer Division to Nijmegen to reinforce the bridge defences. By midnight, Model had gained a clear picture of the situation and had an extemporised defence of Arnhem in hand. The confusion usually attendant upon defending against airborne operations was absent at Arnhem and the advantage of surprise was reduced by the quick reaction. During the operation, the Germans recovered a copy of the Market-Garden plan from the corpse of an American officer who should not have been carrying it into combat.[109]
Day 2: Monday, 18 September
Allied weather forecasters correctly predicted that England would be covered in fog on the morning of 18 September. The Second Lift was postponed for three hours and thick low clouds began to develop over the southern part of the battle zone, spreading during the day over the area, hampering supply and air support (Seven of the next eight days had poor weather and all air operations were cancelled on 22 and 24 September).
1st Airborne zone
 British landings in Arnhem
The 1st and 3rd Parachute Battalions pushed towards the Arnhem bridge during the early hours and had made good progress but they were frequently halted in skirmishes as soon as it became light. With their long and unwieldy columns having to halt to beat off attacks whilst the troops in front carried on unaware, the Germans delayed segments of the two battalions, fragmented them and mopped up the remnants.
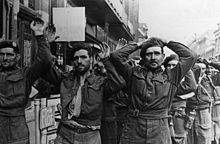
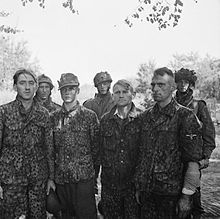 Four Waffen SS troopers taken prisoner from 9th SS Reconnaissance Battalion at Arnhem Bridge,18 September 1944; one is seventeen years old. All of them are wearing the camouflage uniforms that were peculiar to the Waffen SS; these are not 'snipers'.
Early in the day the 9th SS Reconnaissance Battalion (sent south the day before) concluded it was not needed in Nijmegen and returned to Arnhem. Though aware of the British troops at the bridge, it attempted to cross by force and was beaten back with heavy losses, including its commanding officer, SS-Hauptsturmführer Gräbner.
By the end of the day the 1st and 3rd Parachute Battalions had entered Arnhem and were within 2 km (1.2 mi) of the bridge with approximately 200 men, one-sixth their original strength. Most of the officers and non-commissioned officers had been killed, wounded or captured. The Second Lift was delayed by fog and jumped onto a landing zone under heavy attack but landed at full strength (the 4th Parachute Brigade consisting of the 10th, 11th and 156th Battalions of the Parachute Regiment, commanded by Brigadier-General John Winthrop Hackett) and C and D Companies of the 2nd South Staffordshire Regiment.
82nd Airborne zone
Grave proved to be well defended and German forces continued to press on the 82nd deployed on the Groesbeek heights to the east of Nijmegen. The 505th Parachute Infantry Regiment defended against German attacks in Horst, Grafwegen and Riethorst. Early in the day, German counterattacks seized one of the Allied landing zones where the Second Lift was scheduled to arrive at 13:00. The 508th Parachute Infantry Regiment attacked at 13:10 and cleared the LZ by 14:00, capturing 16 German flak pieces and 149 prisoners. Delayed by weather in Britain, the Second Lift did not arrive until 15:30. This lift brought in elements of the 319th and 320th Glider Field Artillery battalions, the 456th Parachute Field Artillery battalion and medical support elements. Twenty minutes later, 135 B-24 bombers dropped supplies from low level (100'), 80% of which was recovered.
101st Airborne zone
 Map of US landings near Eindhoven
Faced with the loss of the bridge at Son, the 101st unsuccessfully attempted to capture a similar bridge a few kilometres away at Best but found the approach blocked. Other units continued moving to the south and eventually reached the northern end of Eindhoven.
At 06:00 hours the Irish Guards Group resumed the advance while facing determined resistance from German infantry and tanks.[107] Around noon the 101st Airborne were met by the lead reconnaissance units from XXX Corps. At 16:00 radio contact alerted the main force that the Son bridge had been destroyed and requested that a bailey bridge be brought forward.[citation needed] By nightfall the Guards Armoured Division had established itself in the Eindhoven area[110] however transport columns were jammed in the packed streets of the town and were subjected to German aerial bombardment during the night. XXX Corps engineers, supported by German prisoners of war, constructed a class 40 bailey bridge within 10 hours across the Wilhelmina Canal.[111]
During the day the British VIII and XII Corps, supporting the main attack, had forged bridgeheads across Meuse-Escaut Canal while facing stiff German resistance; 50th (Northumbrian) Infantry Division was transferred from XXX Corps to VIII Corps so to relieve XXX Corps from having to secure the ground gained thus far. Throughout the day German attacks were launched against XXX Corps and against the newly gained bridgeheads over the Meuse-Escaut Canal, all without success.[110][111]
Day 3: Tuesday, 19 September
Arnhem
During the early morning hours the 1st Parachute Brigade began its attack towards Arnhem Bridge, with the 1st Battalion leading supported by remnants of the 3rd Battalion, with the 2nd South Staffordshires on the 1st Battalion's left flank and the 11th Battalion following. As soon as it became light the 1st Battalion was spotted and halted by fire from the main German defensive line. Trapped in open ground and under heavy fire from three sides, the 1st Battalion disintegrated and what remained of the 3rd Battalion fell back. The 2nd South Staffordshires were similarly cut off and, save for about 150 men, overcome by midday. The 11th Battalion, (which had stayed out of much of the fighting) was then overwhelmed in exposed positions while attempting to capture high ground to the north. With no hope of breaking through, the 500 remaining men of these four battalions withdrew westwards in the direction of the main force, 5 km (3.1 mi) away in Oosterbeek.
The 2nd Battalion and attached units (approximately 600 men) were still in control of the northern approach ramp to the Arnhem bridge. The Germans recognised that they would not be moved by infantry attacks such as those that had been bloodily repulsed on the previous day so instead they heavily shelled the short British perimeter with mortars, artillery and tanks; systematically demolishing each house to enable their infantry to exploit gaps and dislodge the defenders. Although in battle against enormous odds, the British clung to their positions and much of the perimeter was held.
Oosterbeek
 British paratroopers in Oosterbeek
To the north of Oosterbeek the 4th Parachute Brigade led an attempt by the 1st Airborne Division to break through the German lines but communication difficulties and enemy resistance caused the attack to fail with heavy losses. The Division, scattered far and wide and hard pressed by the enemy on all sides had lost its offensive capability. Unable to help Lt.-Col. Frost at the bridge, the remaining soldiers attempted to withdraw into a defensive pocket at Oosterbeek and hold a bridgehead on the north bank of the Rhine.
The parachute elements of the Polish 1st Independent Parachute Brigade had remained in England because of dense fog. Their gliders, mainly carrying anti-tank guns and vehicles, were able to take off but had the misfortune to arrive above the landing zone just as the 4th Parachute Brigade was retreating across it and the gliders came under fire from German units pursuing the Brigade.
Nijmegen
At 08:20, the 504th Parachute Infantry Regiment made contact with the Grenadier Guards of the XXX Corps at Grave. This enabled the Regiment to move on to other missions and place the 3rd Battalion in division reserve. By this time, according to the plan, they were due in Arnhem. XXX Corps were eight miles (13 km) from Arnhem with six hours in hand, 'The earlier delays had been made up' (Neillands). A combined effort to take the Nijmegen bridge was mounted by two companies from the Guards Armoured Division and the 2nd Battalion, 505th Parachute Infantry Regiment. The attack got within 400 metres (440 yards) of the bridge before being stopped; skirmishing continued throughout the night. A plan was made to attack the south end of the bridge again while the 3rd Battalion, 504th Parachute Infantry Regiment, planned to cross the river in boats 2 km (1.2 mi) downstream and then attack the north end. The boats were requested for late afternoon but did not arrive at that time. Once again XXX Corps was held up in front of a bridge which should have been captured before they arrived.
The 1st and 5th battalions, Coldstream Guards, were attached to the division. A supply attempt by 35 C-47s (out of 60 sent) was unsuccessful; the supplies were dropped from a high altitude and could not be recovered. Bad weather over English bases prevented the scheduled big glider mission carrying the 325th Glider Infantry Regiment from taking off, ending any hope for the scheduled reinforcements for the 82nd Airborne.
Wijchen
At 09:50 the 504th Parachute Infantry Regiment was going forward to Wijchen, to attack the Edithbridge from its south end. The bridge was secured. After this fierce engagement they pushed on to the traffic bridge south of Wijchen. Another fierce engagement followed and this bridge was secured.
Eindhoven-Veghel
To their south, units of the 101st sent to take Best the day before were forced to yield to German counterattacks during the morning. British tanks arriving during the day helped push back the Germans by late afternoon. Later a small force of Panther tanks arrived at Son and started firing on the Bailey bridge. These too were beaten back by anti-tank guns that had recently landed and the bridge was secured. In the night of 19 September, Luftwaffe Dornier Do-17 night fighters dropped bright phosphorous flares to light up the target, then the Junkers Ju 87 "Stuka"s bombed Eindhoven, giving the civilian very little time to take shelter, and British XXX Corps no time to mount air defense. No German planes were shot down during the bombing. The men of 506th Parachute Infantry Regiment luckily managed to escape the bombing, while the men of 505th Parachute Infantry Regiment were on the east and west of the city during the bombing. Upon returning to Eindhoven, the 506th PIR rushed into the burning city, spending the night by rescuing civilians from the wreckage of the city.
Day 4: Wednesday, 20 September
Arnhem bridge
Lt. Colonel John Frost's force at the bridge continued to hold and established communication via the public telephone system with 1st Division around noon learning that the division had no hope of relieving them and that XXX Corps was stopped to the south in front of Nijmegen bridge. By the afternoon the British positions around the north end of Arnhem bridge had weakened considerably. Casualties, mostly wounded, were high from constant shelling. An acute lack of ammunition especially anti-tank munitions, enabled enemy armour to demolish British positions from point-blank range. Food, water and medical supplies were scarce, and so many buildings were on fire and in such serious danger of collapse that a two-hour truce was arranged to evacuate the wounded (including Lieutenant-Colonel Frost) into German captivity. Frederick Gough took over as commander when Frost left.
 British POWs at Arnhem
The Germans overcame pockets of resistance throughout the day, gaining control of the northern bridge approaches and permitting reinforcements to cross the span and reinforce units further south near Nijmegen. The remaining British troops continued to fight on, some with just fighting knives but by early Thursday morning almost all had been taken prisoner. The last radio message broadcast from the bridge – "Out of ammo, God save the King" – was heard only by German radio intercept operators.
While it was estimated that the 1st Airborne Division, 10,000 strong, would only need to hold the Arnhem bridge for two days, 740 had held it for twice as long against far heavier opposition than anticipated. While 81 British soldiers died defending Arnhem bridge, German losses cannot be stated with any accuracy, though they were high; 11 units known to have participated in the fighting reported 50% casualties after the battle. In memory of the fighting there, the bridge has been renamed the "John Frost Bridge".
Oosterbeek
 The Germans advance on Oosterbeek
Further west the remnants of the 1st Airborne Division were gathering at Oosterbeek for their last stand; those already there were not seriously challenged by the enemy throughout the day. To the east of the village the 1st, 3rd and 11th Parachute Battalions and 2nd South Staffordshires were organised into a defensive position and in desperate fighting later in the day they bloodily repulsed an enemy attack which threatened to cut the division off from the Rhine and so seal the fate of the bridgehead.
In the woods to the west of Oosterbeek the 4th Parachute Brigade was fighting its way towards the divisional perimeter but was under severe attack from German troops supported by artillery, mortars and tanks (some mounting flame-throwers). Their casualties were heavy; the 10th Battalion reached Oosterbeek in the early afternoon but with only 60 men.
Further in the rear, the 156th Parachute Battalion was being more hard pressed and was forced to fight off numerous enemy attacks before mounting counter-attacks of their own; indeed it is a credit to the battalion that they were so successful in these respects that the Germans did not know they were fighting men who were in full retreat. The battalion, down to 150 men mounted a desperate bayonet charge to capture a hollow in the ground in the woods, in which they remained pinned by enemy attacks for the next eight hours. Towards the end of the day the 75 men who could, fixed bayonets and broke through the German lines and retreated into the Allied pocket at Oosterbeek.
Nijmegen
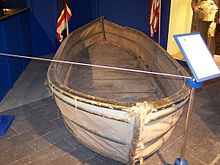 Canvas assault boat
Boats ordered by the 82nd Airborne the day before failed to arrive until afternoon and a hasty daylight assault crossing was ordered. At about 15:00, the 3rd Battalion, 504th PIR, commanded by Major Julian Cook, began their assault across the Waal. The American paratroopers were rowed across the Waal by members of C/307th EN BN in 26 canvas assault boats provided by the British.[112] The American unit had no training on the British-made boats. A shortage of paddles required some troopers to paddle the craft with rifle butts. About half the boats survived the crossing under heavy fire, eleven survived the first two crossings. Before the day was over, C/307th crossed the Waal five times while ferrying across two battalions of the 504th.[113]. The surviving paratroopers then assaulted across 200 metres (218 yards) of open ground on the far bank and seized the north end of the bridge. The costly attack was nicknamed "Little Omaha" in reference to Omaha Beach. German forces withdrew from both ends of the bridge which was then rushed by Guards tanks and the 2nd Battalion, 505th PIR, securing the bridge at 18:30, D+4.
To the east, German attacks on the heights made significant progress, capturing the only remaining bridge suitable for tanks. A counterattack at Mook by elements of the 505th PIR and 4th Battalion, the Coldstream Guards forced the Germans back to their line of departure by 20:00. The 508th PIR lost ground at Im Thal and Legewald when attacked by German infantry and tanks. By now it was evident that the Germans' plan was to cut the highway which would split up the Airborne units and cut off the advance elements of XXX Corps.
To the south, running battles between the 101st and various German units continued. Eventually several Panther tanks managed to cut the roads but pulled back when low on ammunition.
When Lieutenant General Dempsey of the Second Army met Brigadier General Gavin, commander of the U.S. 82nd Airborne Division, he is reported to have said (in reference to the Nijmegen attack), "I am proud to meet the commander of the greatest Division in the world today."[114][115]
Day 5: Thursday, 21 September
Oosterbeek
 A Dutch school damaged by mortar fire, being searched for German snipers by Sergeant J. Whawell and Sergeant J. Turrell of the Glider Pilot Regiment. An empty weapons supply canister lies open on the ground in the doorway of the school. 20 September 1944
Approximately 3,584 survivors of the 1st Airborne Division established themselves in the buildings and woods around Oosterbeek with the intention of holding a bridgehead on the north side of the Rhine until XXX Corps could arrive. Throughout the day their position was heavily attacked on all sides. In the southeast, Lonsdale Force (the remnants of the 1st, 3rd, and 11th Parachute Battalions and 2nd South Staffordshires) repulsed a big attack aided by the fire of the divisional light artillery. In the north the 7th King's Own Scottish Borderers were almost overrun during the afternoon but a counterattack with bayonets restored the situation and the heavily depleted battalion moved further south to occupy a narrower front. The most serious attack of the day was made at dawn against "B" Company, 1st Battalion, Border Regiment which controlled a vital area of high ground in the southwestern tip of the perimeter overlooking the Heveadorp ferry crossing at Driel, which was the division's only straightforward means of receiving reinforcements from the south. The company was attacked by enemy armour and infantry, using captured French tanks equipped with flamethrowers and the heights were lost. Counterattacks failed and the remnants of the company were redeployed. The division was left in a precarious position, controlling just 700 metres (770 yards) of the riverbank. The division held ground to similar attacks elsewhere on their front.
A supply attempt by RAF Stirlings of 38 Group was disrupted by the only Luftwaffe fighter interception during the operation. Fw 190s intercepted the Stirlings at low altitude and shot down 7 of one line of 10 and 15 overall. Anti-aircraft fire accounted for 8 further losses. The Fw 190s were able to penetrate the screen of Allied fighters sent to cover the drop when the U.S. 56th Fighter Group was late in arriving in its patrol sector between Lochem and Deventer. The 56th redeemed itself to an extent by shooting down 15 of the 22 Fw 190s as they departed.[116]
Polish paratroopers enter the battle
After two days of delay due to the weather, the Polish 1st Independent Parachute Brigade under Major-General Stanislaw Sosabowski entered the battle on the afternoon of 21 September, delivered at about 17:15 by 114 C-47s of the U.S. 61st and 314th Troop Carrier Groups. Two of the brigade's three battalions were dropped amidst heavy German fire, opposite the 1st Airborne Division's position on a new drop zone south of the Rhine near the village of Driel. Poor coordination by the RAF and persistent attacks by Luftwaffe aircraft caused their supplies to be dropped 15 km (9.3 mi) away on the opposite side of the Rhine.
Intending to use the Heveadorp ferry to reinforce the division, they discovered that the opposite bank was dominated by the enemy and that the ferry was missing; it was later found downstream past the road bridge, unserviceable. Unable to help the British, the Polish withdrew to Driel for the night. The brigade had lost 25% of its fighting strength, amounting to 590 casualties. The 1st Airborne Division made radio contact during the day with guns of the 64th Medium Regiment of XXX Corps' artillery which had advanced with the ground forces and were assigned to the division for support. Unlike many others, this radio link worked throughout the battle and the regiment provided valuable fire support to the division.
Nijmegen
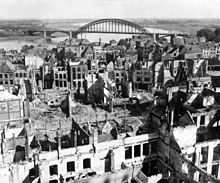 Nijmegen after the battle. 28 September 1944
Despite the capture of Nijmegen bridge and the clearing of the town on the previous evening, the five tanks of Guards Armoured Division which were across the river did not advance. The Division resumed its advance about 18 hours later, at noon. Lieutenant-General Brian Horrocks claimed he needed this delay to sort out the confusion among his troops that had resulted from the battle in Nijmegen. This was a controversial decision that has been examined often in the years since. The Coldstream Guards Group were repulsing an attack on the Groesbeek position, the Irish Guards Group had gone back to Eindhoven to meet another attack, the Grenadiers had just captured the approaches to the bridge with the US paratroops and got five tanks over it to support the Airborne bridgehead and the Welsh Guards were in 82nd Airborne reserve. The Guards Armoured Division was scattered over twenty-five square miles of the south bank of the Waal.
The Market Garden plan depended upon a single highway as the route of advance and supply. This imposed a delay since other units could not be deployed on other routes to maintain momentum. Brigadier General Gavin's diary comment was: "Had Ridgway been in command at that moment, we would have been ordered up that road in spite of all our difficulties, to save the men at Arnhem."[117] He is silent on the 36 hour delay caused by his failure to capture the bridge on schedule. The historian Max Hastings wrote "It reflected poorly on the British Army...". Another version of events quotes Captain Lord Carrington ". . . I certainly met an American officer . . . . the Airborne were all very glad to see us and get some support; no one suggested we should press on to Arnhem.". 'Let us be frank. The 82nd should have taken the Nijmegen bridge on D-Day, 17 September. By failing to do so Gavin made a major contribution to the failure of the entire Arnhem operation and it will not do to pass the blame for that failure on to the British or to Captain Lord Carrington.' (Neillands, 'The Battle for the Rhine 1944', p. 122.).
The delay enabled the Germans to reinforce the defence already established at Ressen (an SS infantry battalion, eleven tanks, an infantry battalion, two 88 mm batteries, twenty 20 mm flak and the remnants of the fighting at Nijmegen [quoted from the US Official History in Neillands p. 125]) south of Arnhem aided by use of the bridge following their capture of its northern end. The advance of the Guards, hindered by marshes that prevented off-road movement, was soon halted by a firm German defensive line. The Guards not having the strength to outflank it, the 43rd Division was ordered to take over the lead, work its way around the enemy positions and make contact with the Polish at Driel. The 43rd was 16 km (9.9 mi) away and there was a traffic jam between it and Nijmegen. It was not until the following day (Friday) that the whole division crossed the River Waal and began its advance.
The Germans, clearly starting to gain the upper hand, continued their counterattacks all along the path of XXX Corps, although the Corps still managed to advance and the 101st Airborne Division continued to exploit its gains.
At about 15:00, 406 C-47 glider tugs and 33 C-47 cargo carriers delivered supplies to the 82nd Airborne Division. About 60% of the supplies were recovered (351 of the gliders were counted effective), partly with the help of Dutch civilians. Most of the 82nd and 101st, reinforced with British armoured units, were engaged in defensive fighting with the objective of holding the highway corridor. Small attacks were fought all along the corridor.
Wijchen bridge
After the victory of the 504th Parachute Infantry Regiment at Wijchen the Germans tried to attack the Edithbridge from the north end. The 504th Parachute Infantry Regiment requested help from the 101st Airborne Division. Advancing directly, they couldn't get close enough to the Germans. It looked like another failure to secure the bridge. The 101st then headed into Wijchen. Ultimately the Germans were not strong enough to defend their position and had to abandon the bridges in Wijchen to the 504th Parachute Infantry Regiment.
Day 6: Friday, 22 September ("Black Friday")
The Germans, wary after unsuccessful and costly attacks the previous day, shelled and mortared the airborne positions heavily. By the end of the battle some 110 guns had been brought to Oosterbeek as the Germans shifted to the tactics that had worked so well at Arnhem bridge. Attacks were limited, conducted against specific positions and even individual houses. Numerous well-sited British anti-tank guns also caused German reluctance to attack. The survivors of the 1st Airborne were outnumbered 4 to 1. The Polish 1st Parachute Brigade at Driel, unable to cross the Rhine, nonetheless forced a redeployment of German forces. Fearing a Polish attempt to recapture Arnhem bridge or, worse, an attempt to cut the road to the south and so trap the 10th SS Panzer Division then blocking the route of the Guards Armoured Division to Arnhem, the Germans withdrew 2,400 troops from Oosterbeek. They were moved south of the river to engage the Polish paratroopers at Driel, making attacks to little effect through the day.
Link-up between the Poles and XXX Corps
The fog lifted as leading elements of the 43rd Division attempted to advance to Driel, exposing them to German fire. They arrived in Driel during the evening. Lacking assault craft, an unsuccessful attempt was made that night to put elements of the Polish brigade across the river. British and Polish engineers on both sides of the Rhine had worked through the day to improvise a crossing using small boats linked by signals cable but the cable kept breaking forcing the Polish troops to slowly row across against the strong current. The attempt was made under enemy observation and fire and only 52 soldiers of the 8th Polish Parachute Company survived the crossing before a halt was called at dawn.
While much of the corridor was firmly in Allied hands, German counterattacks were still being mounted along its length. During the previous night, two mixed armoured formations on either side of Highway 69 attacked between Veghel and Grave; one group managed to cut the highway and prevent any further advance to Arnhem.
Day 7: Saturday, 23 September
The Germans had figured out what the Poles were attempting to do and they spent the rest of the day trying to cut off the British in their northern bridgehead from the riverside. The British managed to hold on and both sides suffered heavy losses. The Germans also attacked the Poles on the south side in order to tie them down but several tanks arrived from XXX Corps and they were beaten off. Boats and engineers from the Canadian army also arrived that day and another river crossing that night landed 150 troops of the Polish 3rd Parachute Battalion on the north bank of the Rhine.
To the south several more German attacks from their position astride the road were stopped but the road was still cut. XXX Corps then sent a unit of the Guards Armoured Division 19 km (12 mi) south and re-took the road. The rest of the force to the north continued to wait for infantry to move up, still only a few kilometres south of Arnhem.
The 325th GIR was finally delivered to reinforce the 82nd Airborne, originally planned for 19 September, and while it was immediately 75% effective, arrived far too late to affect the battle in that sector.
Day 8: Sunday, 24 September
Another German force cut the road to the south of Veghel and set up defensive positions for the night. It was not clear to the Allies at this point how much of a danger this represented but the principal objective of Operation Market Garden, i.e. the Allied crossing of the Rhine, was abandoned this day and the decision made to go over to the defensive with a new front line in Nijmegen. Nonetheless, an attempt was made on Sunday night to reinforce the 1st Airborne Division with the 4th Battalion, The Dorsetshire Regiment. Two companies were put across the river but the location of the crossing point was ill-advised and the Dorsets landed among German positions. Fragmented by their landing and immediately pinned down, of the 315 men who crossed only 75 reached Oosterbeek; the remainder were taken prisoner. As a result of this failure, it was decided to withdraw the 1st Airborne Division from its bridgehead on the northern side of the Rhine.
Day 9: Monday, 25 September
Main article: Operation Berlin (Arnhem rescue)At dawn the 1st Airborne Division received their orders to withdraw across the Rhine; this was called Operation Berlin. This could not be done until nightfall and in the meantime the division struggled to survive. In a departure from their cautious attritional tactics of the previous days, the Germans formed two potent SS battlegroups and made a significant thrust along a narrow front in the eastern sector. This succeeded in breaking through the thin front line and for a time the division was in peril. The attack met with increasing resistance as it pushed deeper into the British lines and was finally broken up by a heavy bombardment of the 64th Medium Regiment.
Employing every ruse to give the Germans the impression that their positions were unchanged, the 1st Airborne Division began its withdrawal at 22:00. British and Canadian engineer units ferried the troops across the Rhine, covered by the Polish 3rd Parachute Battalion on the north bank. By early the next morning they had withdrawn 2,398 survivors, leaving 300 men to surrender on the north bank at first light, when German fire prevented their rescue. Of approximately 10,600 men of the 1st Airborne Division and other units who fought north of the Rhine, 1,485 had died and 6,414 were taken prisoner of whom one third were wounded.
To the south the newly-arrived 50th (Northumbrian) Infantry Division attacked the Germans holding the highway and secured it by the next day. Allied positions in the Nijmegen Salient as it came to be known, were manned throughout the rest of September and October by airborne units, then handed over to the First Canadian Army in November 1944 and remained unchanged until February 1945 when Operation Veritable was launched on the Rhineland, advancing east instead of north towards Arnhem.
Losses
XXX Corps suffered fewer than 1,500 casualties, which stands in stark contrast to the 8,000 casualties suffered by the 1st Airborne Division. On several occasions, units of the flanking British Corps made contact with paratroopers before units of XXX Corps, and fought on to support them until the end of the operation. The higher toll by the 101st Airborne Division reflects the reality that aside from contending with the local German defenders, they also had to combat German troops retreating from XXX Corps advance.
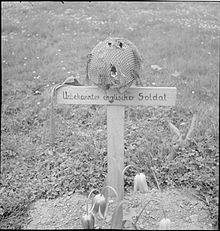 The grave of an unknown British airborne soldier at Arnhem, photographed after its liberation 15 April 1945.
Casualties Total Grand Total Dutch civilians Less than 500[nb 10] Less than 500 Second Army and I Airborne Corps 11,784–13,226[nb 11] 15,326–17,200 XVIII Airborne Corps 3,542–[118] 3,974[9][nb 12] German casualties are harder to determine, as the records are mostly incomplete. The official casualties estimated by Rundstedt are 3,300,[11][120] but these numbers are challenged by historians. Conservative estimates range from 6,400,[10] 8,000,[11] to as high as 9,800–13,300.[120] Kershaw gives a detailed but incomplete list of the participated German units and their casualties and concludes with 6,315 – 8,925 overall German casualties.[12] A contemporary paper of the 21st Army Group mentions that 16,000 German prisoners were taken during Operation Market Garden, but it is unclear how those numbers relate to later casualty estimates.[13][nb 13]
Transport Command Victoria Cross
On 19 September, RAF Douglas Dakota Mk. III, KG374, c/n 12383, (ex-USAAF C-47A-DK, 42-92568), 'YS-DM', of 271 Squadron, RAF Down Ampney, Gloucester, piloted by F/Lt. David S. Lord, was hit by AAA in the starboard engine while on a supply sortie for beleaguered troops at Arnhem. Despite fire spreading to all of the starboard wing, the pilot spent ten minutes making two passes over very small dropzones (which, unbeknownst to the crew, had been overrun by German forces) to drop eight ammunition panniers. Just after the last one was dropped, the fuel tank exploded, tearing off the wing, and only navigator F/O Harry A. King escaped from the stricken aircraft, descending by parachute. He was captured as a POW the following morning, spending the rest of the war in Stalag Luft I at Barth. Killed While Flying (KWF) were pilot Lord, second pilot P/O R. E. H. "Dickie" Medhurst (son of Air Chief Marshal Sir Charles Medhurst), wireless operator F/O Alec F. Ballantyne, and four air despatchers of 223 Company RASC, Cpl. P. Nixon, Dvr. A. Rowbotham, Dvr. J. Ricketts and Dvr. L. Harper. Following the release of King from prison camp, full details of the action became known and pilot Lord received a posthumous Victoria Cross on 13 November 1945, the only VC awarded to any member of Transport Command during the Second World War. In May 1949 the Dutch Government awarded Harry King the Netherlands Bronze Cross.[122]
Aftermath
Debate on Allied strategy and tactics
Operation Market Garden has remained a controversial battle for several reasons. Allied tactics and strategy have been much debated. The operation was the result of a strategy debate at the highest levels of Allied command in Europe. Much post-war analysis has thus probed the alternatives that were not taken, such as giving priority to securing the Scheldt estuary.
Optimistic planning
Among the controversial aspects of the plan was the necessity of all the main bridges being taken in order for success. The terrain was also ill-suited for the mission of XXX Corps.[123] Brereton had ordered that the bridges along XXX Corps' route should be captured with "thunderclap surprise".[124] It is therefore surprising in retrospect that the plans placed so little emphasis on capturing the important bridges immediately with forces dropped directly on them. In the case of Veghel and Grave where this was done, the bridges were captured with only a few shots being fired.
The decision to drop the 82nd Airborne Division on the Groesbeek Heights, several kilometres from the Nijmegen Bridge, has been questioned because it resulted in a long delay in its capture. Browning and Gavin considered holding a defensive blocking position on the ridge a prerequisite for holding the highway corridor. Gavin generally favoured accepting the higher initial casualties involved in dropping as close to objectives as possible in the belief that distant drop zones would result in lower chances of success. With the 82nd responsible for holding the centre of the salient, he and Browning decided the ridge must take priority. Combined with the 1st Airborne Division's delays within Arnhem, which left the Arnhem bridge open to traffic until 20:00, the Germans were given vital hours to reinforce their hold on the bridge.
At Arnhem, the RAF planners selected the drop zones, refusing to drop near the town on the north side of the target bridge because of flak at Deelen. Another suitable drop zone just to the south of the bridge was rejected because it was thought to be too marshy for landing gliders containing the force's heavier equipment, however that same drop zone was selected for the 1st Polish Independent Parachute Brigade in the third lift, which suggests they were well aware of its suitability. Urquhart made his objections to the RAF planners who were unmoved, even when he informed them that the troops and glider pilots were willing to take whatever risks landing closer to the objectives entailed. Urquhart made the best of the RAF planners' decision,[125] and thus the three main landing and drop zones were 8–10 km (5–6 miles) from the bridge, with the fourth being 13 km (8.1 mi) away.[126]
Weather
A precarious timetable at the mercy of the weather resulted in the 101st Airborne Division being without its artillery for two days, the 82nd Airborne without its artillery for a day and without its glider infantry regiment for four days and the British 1st Airborne division without its fourth brigade until the fifth day. The more time required to complete the air drops, the longer each division had to devote forces to defending the drop and landing zones, weakening their offensive power.
Priority of operation
Several weeks prior to the plan taking shape, the British had captured Antwerp and its all-important port facilities. This action had the potential to greatly shorten the Allies' supply lines and trap Gustav-Adolf von Zangen's 15th Army of 80,000 men on the south side of the Scheldt Estuary. Instead, Von Zangen's men, with most of their heavy equipment including their artillery, escaped by boat to the South Beveland peninsula. In September, the peninsula could have been sealed by a short advance of only 24 km (15 mi) past Antwerp. Instead, because priority on supplies went to Market Garden, the First Canadian Army paused at Antwerp and then fought the Battle of the Scheldt in October at the cost of thousands of casualties. In the aftermath of Market Garden, Antwerp was not made operational until 28 November. By 1 October, over 240 Allied supply ships were waiting, unable to unload their cargo because of the limited port facilities on the continent.
Unseized tactical initiative
Arnhem bridge was not the only Rhine crossing. In fact, had the Market Garden planners realized that a ferry was available at Driel, Frost's paratroops might well have secured that instead of the Arnhem bridge, making a profound difference in the campaign because at a shorter distance away from their western drop and landing zones — the whole of the 1st Brigade could have concentrated to hold the Oosterbeek heights instead of just one battalion farther away at the road bridge. In this case, Arnhem was "one bridge too many". A contrasting view is that the attack into Arnhem was intended to capture the rail bridge, the pontoon bridge and the road bridge; that the rail bridge was blown in the face of Frost's 2nd parachute battalion, the pontoon bridge had been disabled by the removal of several sections and that this left only the road bridge intact. Clearly the Heveadorp ferry was no substitute for a bridge.[127]
At a minimum, had XXX Corps pushed north, they might have arrived at the south end and secured it (had the five Guards Armoured Shermans not been stopped by the German position at Ressen), leaving the way open for another crossing to the north at some other point. There was the smaller possibility of arriving with Frost's force intact. This perceived "lack of guts" caused some bitterness at the time although this episode has been questioned by participants other than Gavin. Sergeant Peter Robinson (Grenadier Guards) wrote: "The Nijmegen Bridge wasn't taken...we reached the far end and immediately there was a roadblock. So the troop sergeant covered me through and then I got to the other side and covered the rest of the troop through. We were still being engaged....We got down the road to the railway bridge;....We were being engaged all the time....I suddenly realised they were Americans. They jumped out of the ditch; they kissed the tank; they kissed the guns because they'd lost a lot of men....Well my orders were to collect the American colonel...the first thing he said to me was 'I have to surrender.'[128]
The commander of XXX Corps advocated another course of action. About 25 km (16 mi) to the west was another bridge similar to Arnhem at Rhenen, which he predicted would be undefended because of all the efforts being directed on Oosterbeek. This was true but the corps was never authorised to take the bridge; if they had, it is almost certain they would have crossed unopposed into the rear of the German lines. By this time, it appears that Montgomery was more concerned with the German assaults on Market Garden's lengthy 'tail'.
 Gen. Sosabowski (left) with Gen. Browning.
Despite the heroism, bad choices were made throughout and opportunities were ignored. The commander of the Glider Pilot Regiment had asked for a small force with gliders to land on the southern side of the bridge at Arnhem to quickly capture it but he was denied. This was surprising in light of the fact that in Normandy, the British 6th Airborne Division had used such coup-de-main tactics to take smaller bridges, such as Pegasus Bridge. In Britain, the commander of the British 52nd (Lowland) Infantry Division, whose troops were slated to fly into a captured airfield, pleaded with his superiors to allow a brigade to fly in with gliders to assist Major-General Urquhart's trapped forces.[129] Browning declined the offer, "as situation better than you think" and reaffirmed his intention to fly the 52nd Division in to Deelen airfield as planned.[130] This was probably fortunate, as glider landings on undefended landing zones before the eyes of an alert enemy could have resulted in catastrophe. However, there was another airfield near Grave, and the 52nd Lowland could have been landed there. The 1st Light Anti-Tank Battery landed there on 26 September.[131] Polish 1st Parachute Brigade commander Major-General Stanisław Sosabowski was prepared to try a dangerous drop through the fog which held up his deployment but again was refused.
Market Garden was a risky plan that required a willingness to gamble at the tactical, small-unit level. Unfortunately, the detailed planning and leadership required at that level was not always present. The 1st Airborne Division, the least experienced working as a whole division was given the most difficult distant objective. XXX Corps was also criticized for its "inability" to keep to the operation's timetable although the delay at Son was caused by a bridge demolition and the delay at Nijmegen (having made up time, compensating for the delay while a Bailey Bridge was built at Son) was caused by Gavin's failure to capture the bridges on the first day. Its lead unit, the Guards Armoured Division, was led by a commander (Allan Adair) whom Montgomery had sought to remove prior to D-Day. This action was blocked due to Adair's popularity. Gavin regretted giving his division's most important tasks (Groesbeek ridge and Nijmegen) to the 508th Parachute Infantry Regiment rather than his best regiment, Tucker's 504th Parachute Infantry Regiment.
Intelligence Failure
Unlike the American airborne divisions in the area, British forces at Arnhem ignored the local Dutch resistance. There was a good reason for this: Britain's spy network in the Netherlands had been thoroughly and famously compromised — the so-called England game, which had only been discovered in April 1944. Perhaps assuming that the Dutch resistance would be similarly penetrated, British intelligence took pains to minimise all civilian contact. U.S. units, without this bad experience, made use of Dutch help. As things turned out, knowledge of the Driel ferry or of the underground's secret telephone network could have changed the result of the operation, especially since Allied radio equipment failed, having to rely on messengers. The latter was very important: it would have given the XXX Corps and Airborne High Command knowledge about the dire situation at Arnhem.
After the war, claims arose that the Dutch resistance had indeed been penetrated. One high-ranking Dutch officer who had worked in counter-intelligence at SHAEF, Lieutenant-Colonel Oreste Pinto published a popular book, Spy Catcher, part-memoir and part counter-intelligence handbook. Pinto, who had made a name for himself in World War I for his part in uncovering Mata Hari, claimed that a minor figure in the Dutch resistance, Christiaan Lindemans (nicknamed "King Kong") had been a German agent and had betrayed Operation Market Garden to the Germans.[132] Lindemans was arrested in October 1944, but committed suicide in his cell in 1946 while awaiting trial. In 1969, French journalist and historian Anne Laurens concluded that Lindemans had been a double agent.[133]
Allied Reflections
In 1948, Eisenhower wrote that "The attack began well and unquestionably would have been successful except for the intervention of bad weather."[134] He was isolated in the SHAEF HQ at Granville which did not even have radio or telephone links, so his staff were largely ignorant of the details of the operation. Bedell Smith’s objections were brushed aside by Montgomery, as were those of Montgomery’s chief of staff Freddie de Guingand who went to England on sick leave. Responsibility for the failure "began with Eisenhower and extended to Montgomery, Brererton, Browning, and, on the ground side, Dempsey and Horrocks, neither of whom ... galvanised their tank units while there was still time to have seized and held Arnhem bridge". In the end Browning and Montgomery made Sosabowski (who had been ignored) and the Poles the scapegoat.[135] But D’Este notes that Montgomery’s admission of a mistake was unique: "the only admission of failure by a senior Allied commander".[136] Eisenhower wrote to Urquhart: "In this war there has been no single performance by any unit that has more greatly inspired me or more highly excited my admiration, than the nine days action of your division between 17 and 26 September".[137]
Montgomery predicted that "in years to come it will be a great thing for a man to be able to say: 'I fought at Arnhem'."[138] Montgomery claimed that Market Garden was "90% successful"[139] and said:
It was a bad mistake on my part – I underestimated the difficulties of opening up the approaches to Antwerp ... I reckoned the Canadian Army could do it while we were going for the Ruhr. I was wrong ............. In my — prejudiced — view, if the operation had been properly backed from its inception, and given the aircraft, ground forces, and administrative resources necessary for the job, it would have succeeded in spite of my mistakes, or the adverse weather, or the presence of the 2nd SS Panzer Corps in the Arnhem area. I remain Market Garden's unrepentant advocate.[138]Subsequent combat in the Netherlands
 The front line in the Low Countries after Operation Market Garden
After Operation Market Garden failed to establish a bridgehead across the Rhine, Allied forces launched offensives on two fronts in the south of the Netherlands. To secure shipping to the vital port of Antwerp they advanced northwards and westwards, taking the Scheldt Estuary in the Battle of the Scheldt.[140] Allied forces also advanced eastwards in Operation Aintree in order to secure the banks of the Meuse as a natural boundary for the established salient. This attack on the German bridgehead west of the Meuse near Venlo was for the Allies an unexpectedly protracted affair, which included the Battle of Overloon.[141]
In February 1945, Allied forces in Operation Veritable advanced from the Groesbeek heights which had been taken during Market Garden, and into Germany,[142] crossing the Rhine in March during Operation Plunder.[143] As a result of Operation Plunder, the city of Arnhem was finally liberated by I Canadian Corps on 14 April 1945 after two days of fighting.[144] A surrender of the remaining German forces in the west of the Netherlands was signed on 5 May.[145]
Famine in Holland
A tragic consequence of the operation's failure was the Hongerwinter (Hungerwinter). During the battle Dutch railway workers, incited by the Dutch government in London, went on strike in order to aid the Allied assault. In retribution Germany forbade food transportation, and in the following winter thousands of Dutch citizens starved to death.
Memorials and remembrance
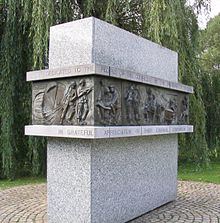 Monument for the Dutch at Sint-Oedenrode
The prized Arnhem bridge for which the British had fought so hard did not survive the war. As the front line stabilised south of the Rhine, B-26 Marauders of 344th Bomb Group, USAAF destroyed it on 7 October to deny its use to the Germans.[146] It was replaced with a bridge of similar appearance in 1948[147] and renamed John Frost Bridge (John Frostbrug) on 17 December 1977.[148]
 The Polish Monument in Driel at the 'Polenplein'
There are a number of monuments in the Arnhem area. A memorial near Arnhem reads: "To the People of Gelderland; 50 years ago British and Polish Airborne soldiers fought here against overwhelming odds to open the way into Germany and bring the war to an early end. Instead we brought death and destruction for which you have never blamed us. This stone marks our admiration for your great courage remembering especially the women who tended our wounded. In the long winter that followed your families risked death by hiding Allied soldiers and Airmen while members of the resistance led many to safety. You took us then into your homes as fugitives and friends we took you forever into our hearts. This strong bond will continue long after we are all gone."[149]
On 16 September 1994, 101st Airborne veterans unveiled a "Monument for the Dutch" in Sint-Oedenrode. The monument is a gift from the veterans to the civilians who fought alongside of the U.S. troops, much to the surprise and relief of the U.S. soldiers. The inscription on the monument is in English and reads "Dedicated to the people of the Corridor by the veterans of the 101st Airborne Division, in grateful appreciation of their courage, compassion and friendship".[150]
 Airborne Museum Hartenstein
On 31 May 2006, Polish 1st Independent Airborne Brigade was awarded the Dutch Military William Order by HM Queen Beatrix for gallantry at Arnhem during Operation Market Garden in 1944.[151] The American 82nd Airborne Division had previously been awarded the same order for gallantry during the operation on 8 October 1945.
Several museums in the Netherlands are dedicated to Operation Market Garden, including: National Liberation Museum in Groesbeek,[152] Wings of Liberation Museum Park in Best (near Eindhoven),[153] and Airborne Museum Hartenstein in Oosterbeek.[154]
In film
Operation Market Garden was the subject of the 1946 film Theirs Is the Glory. This film mixed original footage from the battle with re-enactments, shot on location in Arnhem itself. Many of the actors portraying the paratroopers were actual soldiers who fought in the battle. Some played themselves, including Kate ter Horst, Frederick Gough, John Frost and Stanley Maxted, the Canadian journalist who posted gripping reports from the front at Arnhem.[155]
A Bridge Too Far was a 1977 epic war film based on the 1974 book of the same name by Cornelius Ryan. It was adapted by William Goldman, directed by Richard Attenborough, and had an all-star cast. Unlike the earlier film — which it lifted some scenes from — it covered the entire operation, from all sides, British, American, German, Polish and Dutch. Dramatisations of the actions of the 101st Airborne Division's 506th PIR during the battle formed part of the HBO television miniseries Band of Brothers.
See also
Notes
- Footnotes
- ^ Dr. John C Warren wrote: "Thus ended in failure the greatest airborne operation of the war .... All objectives save Arnhem had been won, but without Arnhem the rest were as nothing.[1]
- ^ Montgomery said that "Had good weather obtained, there was no doubt that we should have attained full success". [General] Student, when interrogated by Liddell Hart, did not go quite so far as this, but gave the weather as the main cause of the failure [of the operation]".[2] Chester Wilmot wrote: "Summing up the overall results of Market Garden, ... [Montgomery claiming 90% success] .... This claim is difficult to support, unless the success of the operation is judged merely in terms of the numbers of bridges captured. Eight crossings were seized but the failure to secure the ninth, the bridge at Arnhem, meant the frustration of Montgomery's strategic purpose. His fundamental objective had been to drive Second Army beyond the Maas and Rhine in one bound."[3]
- ^ While the size of the German force used to oppose Market Garden is currently unknown, Michael Reynolds notes that Fifteenth Army, based to the west of the axis of advance, contained over 80,000 men. The strength of First Parachute Army is not given. However Reynolds notes it had just been reinforced with over 30,000 men from the Luftwaffe, including paratroopers in various stages of training. Finally, the 9th and 10th SS Panzer Divisions each contained in the neighborhood of 6–7,000 men.[6]
- ^ XXX Corps lost 70 tanks while VIII and XII Corps lost approximately 18 tanks in total.[7]
- ^ Operation Varsity in 1945 involved more planes, gliders, and troops on D-Day than in Market, but additional airborne troops flown in on subsequent days made Market Garden the larger operation.[14]
- ^ The CIGS, Field Marshal Sir Alan Brooke, was absent at the Second Quebec Conference
- ^ "Handsup", a drop on Quiberon, was cancelled after naval objections and "Beneficiary", a drop on Saint-Malo, because defences were too strong.[48]
- ^ After 25 August, IX TCC was removed from Ninth Air Force and placed directly under US Strategic Air Forces.[48]
- ^ 655 of the 700 scheduled RAF sorties on the first two days towed gliders and the RAF only dropped 186 total troops by parachute.[59]
- ^ Ryan claims civilian casualties in the Arnhem area are said to be less than 500 while he had heard of claims of up to 10,000 killed, wounded or displaced civilians in the entire Market Garden operation area.[9]
- ^ According to Ellis Second Army casualties (excluding the 1st Airborne Division) ammounted to 3,716 men from 17–26 September.[118] Ryan states that total British casualties amounted to 13,226: 1st Airborne Division (including Polish forces and glider pilots), 7,578; RAF pilot and crew losses, 294; XXX Corps, 1,480, while supporting operations by VIII and XII Corps resulted in 3,874 casualties.[9] VIII Corps staff place their losses at 663 men.[119] Michael Reynolds arrives at a slightly different figure to Ryan for the airborne losses; 1,446 men of the 1st Airborne and Glider Pilot Regiment were killed while 6,414 were taken prisoner. Furthermore 97 Poles were killed and a further 111 captured.[4]
- ^ 82nd Airborne Division: 1,432. 101st Airborne Division: 2,118. Glider pilots and air crew: 424.[9]
- ^ Historian Cornelius Ryan states that "complete German losses remain unknown but that in Arnhem and Oosterbeek admitted casualties came to 3,300 including 1,300 dead. ... I would conservatively estimate that Army Group B lost at least another 7,500–10,000 men of which prehaps a quarter were killed."[9] Michael Reynolds counters these figures stating, while "precise details of German casualties do not exist" they totalled about 6,400 based on research by Robert Kershaw. Kershaw estimates that 2,565 Germans were killed north of the lower Rhine and a further 3,750 were lost fighting around XXX Corps corridor.[10] Stephen Badsey states that "other calculations place [German losses] at 2,000 dead and 6,000 wounded".[121] A contemporary paper of the 21st Army Group mentions that 16,000 men were captured during the course of the operation.[13]
- Citations
- ^ Warren 1956, p. 146
- ^ Wilmot 1952, p. 525
- ^ Wilmot 1952, p. 523
- ^ a b Reynolds, p. 173
- ^ Randel, p. 81
- ^ Reynolds, pp. 100–101
- ^ MacDonald ,p. 199 and endnotes
- ^ MacDonald ,p. 199
- ^ a b c d e f Ryan, A Bridge Too Far, p. 457
- ^ a b c Reynolds, pp. 173–174
- ^ a b c Badsay 1993 p. 85
- ^ a b Kershaw, p. 339-340
- ^ a b c d Notes on the operations of 21 Army Group 6 June 1944 – 5 May 1945, p. 32
- ^ MacDonald 1963, p. 132
- ^ Chant, Chris (1979). Airborne Operations. An Illustrated Encyclopedia of the Great Battles of Airborne Forces. Salamander books, p. 108 and 125. ISBN 0861010140
- ^ Ellis 1968, p. 1
- ^ Ellis 1968, p. 6
- ^ Ellis 1968, pp. 7–8
- ^ Ellis 1968, pp. 70–71
- ^ Ruppenthal 1953, p. 464
- ^ Ruppenthal 1953, p. 535
- ^ Ruppenthal & 1953 pp. 463–474
- ^ Ruppenthal 1959, pp. 55–57
- ^ Ellis 1968, p. 5
- ^ Ellis 1968, p. 9
- ^ Ellis 1968, p. 343
- ^ Ruppenthal 1953, pp. 509–511
- ^ Ruppenthal 1953, p. 487
- ^ Ellis 1968, p. 72
- ^ Ruppenthal 1953, p. 484
- ^ Ruppenthal 1953, p. 520
- ^ Ruppenthal 1953, p. 505
- ^ Administrative History of the Operations of 21 Army Group, p. 34
- ^ Administrative History of the Operations of 21 Army Group, p. 47
- ^ Pogue 1954, pp. 254–255
- ^ Ellis 1968, p. 17
- ^ Pogue 1954, p. 255
- ^ Bennett 2008, pp. 19–21
- ^ a b Pogue 1954, p. 281
- ^ Hibbert 1962, pp. 29–30
- ^ Hibbert 1962, pp. 30–31
- ^ MacDonald 1963, p. 129
- ^ Ellis 1968, pp. 21–23
- ^ Administrative History of the Operations of 21 Army Group, p. 37
- ^ Ruppenthal 1953, pp. 139–140
- ^ Pogue 1954, p. 269
- ^ MacDonald 1963, p. 128
- ^ a b Warren 1956, p. 83
- ^ a b MacDonald 1963, p. 131
- ^ a b Ellis 1968, p. 30
- ^ p.209, Horrocks
- ^ Ellis 1968, p. 29
- ^ Bennet 2008, p. 29
- ^ Warren 1956, p. 81
- ^ Warren 1956, pp. 226–227
- ^ Warren 1956, p. 82 (operational control of IXTCC to First Airborne Army) and p.97 (size and composition of troop carrier units)
- ^ Warren 1956, p. 112
- ^ Warren 1956, p. 98
- ^ Warren 1956, p. 227 Table III
- ^ D’Este 2002 pages 614, 616
- ^ Warren 1956, p. 90
- ^ Warren 1956, p. 154
- ^ Warren 1956, p. 100
- ^ Warren 1956, p. 99
- ^ Hastings 2004, p. 36
- ^ Bennett 2008, p. 29
- ^ Hibbert 1962, p. 56
- ^ a b Kershaw 2004, p. 14
- ^ Kershaw 2004, p. 15
- ^ Kershaw 2004, p. 19
- ^ Bennett 2008, pp. 43–44
- ^ Ryan 1974, p. 36
- ^ Ryan 1974, p. 43
- ^ Ryan 1974, p. 58
- ^ Harclerode 2005, p. 454
- ^ a b Kershaw 2004, p. 21
- ^ Ryan 1974, p. 44
- ^ a b Kershaw 2004, p. 22
- ^ a b Harclerode 2005, p. 456
- ^ Kershaw 2004, p. 23
- ^ Harclerode 2005, p. 455
- ^ a b Kershaw 2004, p. 39
- ^ Harclerode 2005, pp. 455–456
- ^ The 9th SS Panzer Division was onganized into the divisional reconnaissance battalion and nineteen Alarmheiten (Alarm Companies) trained to head towards the sound of gunfire, each being about 130 men.Harclerode 2005, p. 459
- ^ Kershaw 2004, p. 24
- ^ Kershaw 2004, pp. 36–37
- ^ Kershaw, p. 30
- ^ a b Kershaw, p. 31
- ^ Harclerode, p. 458
- ^ Harclerode, p. 459
- ^ Harclerode, p. 460
- ^ p.119, Dibbs, Holmes
- ^ Middlebrook, pp. 64–65
- ^ Middlebrook, p. 66
- ^ A brief history of the 44th Royal Tank Regiment 1939–1945, Geocities.com
- ^ a b Hibbert, pp. 99–100
- ^ Greenacre, John (2004) 'Assessing the Reasons for Failure: 1st British Airborne Division Signal Communications during Operation 'Market Garden, Defence Studies, 4:3, 283 — 308, Informaworld.com
- ^ Hibbert, p. 100
- ^ pp.291–294, Austin
- ^ a b c d e f g h i j Randel, p. 32
- ^ Ryan, p. 182
- ^ a b c d Gill, p. 70
- ^ a b c d Ryan, p. 183
- ^ Ryan, pp. 185–186
- ^ Ryan, p. 186
- ^ Ryan, pp. 185–186
- ^ a b c Gill, p. 71
- ^ a b Ryan, p. 187
- ^ D’Este 2002 page 616
- ^ a b Randall, p. 33
- ^ a b Gill, p. 72
- ^ Burriss, Moffatt. Strike and Hold: A Memoir of the 82d Airborne in World War II
- ^ Turnbill, Peter. I Maintain the Right: The 307th Engineer Battalion in WWII
- ^ Lonesentry.com
- ^ Routetovictory.co.uk
- ^ Warren 1956, pp. 137–138
- ^ Hastings, p. 54
- ^ a b Ellis 1968, p. 56
- ^ Jackson, p. 156
- ^ a b Ryan, pp. 599
- ^ Badsey, p. 85
- ^ Rodgers, Phil, "Dakota Heroes", Flypast, Stamford, Lincs., UK, Number 53, December 1985, pages 24–27.
- ^ Hastings, p. 36
- ^ Ryan, p.106
- ^ Buckingham, William F. Arnhem 1944 (ISBN 0752431870) pages 12–13 & 85–86
- ^ Hibbert, The Battle of Arnhem, pp. 40–45
- ^ Neillands 'The Battle...', p. 132
- ^ Robinson in Neillands 'The Battle...' pp. 120–121
- ^ Ryan 1974, p. 482
- ^ Brereton 1946, p. 354
- ^ Otway 1951, p. 271
- ^ Laurens 1971, pp. 168–169, Books.Google.co.il
- ^ Laurens 1971, pp. 180–181
- ^ Eisenhower, Dwight David (1977), Crusade in Europe, Politics and Strategy of World War II (reprint ed.), Doubleday, p. 310, ISBN 0306707683
- ^ D’Este pp 615–618
- ^ D’Este page 624
- ^ "Letter, Eisenhower to Urquart". October 1944. http://www.pegasusarchive.org/arnhem/RepLetters.htm.
- ^ a b Montgomery 1958, p. 298
- ^ Montgomery 1947, p. 243
- ^ Ellis 1968, pp. 109–127
- ^ Ellis 1968, pp. 158–162
- ^ Ellis 1968, pp. 253–277
- ^ Ellis 1968, pp. 279–294
- ^ Ellis 1968, pp. 313–315
- ^ Ellis 1968, pp. 416–420
- ^ Middlebrook, p449
- ^ Ramsey 1973, p. 8
- ^ Frost, preface p16
- ^ "Monuments in Arnhem". http://web.mac.com/davedepickere/World_War_II,_analyzed!/Monuments_Arnhem.html.
- ^ "Weblog Lau van Lieshout: Monument to the Dutch" (in Dutch). http://lauvanlieshoutfotos.web-log.nl/lauvanlieshoutfotos/2006/10/monument_to_the.html.
- ^ "Wręczenie Orderu Wojskowego im. króla Willema I i Orderu Brązowego Lwa przez Jej Wysokość Królową, 31 maja 2006 roku w Hadze" (in Polish) (pdf). http://www.defensie.nl/_system/handlers/generaldownloadHandler.ashx?filename=/media/Uitreiking_Militaire_Willemsorde_Polen_tcm46-105269.pdf.
- ^ "Nationaal Bevrijdingsmuseum 1944–1945 – Bezoekinformatie". http://www.bevrijdingsmuseum.nl/.
- ^ "Wings of Liberation Museum Park". http://www.wingsofliberation.nl.
- ^ "Airborne Museum Hartenstein". http://www.airbornemuseum.com/.
- ^ Bennett 2008, pp. 268–269
References
- Austin, Brian (2002), Schonland: scientist and soldier, London: Taylor & Francis
- Badsey, Stephen (1993), Arnhem 1944: Operation Market Garden, London: Osprey Publishing, ISBN 1855323028
- Bennett, David (2008), A Magnificent Disaster, Newbury: Casemate Publishers, ISBN 978-1-932033-85-4
- Cholewczynski, George F. (1993), Poles Apart: The Polish Airborne at the Battle of Arnhem, London: Greenhill Books, ISBN 1-85367-165-7
- D'Este, Carlo (2002), Eisenhower: A Soldier’s Life, New York: Henry Holt, ISBN 0-8050-5686-6
- Dibbs, John; Holmes, Tony (2000), Spitfire: flying legend, Osprey Publishing, ISBN 1841350125
- Devlin, Gerard M. (1979), Paratrooper — The Saga Of Parachute And Glider Combat Troops During World War II, Robson Books, ISBN 0-31259-652-9
- Ellis, Major L.F. & with Warhurst, Lieutenant-Colonel A.E. (2004) [1st. pub. HMSO 1968], Butler, J.R.M, ed., Victory in the West, Volume II: The Defeat of Germany, History of the Second World War United Kingdom Military Series, Naval & Military Press Ltd, ISBN 1-84574-059-9
- Frost, Major General John (1980), A Drop Too Many, Cassell, ISBN 0-85052-927-1
- Gill, Ronald; Groves, John (2006) [1946], Club Route in Europe: The History of 30 Corps from D-Day to May 1945, MLRS Books, ISBN 978-1-905696-24-6
- Harclerode, Peter (2005), Wings Of War – Airborne Warfare 1918–1945, Weidenfeld & Nicolson, ISBN 0-30436-730-3
- Hastings, Max (2005) [2004], Armageddon: The Battle for Germany 1944–45 (New ed.), London: Pan Books, ISBN 0-33049-062-1
- Hibbert, Christopher (2003) [1962], Arnhem, London: Phoenix, ISBN 1-84212-727-6
- Horne, Alistair; with Montgomery, David (1994), The Lonely Leader: Monty 1944–1945, London: Macmillan, ISBN 0 333 58708 1
- Horrocks, Brian (1960), Escape to action, New York: St Martin's Press
- Huston, James A. (1998), Out Of The Blue — U.S Army Airborne Operations In World War II, Purdue University Press, ISBN 1-55753-148-X
- Kershaw, Robert J. (2004), 'It Never Snows in September'. The German View of Market-Garden and the Battle of Arnhem, September 1944 (Paperback ed.), Hersham: Ian Allen Publishing, ISBN 0711030626
- Laurens, Anne (1971) [1969], Lindemans Affair: Betrayal of the Arnhem Drop, Allan Wingate, ISBN 085523007X
- MacDonald, Charles B. (1963), The Siegfried Line Campaign, Washington, DC: Office of the Chief of Military History, Department of the Army
- Middlebrook, Martin (1995), Arnhem 1944: The Airborne Battle, Penguin, ISBN 0-14-014342-4
- Montgomery, Bernard Law (1958), The memoirs of Field-Marshal the Viscount Montgomery of Alamein, K.G., London: Collins
- Montgomery, Bernard Law (1947), Normandy to the Baltic, London: Hutchinson & Co
- Otway, Lieutenant-Colonel T.B.H (1990), The Second World War 1939–1945 Army — Airborne Forces, Imperial War Museum, ISBN 0-90162-75-77
- Peters, Major M.L.; Buist, Luuk (2009), Glider Pilots at Arnhem, Pen and Sword Books, ISBN 9781844157631, http://www.pen-and-sword.co.uk/?product_id=1971
- Pogue, Forrest C. (1954), The Supreme Command, Washington, DC: Office of the Chief of Military History, Department of the Army
- Ramsey, Winston G., ed. (1973), "Arnhem", After the Battle (Number 2): 1–25
- Randel, R.A., Major P. B.; Crawford, W.H. (illustrator); Wilson, Major D.B. (editor) (2006) [1945], A short history of 30 Corps in the European Campaign 1944–1945, MLRS Books, ISBN 978-1-905973-69-9
- Ruppenthal, Roland G (1953), Logistical Support of the Armies: Volume I, May 1941– September 1944, Washington, DC: Office of the Chief of Military History, Department of the Army
- Ruppenthal, Roland G (1959), Logistical Support of the Armies: Volume II, September 1944 – May 1945, Washington, DC: Office of the Chief of Military History, Department of the Army
- Ryan, Cornelius (1999) [1974], A Bridge Too Far, Wordsworth Editions, ISBN 1-84022-213-1
- Warren, Dr. John C. (1956) (PDF), Airborne Operations in World War II, European Theater, USAF Historical Studies: No. 97, USAF Historical Division Research Studies Institute, OCLC 78918574, http://www.afhra.af.mil/shared/media/document/AFD-090602-016.pdf
- Wilmot, Chester; Christopher Daniel McDevitt (1997) [1952], The Struggle For Europe, Wordsworth Editions, ISBN 1-85326-677-9
- Whiting, Charles (2002) [1985], Bounce the Rhine, Siegfried Line Series (New ed.), Staplehurst: Spellmount, ISBN 1-86227-151-8
Further reading
- MacDonald, Charles B. (2000 (reissue from 1960)), "Chapter 19: The Decision to Launch Operation Market-Garden", in Kent Roberts Greenfield, Command Decisions, United States Army Center of Military History, CMH Pub 70-7, http://www.history.army.mil/books/70-7_19.htm
- "JSCSC library bibliography: Campaign & Battle Series: Operation Market Garden, The Battle of Arnhem, September 1944". UK Joint Services Command and Staff College Library. http://www.da.mod.uk/colleges/jscsc/jscsc-library/bibliographies/campaign-and-battle-studies/ArnhemInternet.pdf. Retrieved 22 October 2010. This is a comprehensive bibliography including detailed reviews of the major publications about Operation Market Garden and links to web sites about the topic.
- Donald Burgett (2001). The Road to Arnhem: A Screaming Eagle in Holland. Dell Publishing. ISBN 0-440-23633-9.
World War II Participants Timeline - Monte Cassino and Shingle
- Narva
- Cherkassy
- Tempest
- Ichi-Go
- Normandy
- Mariana and Palau
- Bagration
- Western Ukraine
- Tannenberg Line
- Warsaw
- Eastern Romania
- Yugoslavia
- Paris
- Gothic Line
- Market Garden
- Estonia
- Crossbow
- Pointblank
- Lapland
- Hungary
- Leyte
- Bulge
- Burma
Aspects GeneralWar crimes- German and Wehrmacht war crimes
- The Holocaust
- Italian war crimes
- Japanese war crimes
- Allied war crimes
- Soviet war crimes
- United States war crimes
- German military brothels
- Camp brothels
- Rape during the occupation of Japan
- Comfort women
- Rape of Nanking
- Rape during the occupation of Germany
- Nazi crimes against Soviet POWs
- Italian prisoners of war in the Soviet Union
- Japanese prisoners of war in the Soviet Union
- Japanese prisoners of war in World War II
- German prisoners of war in the Soviet Union
- Finnish prisoners of war in the Soviet Union
- Polish prisoners of war in the Soviet Union
- Romanian prisoners of war in the Soviet Union
- German prisoners of war in the United States
Categories:- 1944 in the Netherlands
- Parachute Regiment (United Kingdom)
- Battles and operations of World War II involving Poland
- Battles of World War II involving the United Kingdom
- Battles of World War II involving the United States
- World War II operations and battles of the Western European Theatre
- Military operations of World War II involving Germany
- Airborne warfare
- Glider Pilot Regiment operations


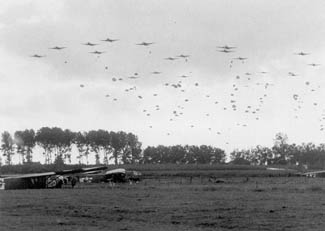

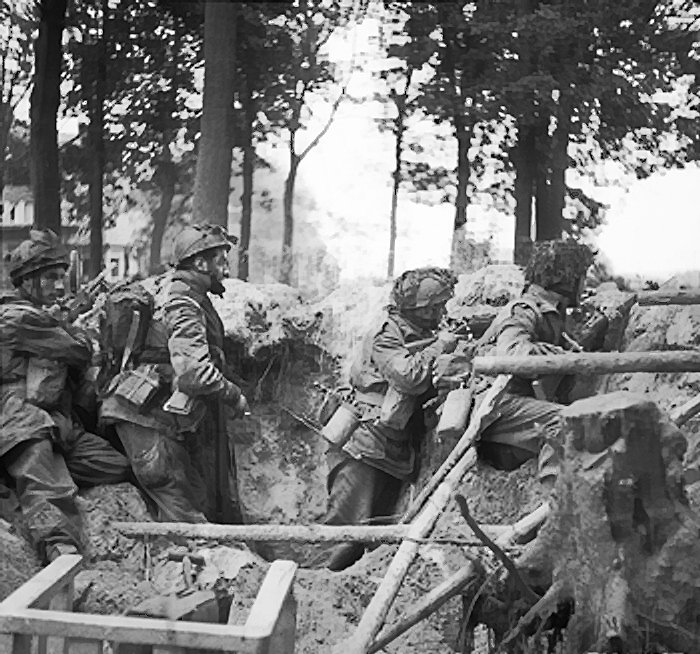


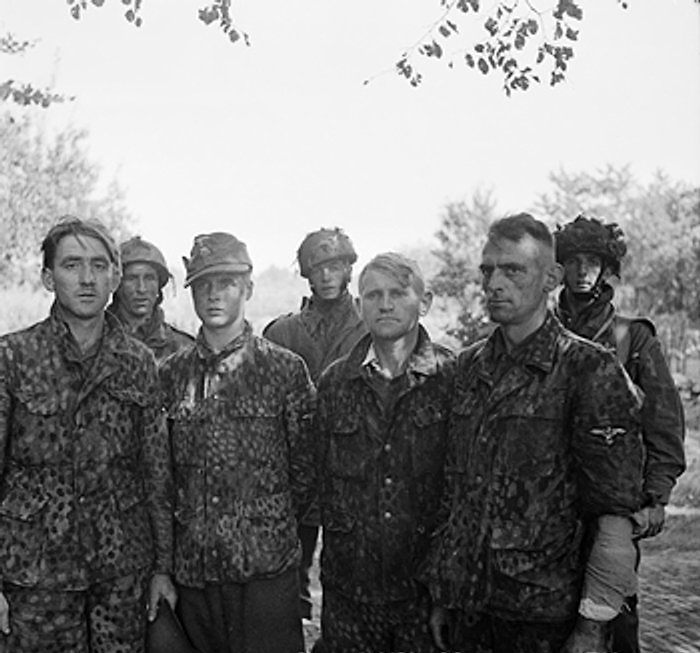
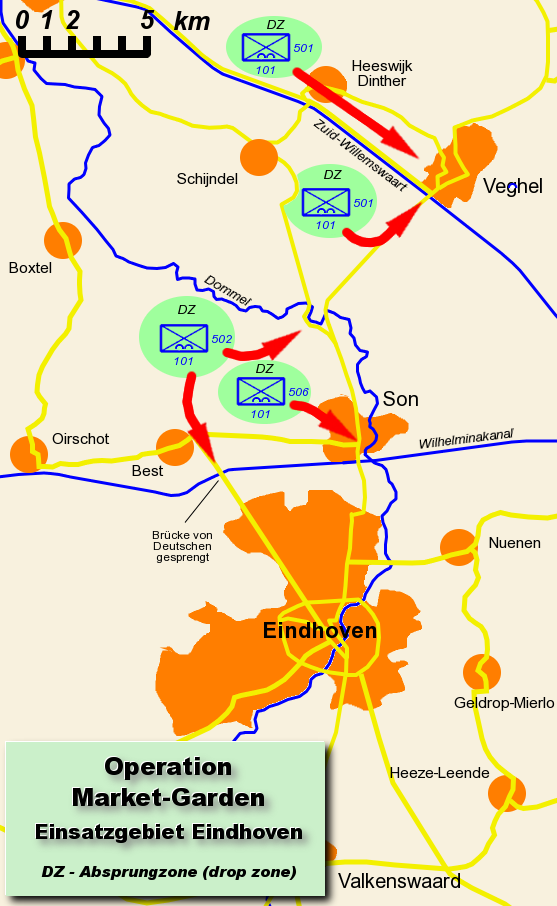


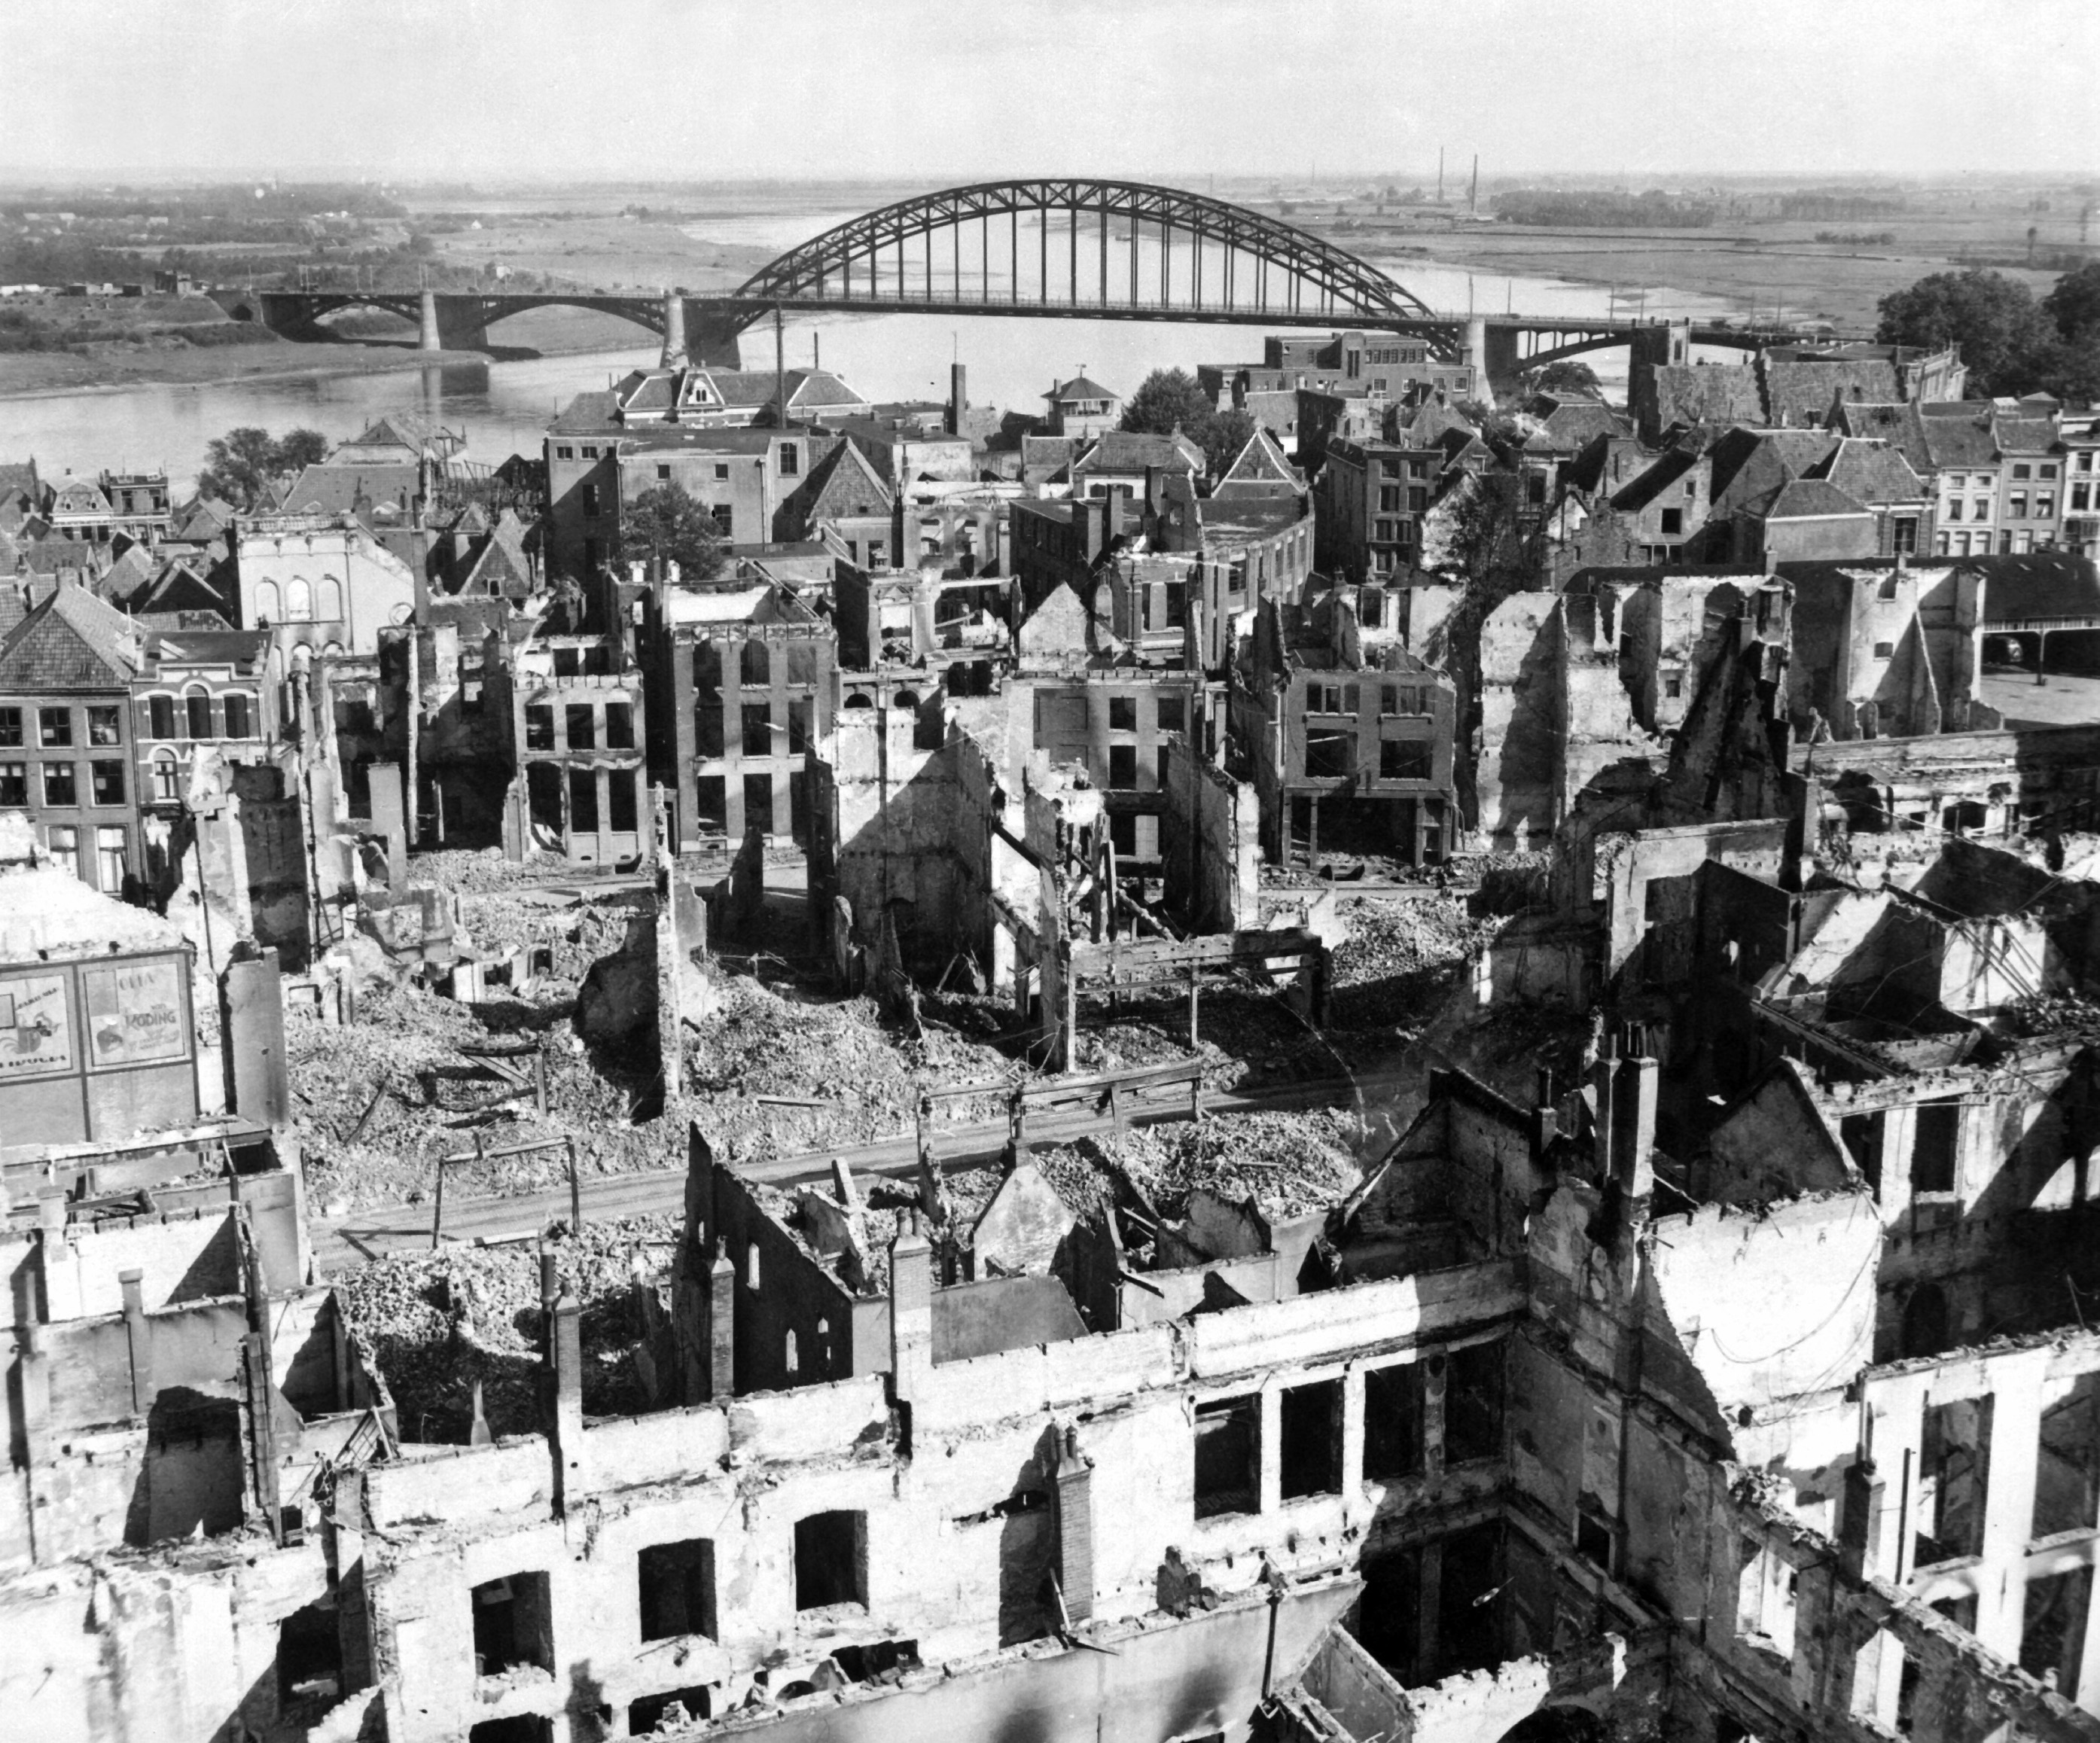


Wikimedia Foundation. 2010.