- German auxiliary cruiser Kormoran
-
"Kormoran" redirects here. For other uses, see Kormoran (disambiguation).
Auxiliary cruiser Kormoran meets a German U-boat at seaCareer (Nazi Germany) 
Name: Steiermark Operator: Hamburg-America Line Route: East Asia (intended) Builder: Friedrich Krupp Germaniawerft, Kiel, Germany Launched: 15 September 1938 Fate: Requisitioned by Kriegsmarine Career (Nazi Germany) 
Name: Kormoran Namesake: SMS Cormoran and the Cormorant Commissioned: 9 October 1940 Reclassified: Auxiliary cruiser (1940-41) Identification: HSK-8 (German class designation)
Schiff 41 (German administrative designation)
Raider G (British designation for tracking)Fate: Scuttled following battle, 19 November 1941 General characteristics as Kormoran Type: Handels-Stör-Kreuzer (commerce raider) Tonnage: 8,736 GRT Length: 515 ft (157 m) Beam: 66 ft (20 m) Propulsion: 4 × 9-cylinder diesel motors Speed: 18 knots (33 km/h; 21 mph) Boats and landing
craft carried:1 × LS-3 minelaying boat Complement: 400 Armament: 6 × 15 cm (5.9 in) SK L/45 C guns
2 × 37 mm (1.46 in) PaK 36 anti-tank guns
5 × 20 mm (0.79 in) FlaK 30 anti-aircraft guns
6 533 mm (21.0 in) torpedo tubes (2 twin deck mounts; 2 single, aft-angled submerged tubes
Naval minesAircraft carried: 2 × Arado 196 seaplanes The German auxiliary cruiser Kormoran (HSK-8) was a Kriegsmarine (German Navy) merchant raider of World War II. Originally the merchant vessel Steiermark, the ship was acquired by the Kriegsmarine following the outbreak of war for conversion into a raider. Administered by the Kriegsmarine under the designation Schiff 41, to the Allied navies she was known as Raider G. The largest merchant raider operated by Germany during World War II, Kormoran was responsible for the destruction of ten merchant vessels and the capture of an eleventh during her year-long career in the Atlantic and Indian oceans.
She is also known for sinking the Australian light cruiser HMAS Sydney during a mutually destructive battle off Western Australia on 19 November 1941. Damage sustained during the battle prompted the scuttling of Kormoran. While 318 of the 399 aboard the German ship were rescued and placed in prisoner of war camps for the duration of World War II, there were no survivors from the 645 aboard the Australian cruiser. The wreck of Kormoran was rediscovered on 12 March 2008, five days before her adversary.
Kormoran's success is commonly attributed to the proximity of the two ships during the engagement, and the raider's advantages of surprise and rapid, accurate fire. Prior to the discovery of the wrecks in 2008, the cruiser's loss with all hands compared to the survival of most of the German crew created controversy and spawned numerous conspiracy theories; some alleged that the German commander, Theodor Detmers, used illegal ruses to lure Sydney into range, others that a Japanese submarine was involved, or that details of the battle were concealed through a wide-ranging cover up.
Contents
Construction and conversion
The merchant vessel Steiermark was constructed by Friedrich Krupp Germaniawerft in Kiel for the Hamburg-Amerika Line. Launched in 1938, the ship was to operate on the East Asia run, but had only completed sea trials when war was declared.[1]
Following World War I, German naval power had limits placed upon it by the Treaty of Versailles, which were later eased by the 1935 Anglo-German Naval Agreement.[2] By the 1930s, the discrepancy between the conventional warship strength of the Kriegsmarine and that of other nations led the German military to recognise that auxiliary cruisers engaged in commerce raiding would play a significant role in any future war, as they had during World War I.[2] Merchant ships that could be converted into raiders were identified, and were to be taken up by the Kriegsmarine for conversion following a declaration of war.[3]
Steiermark was one of these ships.[1] Receiving the designation Schiff 41 (Ship 41) for administrative purposes, she was taken into dockyard hands following the outbreak of World War II.[1][4] Conversion of the merchant ship commenced in early 1940, and was prioritised as second only to work on the U-boat fleet.[5] The conversion work included installation of camouflaged weapons, fitting of bunks for the sailors, creation of internal passageways leading to their stations.[5] Prisoner accommodation, consisting of an open area for hammocks and facilities to keep ship's masters and women separate from the general population, was constructed.[5] The raider was also provided with equipment with which to modify her appearance and allow her to masquerade as other merchant vessels.[5] While the ship was being refitted, her future crew underwent training aboard the blockade runner Monte Pascoal.[6]
Korvettenkapitän (Commander) Theodor Detmers was selected to command Schiff 41 in July 1940; not quite 38, he was the youngest man to command a German merchant raider.[4][7] Detmers named the ship Kormoran, inspired by SMS Cormoran (a Russian merchant ship captured by the Germans during World War I and operated as a raider) and the cormorant (with Detmers comparing the seabird's use in fishing to his ship's attempts in catching Allied vessels).[8][9] After a successful trials cruise in September 1940, Kormoran was commissioned on 9 October.[10]
Design
Kormoran was one of nine(I) civilian ships taken up by the Kriegsmarine (German Navy) for conversion into merchant raiders and referred to alternately as Hilfskreuzers (auxiliary cruisers) or Handelsstörkreuzers (trade disruption cruisers).[11] She was the largest of the raiders, and the most recently constructed when she was taken up for modification.[4] After modification, Kormoran was 515 feet (157 m) long and 66 feet (20 m) wide, with a Gross Register Tonnage of 8,736.[12] She was propelled by four 9-cylinder diesel engines driving electric motors, which could propel the ship at 18 knots (33 km/h; 21 mph).[citation needed]
Armament
The raider was fitted with six 15-centimetre (5.9 in) guns as primary armament: two each within the forecastle ("1" and "2") and quarterdeck ("5" and "6"), and one each fore and aft ("3" and "4" respectively) on the centreline.[13] These guns were World War I-vintage; gun "3" had been removed from the battlecruiser SMS Seydlitz in 1916.[13] The forecastle and quarterdeck guns were hidden behind counter-weighted false hull plates, while each centreline gun was concealed by fake cargo hatch walls.[13]
The secondary armament consisted of five 2-centimetre (0.79 in) anti-aircraft guns.[13] Two were located on the forecastle, two on the after funnel deck, and the fifth in the quarterdeck.[13] All five were hidden by the structure of the ship until they were raised clear on hydraulic platforms.[13] There were plans to fit four 3.7-centimetre (1.5 in) anti-aircraft guns, but only two (former anti-tank guns scrounged from the army) could be acquired; these were installed on Kormoran's superstructure, hidden by sheet metal panels.[13][14] Kormoran was also equipped with six torpedo tubes: two dual launchers on the upper deck, and a single underwater tube on each side.[13] The underwater tubes were amidships, angled at 135° from the bow, and could only be fired if the raider was travelling at less than 3 knots (5.6 km/h; 3.5 mph).[13]
The raider carried two Arado Ar 196 floatplanes for reconnaissance.[5][15] Although Detmers wanted a catapult, such equipment would have spoiled any merchant ship disguise used by Kormoran; instead, the planes were stored inside No. 5 cargo hatch, and were launched and recovered from the water with the assistance of hoists.[5][16] Mechanical problems, difficulties in moving the aircraft from hatch to water and back, and a lack of opportunities meant that only seven flights were made during the ship's operational deployment.[15]
Mines were carried.[5] An LS-3 fast boat was carried inside No. 6 cargo hatch for minelaying.[5]
Operational history
Running the blockade
The day after commissioning, Kormoran sailed to Kiel, where she was provisioned for a twelve-month voyage.[17] The raider then travelled to Gotenhafen, and underwent further trials of the ship's weapons, aircraft, and minelaying boat.[17] Despite a range of problems and defects, Detmers elected to repair problems at sea instead of taking the ship into dock and delaying their mission.[18]
 Kormoran in 1940.
The raider departed on 3 December, and once she cleared German waters on 10 December, her disguise was changed from a Sperrbrecher to the Soviet freighter Vyacheslav Molotov.[19] The British Royal Navy had blockaded German waters at the start of the war, which Kormoran had to break through to reach her first patrol area.[20] It was suggested that the raider either sail through the English channel with support from captured French coastal batteries and the Luftwaffe, or around the Faroe Islands, but Detmers chose to travel north of Iceland and through the Denmark Strait before heading south. The longer route was justified by the greater distance from British naval bases and was thus less likely to be patrolled.[21] The raider reached the strait late in the evening of 12 December, passed through the strait under the cover of a heavy storm, and entered the Atlantic by midday the next day without encountering any Allied ships.[22][23]
Atlantic Ocean
Having cleared the British blockade, Kormoran's instructions were to search the Atlantic Ocean for targets of opportunity, then move to the Indian Ocean and seek out more merchant shipping, with additional orders to lay mines around one or more Allied ports in India or Australia.[24] Kormoran was also expected to replenish U-boats when ordered to do so, and carried extra torpedoes and spare parts.[24] The raider's first operational area was in the Atlantic, below Latitude 40° North, which she crossed during the night of 19–20 December.[22] The German ship initially patrolled the western mid-Atlantic, outside the Pan-American Security Zone.[25] During the first two weeks, the only ships spotted were merchant vessels flying the United States flag, which merchant raiders were forbidden to attack as they were still neutral.[26]
By 6 January 1941, Detmers was ready to relocate to a point outside the Mediterranean because of the lack of targets, but that afternoon, Kormoran encountered the 3,729-ton Greek freighter Antonis.[27][28] The raider ordered the freighter to heave to and not send any wireless transmissions, and sent a boarding party over.[29] Antonis was armed with three British machine guns and loade with 4,800 tons of coal from Wales. Though Germany was not at war with Greece, the presence of Allied weapons and cargo allowed Detmers to sink her or take her as a prize.[28][29] As coal was of little use to the Kriegsmarine, the weapons, ammunition, and 29 crew were transferred to Kormoran, and the boarding party scuttled her at 18°17′N 28°32′W / 18.283°N 28.533°W.[29][30] British Admiralty notifications for raider activity gave the wrong date and location for the attack, and initially attributed it to the raider Thor.[31] Kormoran retreated southeast, avoiding the convoy routes from the Mediterranean to America or down the African coast, in order to prey on vessels sailing alone and without warship escort.[32]
Before sunset on 18 January, smoke was spotted on the horizon.[32] Kormoran accelerated and altered course in pursuit.[32] On sighting the tanker, it was noted that the merchantman flew no flag, was not illuminated, and was following a zigzag course to minimise submarine attack, leading Detmers to conclude that she was an Allied vessel.[32] As there was little time before sunset, and it was likely that the tanker would resist capture, Kormoran opened fire at 7,000 yards (6,400 m) in an attempt to disable the ship.[32] When the third salvo hit the merchantman, she broadcast a distress call, identifying herself as British Union and claiming she was under attack by an unknown vessel at 26°24′N 30°58′E / 26.4°N 30.967°E.[33] Firing continued until British Union directed a light signal towards Kormoran, which the Germans assumed was a surrender signal, but as the raider closed to 4,000 yards (3,700 m), four shots were fired by the tanker.[34] All four missed, and heavy retaliatory fire from the raider set the merchant ship alight and forced the crew to abandon ship.[34] The decision was made to destroy the 6,987-ton British Union with a torpedo, although two torpedoes and shells from the raider's main guns were required to sink the tanker, while a third torpedo exploded as soon as it cleared its safety distance and armed; Detmers later stated that the quantity of ammunition used during the attempted capture was excessive for the result obtained.[30][34] The tanker's master, 27 sailors, and a pet monkey were recovered from two lifeboats as the tanker sank at 26°29′N 31°07′W / 26.483°N 31.117°W, and the raider fled the area.[34][35] The distress call and glow from the fires attracted the attention of the armed merchant cruiser Gold Coast (now Ghana).[43] These intercepts also indicated that several parties, including the British Air Ministry, were aware of the attack, prompting Detmers to order the torpedoing of Eurolychus.[43] This was accomplished with a single torpedo, sinking the British ship and her cargo at 8°15′N 24°04′W / 8.25°N 24.067°W, three and a half hours after Afric Star.[43][44] 39 Chinese and 4 British crew were recovered by the German raider before she fled the area with HM Ships Norfolk and Devonshire in pursuit.[43] Another 28 survivors were found by the Spanish merchant ship Monte Tiede later that night, with 10 men killed during the attack or lost at sea before rescue by either ship.[45] Eurolychus' Master was among those rescued by the Allies, and recounted that two ships had attacked, one of them armed with 11-inch (280 mm), which led British Naval Intelligence to conclude that the responsible ships were Thor and Admiral Scheer, or an unknown raider operating in concert with one of these.[46]
After evading her pursuit, Kormoran made for a point off the Cape Verde Islands, where she rendezvoused with the supply ship Nordmark on 7 February for refuelling and replenishment.[47] During the three-day operation, Kormoran topped up Nordmark's supply of spare parts for U-boats with components brought from Germany, and transferred 170 of the prisoners acquired so far.[48] The other four, Chinese sailors from Eurolychus were hired to stay aboard the raider as laundrymen, and the British Union crew left their pet monkey aboard as a gift of thanks for their treatment while in captivity.[48][49] A piano was taken from the captured merchant ship Duquesa, a coal-burning ship that was to be scuttled when her small supply of fuel was exhausted, but Detmers warned that if the piano caused any problems amongst the crew, it would be pushed overboard.[50]
Kormoran left the rendezvous on 10 February and headed south.[48][clarification needed] During the transit, Detmers received a signal from Germany indicating that his ship had been awarded two First Class Iron Crosses, and fifty Second Class Iron Crosses, to be distributed as he saw fit.[48] Detmers transmitted a request on 18 February for WM-80 white metal, as the softer WM-10 used in bearings for two of the four diesel engines were wearing out too quickly and required replacement.[51] Some metal was acquired from the raider Pinguin on 25 February, but this was not enough to replace all the bearings.[51] On 15 March, Kormoran met U-boat U-124 to transfer torpedoes, provisions and spare parts, but rough seas forced the two vessels to head south, where they met the pocket battleship Admiral Scheer a day later.[52] The raider's broken radar and a crewman with an eye injury were relocated to the warship, but attempts to replenish the U-boat were again interrupted by bad weather, forcing the raider and U-boat to relocate again.[53] The equipment transfer and refuelling took another three days, during which crewmen from U-124 enjoyed the relatively luxurious facilities aboard Kormoran, and a sick sailor from the submarine was traded for a healthy man from the raider.[54]
The raider sailed north to the Freetown-South America shipping route, and began to patrol near where it intersected the border of the Pan-American Security Zone.[55][56] On the morning of 22 March, the raider encountered a tanker, which identified herself as the British vessel Agnita during an exchange of signals.[56] After learning the ship's identity, Kormoran instructed her to stop and maintain wireless silence or be fired upon.[56] The tanker instead broke away and began to transmit a distress signal, which was jammed as Kormoran opened fire.[56] Agnita signalled surrender after two salvoes, and twelve British and twenty-five Chinese sailors were captured, along with maps of the minefields surrounding Freetown Harbour.[57] Efforts to scuttle the tanker failed, and Kormoran had to waste another torpedo to sink the ship at 3°20′S 23°40′W / 3.333°S 23.667°W.[57]
Against usual practice, Detmers decided to return to the site of the action three days later, where another tanker was spotted.[57] Kormoran revealed her weapons and fired a warning shot at the large merchantman, which initially attempted to flee, but chose to instead surrender when the morning mist lifted and revealed the nature of the opposition.[57] The 11,309-ton German-built Canadian tanker Canadolite was taken as a prize ship. A prize officer, with a crew if 16 German sailors and 44 men from the tanker, was instructed to sail the ship to Bordeaux, while the tanker's four senior officers were imprisoned aboard Kormoran.[57][58] After the captured ship left, it was realised recognition signals to avoid Luftwaffe attack had not been supplied, and Kormoran raced to meet the tanker when she rendezvoused with the supply ship Nordmark.[58] The raider met the supply ship on 27 March, but it appeared Canadolite had enough fuel to reach France and chosen to sail straight there.[59] Two U-boats were scheduled to reach the rendezvous point for resupply; Detmers suggested he meet U-105, which was carrying more white metal for Kormoran's engines, while Nordmark focused on U-106.[59] The commanding officer of U-105 agreed to transmit a warning to Germany regarding Canadolite once the U-boat had left the rendezvous point, which did not occur until six days later because of equipment problems delaying the replenishment.[60] The tanker arrived safely on 13 April.[61] The tanker was renamed Sudetenland, and was eventually sunk by the RAF in 1944.[62]
Kormoran was due to meet the tanker Rudolf Albrecht on 4 April, and had no opportunity to search for new targets.[63][64] The 42 prisoners from Kormoran were transferred to the tanker, but as she was a civilian vessel, her master was sworn in by Detmers as a naval officer, and an armed guard had to be supplied.[65] Detmers ordered four men from Nordmark be transferred to Rudolf Albrecht and a fifth man be sent to Kormoran in exchange for the sick sailor taken from U-124 a fortnight previous; the supply ship's commander attempted to obstruct the transfers, and when this failed demanded replacements, one of which came from Kormoran while three merchant sailors were drafted from the tanker.[66] Food, mail, and newspapers were received from Rudolf Albrecht, along with word that another three First Class Iron Crosses and fifty Second Class Iron Crosses had been awarded to Kormoran.[65]
Having returned to the waters off Freetown, Kormoran encountered a merchant ship at dawn on 9 April.[63] As the ship was behind Kormoran and on a similar course, the raider slowed until the merchantman was abeam of the raider and 5,000 yards (4,600 m) to port.[63] The German ship decamouflaged, increased speed, and ordered the freighter to stop or be fired upon.[63] In response, the merchantman attempted to transmit a distress call (which was jammed by Kormoran) and tried to man the stern gun, prompting the Germans to open fire.[63] The freighter took heavy damage, as every time Detmers ordered or was about to order a cease fire, the target ship attempted to escape or transmit another distress signal.[63][67] Eventually, the 46 survivors of the crew (5 were killed by the attack) abandoned their burning vessel, and boarding parties were sent from the raider.[63][68] She was identified as the 8,022-ton British freighter Craftsman, carrying an anti-submarine net for Singapore, which was to be delivered after a stop in Cape Town.[63] After scuttling charges failed to sink Craftsman, she was torpedoed, and submerged at 0°32′N 23°37′W / 0.533°N 23.617°W.[69]
Ships attacked in the Atlantic Ocean[70][71] Date Name Tons (GRT) Location 13 January 1941 Antonis 3,729 18°17′N 28°32′W / 18.283°N 28.533°W 18 January 1941 British Union 6,987 26°29′N 31°07′W / 26.483°N 31.117°W 29 January 1941 Afric Star 11,900 8°44′N 24°38′W / 8.733°N 24.633°W 29 January 1941 Eurylochus 5,273 8°15′N 24°04′W / 8.25°N 24.067°W 22 March 1941 Agnita 3,552[72] 3°20′S 23°40′W / 3.333°S 23.667°W 25 March 1941 Canadolite 11,309 2°30′N 23°48′W / 2.5°N 23.8°W[62] (captured) 9 April 1941 Craftsman 8,022 0°32′N 23°37′W / 0.533°N 23.617°W 12 April 1941 Nicolaos D. L. 5,486 1°54′S 22°12′W / 1.9°S 22.2°W After fleeing the scene, Kormoran headed south, and early on 12 April encountered another ship.[73] After slowly closing on the merchantman over three hours, Kormoran decamouflaged and fired several warning shots.[73] The freighter turned away and sent a distress signal; wireless operators aboard Kormoran were unable to jam it, but there was little concern as the transmission was an SOS instead of the more specific QQQ or RRR for a raider attack, while also giving the wrong coordinates.[73] Kormoran fired for effect, but it was not until the merchant ship's bridge was destroyed that her 35 crew abandoned ship.[74] A boarding party identified the ship as the 5,486-ton Greek freighter Nicholas D.L., carrying Canadian timber.[73] Because of her buoyant cargo, the scuttling charges failed to have major effect, but after firing some shells into Nicholas D.L., Detmers chose to leave the ship to sink slowly at 1°54′S 22°12′W / 1.9°S 22.2°W.[61] Until 1943, the Admiralty accepted the SOS location, 18° further north, as fact, while attributing the sinking to the raider Atlantis.[61]
On 17 April, Kormoran sighted a passenger ship, but was unable to lure her into range before the vessel disappeared into a rain squall.[75] Two days later, Kormoran met Atlantis and the blockade runner Dresden.[73] An expected shipment of white metal for Kormoran had been supplied to another blockade runner, which had been delayed.[73] Several supply ships arrived at the rendezvous point over the next few days and transferred provisions, ammunition, and fuel to the raider.[76] Prisoners from Kormoran were handed over to the other ships, and the raider received new crewmen to make up numbers.[77] Kormoran departed on 22 April, and spent two days changing her disguise to the Japanese freighter Sakito Maru before sailing into the Indian Ocean.[78]
Indian Ocean
On reaching the Indian Ocean, Kormoran was immediately diverted to refuel the whalecatcher Adjutant and the supply ship Alstertor; refuelling was carried out between 13 and 17 May.[79] Although originally confined to waters north-east of latitude 20°S and longitude 80°E, the raider's area of operations expanded on 1 June to encompass the entire ocean.[80][81] The ship's disguise was altered again on 5 June, with Kormoran taking the identity of the Japanese merchant ship Kinka Maru, as the owners of Sakito Maru rarely operated in the western Indian.[82] After patrolling around the Maldives without success, Kormoran sailed towards the Bay of Bengal with plans to lay mines in the approaches to Madras and Calcutta.[83] Although a target was spotted en route on 15 June, the raider's smoke generator malfunctioned and started to produce thick, black smoke, which scared off the merchantman.[83] On 24 June, while approaching Madras, the raider was spotted and shadowed by what the Germans assumed was a British auxiliary cruiser.[83][84] The suspicious ship later resumed her original course without incident, but Detmers decided to postpone the minelaying operation and leave the area, as Allied forces would become suspicious when the 'Japanese' ship failed to reach port.[83]
During the early morning of 26 June, a darkened merchant ship was spotted.[85] Signals were sent to the ship without response, and after the merchantman appeared to ignore a warning shot, Kormoran opened fire and caused massive damage.[85] Nine men, identifying themselves as crew from the 4,153-ton Yugoslavian cargo ship Velebit were recovered from a lifeboat; the lack of response was attributed to the actions of inexperienced Indian sailors taken on in Bombay.[86] The ship was left to sink, but another eight sailors remained onboard, and kept Velebit afloat until she ran aground on the reefs surrounding the Andaman Islands.[85] That afternoon, exhaust smoke from another ship was spotted by Kormoran.[85] Maintaining a steady course away from the merchantman until a rain squall enveloped the raider, Kormoran then altered onto a converging course, and closed to within 600 yards (550 m) before crossing the merchantman's bow to reach a favourable firing position and revealing her identity.[85][87] Orders to stop were ignored, and the raider opened fire after a distress call was sent.[85] During the thirty second attack, shells from the raider destroyed the merchantman's wireless room and forecastle, damaged the engine room, and ignited several fires.[85][88] 48 sailors from the 3,472-ton Australian vessel Mareeba were recovered by Kormoran, and although a boarding party attempted to save the ship for use as a minelayer, the quantity of damage made this impossible.[85][88] The Australian ship was scuttled, and sank quickly at 8°15′N 88°06′E / 8.25°N 88.1°E.[88]
After retreating to open waters, a fifteen-day overhaul of the engines was carried out, along with other maintenance.[89] While working on one of the seaplanes, a sailor was killed by electrocution.[90] Kormoran's disguise was changed to the Dutch freighter Straat Malakka, and notice was received of a further 100 Second Class Iron Crosses and 5 First Class Iron Crosses awarded to the ship.[89] On completion, Detmers set course for the Bay of Bengal for a second attempt at minelaying, but aborted this on 30 July when he learned that the aircraft carrier HMS Hermes would be in the area.[91] Kormoran then took to patrolling the shipping routes from Fremantle to Colombo or Lombok.[92] A merchant ship was spotted near sunset on 13 August, but the ship's actions (which included heading directly for Kormoran on spotting her, broadcasting a raider distress call without coordinates, and repeatedly broadcasting homing signals) caused Detmers to think that the target was either an auxiliary cruiser, or was attempting to lure Kormoran into range of an Allied warship.[91][93] Kormoran broke off pursuit and retreated.[93] The raider continued to search for ships without success.[94] On 25 August, the lookout spotted a strange object on the horizon; this was the peak of Boea Boea Mountain on Enggano Island, and the first sighting of land in 258 days.[95]
Kormoran then moved to waters south of Ceylon, and around midday on 1 September, a large motor vessel, which Detmers determined to be an unaccompanied troopship, was spotted.[96][97] Plans were made to attack during the night, but the transport disappeared over the horizon during the afternoon and could not be found again.[98] Two days later, Detmers was informed that Kormoran would be replaced by Thor at the end of December, and that he would be resupplied by the supply ship Kumberland, which had come from Japan and would wait for the raider at a pre-determined rendezvous point from 12 November.[98][99] Late on 23 September, the navigational lights for a ship were sighted.[100] After signalling the merchant ship for her name and nationality, which identified her as the 3,941-ton Greek freighter Stamantios G. Embiricus, the raider shone searchlights on her and ordered her to stop and accept a boarding party.[101][102] Those aboard the Greek ship assumed they were being pulled up by a British warship for not observing blackout conditions, and it was not until the armed Germans arrived on the ship that the nature of the 'warship' was revealed.[101] Although captured intact, Stamantios G. Embiricus was a coal-fuelled ship, and did not have sufficient fuel to reach any destination than her intended port, Colombo.[103] The merchant ship was scuttled at 0°01′S 64°30′E / 0.017°S 64.5°E, but while a lifeboat carrying the ship's master and five crew rowed to Kormoran, a second lifeboat carrying the other 24 avoided capture in the dark.[102][103] A search using one of the Arado seaplanes found them late the next morning.[102]
Ships attacked in the Indian Ocean.[104][105] Date Name Tons (GRT) Location 26 June 1941 Velebit 4,153 [verification needed] 26 June 1941 Mareeba 3,472 8°15′N 88°06′E / 8.25°N 88.1°E 26 September 1941 Stamatios G. Embirikos 3,941 0°01′S 64°30′E / 0.017°S 64.5°E A few days later, Kormoran′s wireless operators intercepted transmissions between the Norwegian tanker Thelma and a shore station: initially in a new code, then repeated in the recently expired code.[106] This allowed the Germans to identify where the merchant ship was heading to, and make some headway into breaking the new codes.[107] However, the tanker could have taken several routes to her Cape Town destination, and Kormoran was unable to encounter her during four days of searching.[107] The raider then headed south, and met the supply ship Kumberland on 16 October.[102] Supplies and parts were transferred to Kormoran, while the raider's prisoners were moved to Kumberland, along with documents captured from ships and five slightly ill German sailors to serve as guards.[102][108] After leaving on 24 October, maintenance and repairs were carried out.[102] Plans were made to sail up the coast of Western Australia; the original intention was to mine shipping routes near Cape Leeuwin and Fremantle, but after wireless signals were detected from a warship (Australian heavy cruiser HMAS Canberra) escorting a convoy in the area, Detmers decided to sail further north and mine Shark Bay, then proceed to the East Indies before looping back west to the Bay of Bengal.[109][110]
Final battle and loss
- Note: All times in this section are UTC+7.
On 19 November 1941, shortly before 16:00, Kormoran was 150 nautical miles (280 km; 170 mi) south-west of Carnarvon, Western Australia.[111] The raider was sailing northwards (heading 025°) at 11 knots (20 km/h; 13 mph).[111][112] At 15:55, what was initially thought to be a tall ship sail was sighted off the port bow, although it was quickly revealed to be the mast of a cruiser, HMAS Sydney.[112] Detmers ordered Kormoran to alter course into the sun (heading 260°)[clarification needed] at maximum achievable speed (which quickly dropped from 15 to 14 knots (28 to 26 km/h; 17 to 16 mph) because of problems in one of her diesels), while setting the ship to action stations.[112] Sydney spotted the German ship around the same time, and altered from her southward heading to intercept at 25 knots (46 km/h; 29 mph).[111][112]
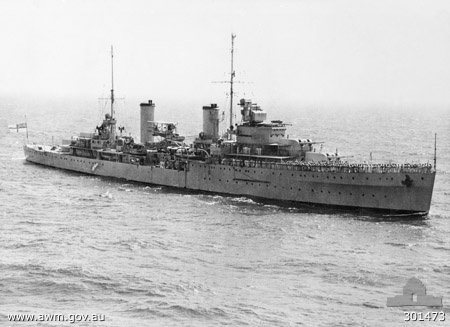
 Australian cruiser HMAS Sydney in 1940
As the cruiser closed from astern, she began to send signals.[113] The first, by searchlight, was not answered by the Germans because they did not understand the coded Morse.[113][114] Sydney repeated for half an hour, but then began to send, "You should hoist your signal letters" in plain language, accompanied by signal flags.[114][115] After another delay, Kormoran raised flags reading "PKQI"—the callsign for her disguise, the Dutch merchant ship Straat Malakka—on the triatic stay and hoisted a Dutch civil ensign.[111] As the cruiser was on Kormoran's starboard quarter at 15,000 metres (16,000 yd) (8.1 nmi (9.3 mi; 15.0 km), the flags were obscured by the raider's funnel; German accounts vary as to if this was to make the ship seem more like a civilian vessel, a deliberate ruse to lure Sydney closer, or an error on the part of the signaller.[116][117] After receiving an instruction from the cruiser to make the flags visible, the signals officer aboard Kormoran did so by lengthening the halyard and swinging it around to the starboard side.[111][116] By 16:35, with Sydney 8,000 metres (8,700 yd) (4.3 nmi (4.9 mi; 8.0 km)) away, the malfunctioning engine aboard Kormoran was repaired, but Detmers chose to keep it in reserve and maintain speed.[117][118] Further flag signals were exchanged, with Sydney asking the raider's destination and cargo.[119][120]
At around 17:00, Detmers instructed his wireless operators to send a distress call indicating Straat Malakka was being approached by a suspicious ship.[111] Transmitted at 17:03 and repeated at 17:05, it contained the distress call for a merchantman under attack from a raider, rather than a warship (QQQQ as opposed to RRRR), the latitude and longitude of the transmitting ship, the time per Greenwich Mean Time (following the time with GMT was a way to let headquarters know she was actually a raider about to be lost), and her name.[121][122] This message was partially read by the tugboat Uco ("QQQQ [unintelligible] 1000 GMT") and a shore station at Geraldton, Western Australia ("[unintelligible] 7C 11115E 1000 GMT").[123] The Geraldton station broadcast a message to all ships asking if there was anything to report, which was interpreted by the Germans as acknowledgement of their signal.[112] During the exchanges and distress signal, Sydney positioned herself off the raider's starboard beam on a parallel course, approximately 1,300 metres (1,400 yd) from Kormoran.[124] Her main guns and torpedoes trained on the raider, but secondary weapons did not appear to be manned, personnel were standing on the upper deck, and although the cruiser's seaplane had been readied for launch, it was soon stowed away.[124][125] During her manoeuvre, Sydney appeared to signal "IK" (the short form for, "You should prepare for a cyclone, hurricane, or typhoon"), a signal that made no sense from the Germans' perspective, in an attempt by Sydney to verify the merchantman's identity, as part of a call and response: signalling part of Straat Malakka's secret secondary callsign as a password, expecting her to respond with the rest it.[114][126]
Fifteen minutes later, the cruiser blinkered, "Show your secret sign", and Detmers knew Kormoran was in trouble.[124][127] Knowing there was no chance of fooling Sydney much longer, he ordered Kormoran's disguise be dropped, the Dutch flag replaced with a German battle ensign, and to commence firing.[124] Kormoran's opening salvo bracketed the ship, and the next four salvoes destroyed Sydney's bridge, gun direction tower, forward turrets, and aircraft.[124][128] Two torpedoes were launched simultaneously with the raider's attack, and the close proximity of the target allowed the use of the anti-aircraft and close defence guns to rake Sydney's flank and interfere with attempts to man the cruiser's secondary weapons.[124][129] In contrast, Sydney was only able to fire a single full salvo before her forward turrets were knocked out, shells from which punched through Kormoran's exhaust funnel and wireless room, and caused shrapnel wounds in two sailors.[130]
Kormoran's gunners shifted their aim to Sydney's waterline with their next three salvoes.[131] Sydney responded from her aft turrets: one damaged the raider's machinery spaces and started a fire in an oil tank, while the other fired only a few ineffective shells.[124][132] Around the time of the eighth or ninth German salvo, one of Kormoran's torpedoes struck Sydney forward of "A" turret, ripping a hole in her side and causing her to settle by the bow.[131][133] After the torpedo hit, Sydney turned hard to port in what the Germans assumed was an attempt to ram, but the cruiser passed harmlessly aft.[124][134]
By 17:35, the cruiser was heading south, heavily damaged, on fire, and losing speed, with her main battery destroyed or jammed facing away from their target and her secondary weapons quickly passing out of range.[135] Kormoran maintained her course and speed, but discontinued salvo firing; her stern guns continued to score hits as Sydney passed through their firing arcs.[136][137] The cruiser fired torpedoes at Kormoran, but as the raider was bearing to bring her port broadside to bear, these passed harmlessly astern.[136][138] After completing the turn, battle damage caused Kormoran's engines to fail completely, leaving the raider dead in the water while Sydney continued to limp southwards.[136] Despite being immobilised, Kormoran continued to fire at a high rate—some of the German sailors reported up to 450 shells were used during the second phase of the battle—and scored hits on the cruiser, although many of the shells would have missed as the range increased.[139] The raider fired her guns for the last time around 17:50, with the range at 6,600 yards (6,000 m), and a torpedo was fired at 18:00, but missed.[136]
By the end of the half-hour engagement, the ships were about 10,000 metres (11,000 yd) (5.4 nmi (6.2 mi; 10.0 km) apart, both heavily damaged and on fire.[136][140] Shell damage to Kormoran's engine room had knocked out the fire-fighting systems, and as it was only a matter of time until the oil fire reached the magazine or mine hold, Detmers ordered abandon ship at 18:25.[136][141] All boats and rafts were launched by 21:00, and a skeleton crew kept the weapons manned while their colleagues evacuated and the officers made preparations for scuttling.[136] During all this, Sydney was seen to proceed south-south-east at low speed; she disappeared over the horizon shortly after the engagement, but the glow of the burning ship was seen on the horizon consistently until 22:00, and sporadically until midnight.[136]
Kormoran was abandoned and scuttled at midnight; she ship sank slowly until the mine hold exploded half an hour later.[136]
The German survivors were in five boats and two rafts: one cutter carrying 46 men, two battle-damaged steel liferafts with 57 and 62 aboard (the latter carrying Detmers and towing several small floats), one workboat carrying 72, one boat with 31 men aboard, and two rafts, each bearing 26 sailors.[142] During the evacuation, a rubber liferaft carrying 60 people, mostly wounded, sank without warning; the three survivors were placed in other boats.[143][144] Total German casualties were 6 officers, 75 German sailors, and 1 Chinese sailor.[145][146]
Rescue
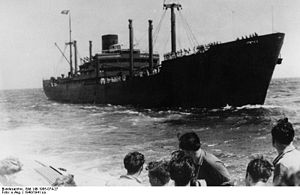
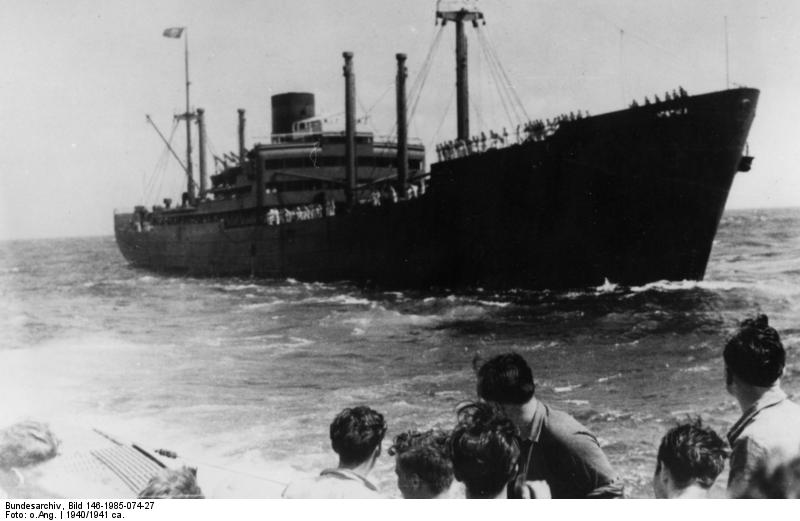
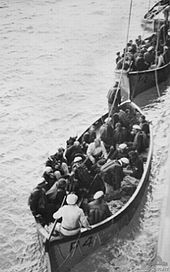 Survivors from Kormoran under tow in two of Centaur's lifeboats. The German lifeboat can be seen behind them.
The first liferaft of German survivors, carrying 26 men, was found by the troopship Aquitania early on 23 November, but as the ship's master believed a raider was still in the area, he maintained wireless silence and did not report his discovery until three days later.[147][148] The boat carrying Detmers saw the troopship, but did not make their presence known, as the German officer hoped to be recovered by a neutral merchant ship.[149]
Attempts to locate Sydney, which was several days overdue in returning to port, commenced on 23 November.[150][151] However, it was not until the afternoon of the next day, after the British tanker Trocas reported the recovery of the second liferaft with 25 men (one having perished) that a full-scale search was started.[152][153] Several German lifeboats were spotted on 25 November during the air search off Western Australia: the 46-man cutter had come ashore at 17-Mile Well, the 57-man lifeboat was nearing Red Bluff when spotted, and a third lifeboat was further off the coast.[154][155] That afternoon, the staff of Quobba Station rounded up the two groups that had made landfall, who did not resist capture.[154]
The 31-man boat was recovered by the passenger ship Koolinda just before sunset on 26 November.[156] The passenger-freighter Centaur, which had been instructed to make landfall at Carnarvon to collect the Germans captured so far and transport them to Fremantle, encountered Detmers' lifeboat that night at 22:00 and took it in tow, as they were equally unwilling to let so many enemy naval personnel aboard or leave them to their fate.[157][158] During the voyage to Carnarvon, the damaged and overloaded German lifeboat was swamped, and the Kormoran survivors were transferred into two of Centaur's lifeboats.[158] Arriving in Carnarvon on the afternoon of 27 November, the Germans were relocated from the boats to Centaur's number one cargo hold, where they were joined by the sailors from the two lifeboats that had reached shore and 40 Australian Army guards.[158]
The last boat, carrying seventy Germans and two Chinese, was spotted from the air during the late morning of 27 November, and was recovered shortly afterward by HMAS Yandra.[159][160] The next day, HMAS Wyrallah recovered a German lifebelt and two four-man liferafts, one of which was carrying a deceased German sailor, who was buried at sea.[159] The search was terminated at sunset on 29 November.[159] By this point, all of the German liferafts were accounted for, and 318(II) of Kormoran's 399 personnel (including three of the four Chinese laundry workers) survived.[146][161] Conversely, none of 645-strong ship's company from Sydney were found, and the only definite remains found of the Australian warship were a damaged carley float and a lifebelt.[162]
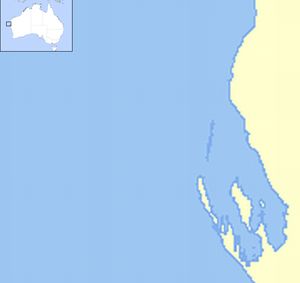
 AquitaniaTrocasKoolindaCentaurYandra17-Mile WellRed Bluff
 CarnarvonRecovery of survivors off the coast of Western Australia
Aftermath
In Germany, news of the battle was assembled from communications intercepts during the search for survivors, which was combined with Allied news articles to assemble an account of the battle and published in early 1943 for internal consumption by German officials.[163] After the events were confirmed by a member of Kormoran's crew sent home in a prisoner exchange later that year, detailed accounts were published in the German media in December 1943.[164]
Most of the German survivors were taken to Fremantle and interrogated.[165] Attempts to learn what had happened were hampered by the German officers instructing their sailors to obfuscate the enemy with false answers, people describing events they did not witness but heard of later, and difficulty in keeping groups separated in order to check their stories against each other.[166] Despite this, Australian authorities were able to piece together the broad details of the battle, which was verified by German sailors recovered by Aquitania who had been taken to Sydney instead: their interviews showed the same commonalities and inconsistencies as those in Fremantle, and the interrogators concluded that the true story was being recounted.[167][168]
Initially, the sailors were imprisoned at Harvey while the officers were imprisoned at Swanbourne Barracks, but after interrogations were concluded in December, Kormoran's crew moved to prisoner-of-war camps near Murchison, Victoria.[169][170] Sailors were interred in No. 13 Prisoner of War Camp, which already hosted 1,200 soldiers of the Afrika Korps, and their shipmates rescued by Aquitania, while officers were sent to the Dhurringile homestead.[170][171]
One sailor died in captivity on 24 March 1942 from lung cancer, and was buried in the Tatura war cemetery.[172] On 11 January 1945, Detmers and nineteen other Axis officers broke out from Dhurringile through a tunnel excavated during the previous seven months, although all were recaptured within days of escaping.[173] Detmers was found with a German-English dictionary which included two accounts of the battle (a deck log or action report, and an engineering log) encrypted within using a Vigenère cipher, although these accounts provided little new information.[174] Shortly after returning to the camp, Detmers suffered a stroke, and spent over three months at Heidelberg Military Hospital.[173] The German officers and sailors were repatriated after the war, departing from Port Phillip Bay with other Axis prisoners aboard the steamer Orontes on 21 February 1947.[175] Ironically, tied up to the pier opposite Orontes was the real Straat Malakka.[175] On arrival in Cuxhaven, the prisoners were searched before leaving the ship, and while several written reports were gathered, none provided new information.[176]
Search and rediscovery
Despite the approximate position of Kormoran being known (most German accounts giving the battle coordinates as 26°S 111°E / 26°S 111°E), efforts to find Kormoran and Sydney were hampered by the size of the search area indicated by such imprecise coordinates, and claims by supporters of alternate views of the engagement that the German coordinates were false and that the ships would be found further south and closer inshore.[177][178][179]
Several post-war searches were made by the Australian military in the years following the war, but these efforts were primarily concerned with finding the Australian cruiser, technologically restricted to shallow waters, and made to verify or prove false civilian claims that Sydney or Kormoran was at a particular location.[180][181] In 1990, Robert Ballard and the Woods Hole Oceanographic Institution were approached to lead a search for the ships, which he agreed to on the condition that the search area be narrowed down considerably.[182] A forum in 1991 attempted to do this, but was unsuccessful in narrowing down the potential search area, and Ballard withdrew from the search plans.[183] A 1999 Australian government report recommended that a seminar be organised to identify the most likely search area for the warships, but again, participants were still split between the battle location given by the Germans (referred to as the "northern position") or a point off the Abrolhos Islands (the area for the battle advocated by supporters of the "southern position").[184]
American shipwreck hunter David Mearns first learned of the battle and mutual destruction of Sydney and Kormoran during a conference in 1996, and decided to start studying the battle with a view to finding the ships in 2001.[185] With the assistance of historians and the Western Australian Museum, Mearns researched the battle by focusing on primary source documents, during which he discovered or rediscovered several archive files and diaries of Kormoran personnel believed lost; these documents led him to believe that the German accounts were truthful.[186] After identifying a potential search area, the Australian government announced several million dollars funding for the search, but German government assistance was limited to formal approval for Mearns to film Kormoran if she was found.[187]
Mearns plan was to determine a 'search box' for Kormoran by plotting the possible starting points of the two rafts from the raider through a reverse drift analysis.[188] This search box (which was calculated to be 52 by 34 nautical miles (96 by 63 km; 60 by 39 mi) in size) would then be inspected over the course of several days with a deep-water, towed side-scan sonar mounted aboard the survey vessel SV Geosounder.[189] Mearns chose to focus on finding Kormoran first, as locating the German ship would significantly narrow down the search area for Sydney, and improve the chances of finding the Australian cruiser in this area.[188] After locating one or both vessels, the search ship would return to port and replace the sonar with a remotely operated vehicle (ROV) to photograph and video the wrecks, although funding limitations meant the search and inspection of both ships had to be concluded within 45 days.[190] After problems with equipment and weather, Geosounder commenced the search, and located Kormoran during the afternoon of 12 March 2008.[191] The wreck site was 2,560 metres (8,400 ft) below sea level, and consisted of two large pieces 1,300 metres (4,300 ft) apart, with an oval-shaped debris field between them, centred at 26°05′46″S 111°04′33″E / 26.09611°S 111.07583°ECoordinates: 26°05′46″S 111°04′33″E / 26.09611°S 111.07583°E.[192] The raider's discovery was publicly announced by Australian Prime Minister Kevin Rudd on the morning of 17 March.[193]
Location of wrecksMearns was then able to plot a search area for Sydney based on Kormoran's location, as although there was no specific information on the cruiser's location, much more information was available concerning her last known position relative to the raider.[194] Sydney was located on 17 March at 26°14′31″S 111°12′48″E / 26.24194°S 111.21333°E, 11.4 nautical miles (21.1 km; 13.1 mi) south-east of Kormoran.[195] Discovery of the vessel was made only hours after the locating of Kormoran was publicly announced.[196] On discovery, both wrecks were placed under the protection of the Australian Historic Shipwrecks Act 1976, which penalises anyone disturbing a protected shipwreck with a fine of up to AU$10,000 or a maximum five years imprisonment.[197] Both wrecks were placed on the Australian National Heritage List on 14 March 2011.[198]
After the side-scan sonar aboard Geosounder was switched out for the ROV (again delayed by technical issues and more bad weather), the survey ship returned sea for detailed inspections of the wrecks, with Sydney was filmed and documented during 3–6 April, and a sonar contact thought to be debris from the battle was visually inspected on 6 April and found to be outcrops of pillow lava.[199] Observation of the Kormoran wreck confirmed that the mine deck explosion had torn the stern half of the ship apart, with few recognisable items in the large debris field.[200] The search was declared complete just before midnight on 7 April, with Geosounder returning to Geraldton.[201]
Awards, memorials, and legacy
For sinking Sydney, Detmers' Iron Cross First Class was upgraded to the Knight's Cross of the Iron Cross.[171] Kormoran's executive officer, gunnery officer, and the sailor who manned the starboard 37-millimetre (1.5 in) gun were awarded the Iron Cross First Class (although for the executive officer, this was a bar to a previous Iron Cross), while the other members of the crew were all awarded the Iron Cross Second Class.[202]
The names of those killed aboard Kormoran are inscribed in the Laboe Naval Memorial.[203] The Kormoran name was carried on by the edit] Footnotes
- ^(I) Other sources state that eleven auxiliary cruisers were operated by the Kriegsmarine during World War II: two were reclassified for other uses before leaving German waters.[11]
- ^(II) Other sources state that 317 survived, including two Chinese.[153] The third Chinese sailor was aboard the lifeboat found by Centaur: as Eurylochus was owned by the Blue Funnel Line, while Centaur belonged to the subsidiary Ocean Steamship Company, the laundryman was integrated into Centaur's crew instead of being handed with the Germans.[146]
Citations
- ^ a b c Frame, HMAS Sydney, p. 45
- ^ a b Frame, HMAS Sydney, pp. 41-4
- ^ Frame, HMAS Sydney, p. 44
- ^ a b c Winter, H.M.A.S. Sydney, p. 13
- ^ a b c d e f g h Frame, HMAS Sydney, p. 47
- ^ Winter, H.M.A.S. Sydney, pgs. 23, 25
- ^ Olson, Bitter Victory, p. 141
- ^ Frame, HMAS Sydney, pp. 47-8
- ^ Winter, H.M.A.S. Sydney, pp. 19-20
- ^ Frame, HMAS Sydney, pp. 50-1
- ^ a b Frame, HMAS Sydney, pp. 275-7
- ^ Frame, HMAS Sydney, p. 277
- ^ a b c d e f g h i Frame, HMAS Sydney, p. 46
- ^ Winter, H.M.A.S. Sydney, p. 22
- ^ a b Winter, H.M.A.S. Sydney, p. 27
- ^ Winter, H.M.A.S. Sydney, pgs. 27, 37
- ^ a b Frame, HMAS Sydney, p. 51
- ^ Winter, H.M.A.S. Sydney, pp. 25-6
- ^ Frame, HMAS Sydney, pgs. 48-55
- ^ Frame, HMAS Sydney, pgs. 44, 52
- ^ Frame, HMAS Sydney, pp. 52-3
- ^ a b Frame, HMAS Sydney, p. 55
- ^ Winter, H.M.A.S. Sydney, pp. 34-5
- ^ a b Winter, H.M.A.S. Sydney, p. 35
- ^ Frame, HMAS Sydney, pgs. 44, 56
- ^ Frame, HMAS Sydney, p. 56
- ^ Frame, HMAS Sydney, pp. 56-7
- ^ a b Winter, H.M.A.S. Sydney, p. 38
- ^ a b c Frame, HMAS Sydney, p. 57
- ^ a b Winter, H.M.A.S. Sydney, p. 39
- ^ Frame, HMAS Sydney, pp. 57-8
- ^ a b c d e Frame, HMAS Sydney, p. 58
- ^ Frame, HMAS Sydney, pp. 58-9
- ^ a b c d Frame, HMAS Sydney, p. 59
- ^ Winter, H.M.A.S. Sydney, pgs. 41, 43, 52
- ^ Frame, HMAS Sydney, pp. 59-60
- ^ Winter, H.M.A.S. Sydney, p. 41
- ^ Winter, H.M.A.S. Sydney, p. 42
- ^ a b c d e Frame, HMAS Sydney, p. 60
- ^ Evans, Francis (2010). Quite Endurance. Argentina: Graficamente Ediciones. p. 36. ISBN 9789871601134.
- ^ Frame, HMAS Sydney, pp. 60-1
- ^ Winter, H.M.A.S. Sydney, p. 43
- ^ a b c d e f g h i j Frame, HMAS Sydney, p. 61
- ^ Winter, H.M.A.S. Sydney, p. 47
- ^ Winter, H.M.A.S. Sydney, pp. 47-8
- ^ Winter, H.M.A.S. Sydney, p. 48
- ^ Frame, HMAS Sydney, pp. 61-2
- ^ a b c d Frame, HMAS Sydney, p. 62
- ^ Winter, H.M.A.S. Sydney, p. 52
- ^ Winter, H.M.A.S. Sydney, p. 49
- ^ a b Frame, HMAS Sydney, p. 63
- ^ Winter, H.M.A.S. Sydney, pp. 63-4
- ^ Winter, H.M.A.S. Sydney, p. 64
- ^ Winter, H.M.A.S. Sydney, p. 64-5
- ^ Winter, H.M.A.S. Sydney, p. 65
- ^ a b c d Frame, HMAS Sydney, p. 64
- ^ a b c d e Frame, HMAS Sydney, p. 65
- ^ a b Winter, H.M.A.S. Sydney, p. 66
- ^ a b Winter, H.M.A.S. Sydney, p. 67
- ^ Winter, H.M.A.S. Sydney, pp. 67-8
- ^ a b c Winter, H.M.A.S. Sydney, p. 73
- ^ a b Canadian WWII Merchant Ship Losses The Naval Museum of Manitoba
- ^ a b c d e f g h Frame, HMAS Sydney, p. 66
- ^ Winter, H.M.A.S. Sydney, p. 68
- ^ a b Winter, H.M.A.S. Sydney, pp. 68-9
- ^ Winter, H.M.A.S. Sydney, p. 69
- ^ Winter, H.M.A.S. Sydney, p. 70
- ^ Winter, H.M.A.S. Sydney, pp. 70-1
- ^ Frame, HMAS Sydney, pp. 66-7
- ^ Winter, H.M.A.S. Sydney, pgs. 38-9, 41, 43, 47, 66, 73
- ^ Frame, HMAS Sydney, pgs. 61, 65-7
- ^ Kormoran HSK 8 Wermacht History 1939-1945
- ^ a b c d e f Frame, HMAS Sydney, p. 67
- ^ Winter, H.M.A.S. Sydney, pp. 72-3
- ^ Winter, H.M.A.S. Sydney, p. 75
- ^ Frame, HMAS Sydney, p. 68
- ^ Winter, H.M.A.S. Sydney, p. 77
- ^ Frame, HMAS Sydney, pp. 68-9
- ^ Winter, H.M.A.S. Sydney, pp. 80-1
- ^ Frame, HMAS Sydney, p. 70
- ^ Winter, H.M.A.S. Sydney, p. 59
- ^ Frame, HMAS Sydney, pp. 70-1
- ^ a b c d Frame, HMAS Sydney, p. 71
- ^ Winter, H.M.A.S. Sydney, p. 92
- ^ a b c d e f g h Frame, HMAS Sydney, p. 72
- ^ Winter, H.M.A.S. Sydney, pp. 93-4
- ^ Winter, H.M.A.S. Sydney, pp. 94-6
- ^ a b c Winter, H.M.A.S. Sydney, p. 96
- ^ a b Frame, HMAS Sydney, p. 73
- ^ Winter, H.M.A.S. Sydney, p. 97
- ^ a b Frame, HMAS Sydney, p. 74
- ^ Winter, H.M.A.S. Sydney, pp. 101-2
- ^ a b Winter, H.M.A.S. Sydney, pp. 102-3
- ^ Winter, H.M.A.S. Sydney, p. 104
- ^ Frame, HMAS Sydney, p. 75
- ^ Frame, HMAS Sydney, pp. 75-6
- ^ Winter, H.M.A.S. Sydney, p. 105
- ^ a b Frame, HMAS Sydney, p. 76
- ^ Winter, H.M.A.S. Sydney, p. 106
- ^ Frame, HMAS Sydney, pp. 76-7
- ^ a b Winter, H.M.A.S. Sydney, pp. 106-7
- ^ a b c d e f Frame, HMAS Sydney, p. 77
- ^ a b Winter, H.M.A.S. Sydney, p. 107
- ^ Winter, H.M.A.S. Sydney, pgs. 93, 96, 107
- ^ Frame, HMAS Sydney, pgs. 72, 77
- ^ Winter, H.M.A.S. Sydney, pp. 107-8
- ^ a b Winter, H.M.A.S. Sydney, p. 108
- ^ Winter, H.M.A.S. Sydney, p. 113
- ^ Winter, H.M.A.S. Sydney, pgs. 123, 125
- ^ Frame, HMAS Sydney, pp. 77-9
- ^ a b c d e f Gill, Royal Australian Navy, 1939-1942, p. 453
- ^ a b c d e Hore, in Stevens, The Royal Australian Navy, p. 78
- ^ a b Olson, Bitter Victory, p. 178
- ^ a b c Frame, HMAS Sydney, p. 104
- ^ Olson, Bitter Victory, pp. 178-9
- ^ a b Olson, Bitter Victory, p. 179
- ^ a b Mearns, The Search for the Sydney, p. 28
- ^ Winter, H.M.A.S. Sydney, p. 130
- ^ Olson, Bitter Victory, pp. 180-1
- ^ Gill, Royal Australian Navy, 1939-1942, pp. 453-4
- ^ Cole, The Loss of HMAS Sydney II, vol. 2, pp. 317-8
- ^ Olson, Bitter Victory, pp. 186-9
- ^ Olson, Bitter Victory, p. 186
- ^ a b c d e f g h Gill, Royal Australian Navy, 1939-1942, p. 454
- ^ Olson, Bitter Victory, pgs. 195, 219-21
- ^ Cole, The Loss of HMAS Sydney II, vol 2, p. 9
- ^ Olson, Bitter Victory, p. 195
- ^ Olson, Bitter Victory, pp. 248-9
- ^ Mearns, The Search for the Sydney, p. 35
- ^ Olson, Bitter Victory, pp. 216-8
- ^ a b Olson, Bitter Victory p. 249
- ^ Olson, Bitter Victory, pp. 234-5
- ^ Mearns, The Search for the Sydney, pgs. 37, 205
- ^ Olson, Bitter Victory, p. 234
- ^ Olson, Bitter Victory, pgs. 249-50, 268
- ^ a b c d e f g h i Gill, Royal Australian Navy, 1939-1942, p. 456
- ^ Olson, Bitter Victory, p. 250
- ^ Olson, Bitter Victory, pp. 258-9
- ^ Olson, Bitter Victory, pp. 259-60
- ^ Olson, Bitter Victory, p. 237
- ^ Olson, Bitter Victory, p. 263
- ^ Frame, HMAS Sydney, pp. 3–5
- ^ Frame, HMAS Sydney, p. 95
- ^ Winter, H.M.A.S. Sydney, p. 142
- ^ Cassells, The Capital Ships, p. 151
- ^ a b c Winter, H.M.A.S. Sydney, p. 183
- ^ Frame, HMAS Sydney, pgs. 4, 6–7
- ^ Olson, Bitter Victory, p. 39
- ^ Frame, HMAS Sydney, p. 4
- ^ Gill, Royal Australian Navy, 1939-1942, p. 451
- ^ Olson, Bitter Victory, p. 34
- ^ Frame, HMAS Sydney, p. 5
- ^ a b Gill, The Royal Australian Navy, 1939-1942, p. 452
- ^ a b Frame, HMAS Sydney, p. 6
- ^ Olson, Bitter Victory, p. 40
- ^ Frame, HMAS Sydney, p. 7
- ^ Olson, Bitter Victory, p. 52
- ^ a b c Milligan and Foley, Australian Hospital Ship Centaur, pp. 18–20
- ^ a b c Frame, HMAS Sydney, p. 8
- ^ Olson, Bitter Victory, pp. 56-7
- ^ Olson, Bitter Victory, p. 308
- ^ Olson, Bitter Victory, p. 72
- ^ Hore, in Stevens, The Royal Australian Navy in World War II, p. 84
- ^ Hore, in Stevens, The Royal Australian Navy in World War II, pp. 77-8
- ^ Frame, HMAS Sydney, p. 80
- ^ Frame, HMAS Sydney, pgs. 80, 140
- ^ Frame, HMAS Sydney, p. 106
- ^ Cole, The Loss of HMAS Sydney II, vol. 1, p. 393
- ^ Frame, HMAS Sydney, pp. 80-1
- ^ a b Olson, Bitter Victory, p. 111
- ^ a b Frame, HMAS Sydney, p. 83
- ^ Winter, H.M.A.S. Sydney, pp. 199-200
- ^ a b Frame, HMAS Sydney, p. 108
- ^ Olson, Bitter Victory, pgs. 190, 193
- ^ a b Frame, HMAS Sydney, p. 109
- ^ Frame, HMAS Sydney, pp. 109–10
- ^ Olson, Bitter Victory, p. 47
- ^ Mearns, The Search for the Sydney, pgs. 80, 90-2, 96-7
- ^ McCarthy, A précis of search-related events, p. 5
- ^ JCFADT, Report on the loss of HMAS Sydney, p. 139
- ^ McCarthy, A précis of search-related events, pp. 2-3
- ^ McCarthy, A précis of search-related events, pp. 3-4
- ^ McCarthy, A précis of search-related events, p. 4
- ^ McCarthy, A précis of search-related events, pp. 6-7
- ^ Mearns, The Search for the Sydney, pgs. 61, 77
- ^ Mearns, The Search for the Sydney, pgs. 80-93, 121
- ^ Mearns, The Search for the Sydney, pgs. 104, 110-5
- ^ a b Mearns, The Search for the Sydney, pp. 121-2
- ^ Mearns, The Search for the Sydney, pgs. 121-2, 126, 137
- ^ Mearns, The Search for the Sydney, pp. 126-7
- ^ Mearns, The Search for the Sydney, pgs. 143-9
- ^ Mearns, The Search for the Sydney, p. 217
- ^ Mearns, The Search for the Sydney, p. 157
- ^ Mearns, The Search for the Sydney, pp. 150-1
- ^ Mearns, The search for the Sydney, p. 204
- ^ Mearns, The Search for the Sydney, pp. 157-8
- ^ Mearns, The Search for the Sydney, p. 169
- ^ Australian Associated Press, HMAS Sydney makes heritage list
- ^ Mearns, The Search for the Sydney, pgs. 170-4, 189, 215-17
- ^ Mearns, The Search for the Sydney, pp. 217-28
- ^ Mearns, The Search for the Sydney, p. 228
- ^ Frame, HMAS Sydney, p. 84
- ^ Winter, H.M.A.S. Sydney, pp. 247-8
- ^ a b c Winter, H.M.A.S. Sydney, p. 243
References
- Books
- Cassells, Vic (2000). The Capital Ships: their battles and their badges. East Roseville, NSW: Simon & Schuster. ISBN 0731809416. OCLC 48761594.
- Frame, Tom (1993). HMAS Sydney: Loss and Controversy. Rydalmere, NSW: Hodder & Stoughton. ISBN 0340584688. OCLC 32234178.
- Gill, George Hermon (1957) (PDF). Royal Australian Navy, 1939–1942. Australia in the War of 1939–1945, Series 2, Volume I. Canberra: Australian War Memorial. OCLC 848228. http://www.awm.gov.au/histories/second_world_war/volume.asp?levelID=67910. Retrieved 12 October 2009.
- Jeans, Peter D. (2004). Seafaring lore & legend: a miscellany of maritime myth, superstition, fable, and fact. New York; London: McGraw-Hill. ISBN 0071435433. OCLC 56456095. http://books.google.com/books?id=2TRxLhG2GiwC.
- Mearns, David (2009). The Search for the Sydney. Pymble, NSW: HarperCollins Publishers. ISBN 9780732288891. OCLC 301679923.
- Milligan, Christopher; Foley, John (2003). Australian Hospital Ship Centaur: the myth of immunity. Hendra, QLD: Nairana Publications. ISBN 0646137158. OCLC 31291428.
- Montgomery, Michael (1981). Who Sank The Sydney?. North Ryde, NSW: Cassell Australia. ISBN 0726954764. OCLC 7925808.
- Olson, Wesley (2000). Bitter Victory: The Death of HMAS Sydney. Nedlands, WA: University of Western Australia Press. ISBN 1876268492. OCLC 45722719.
- Hore, Peter (2005). "HMAS Sydney in World War II". In Stevens, David. The Royal Australian Navy in World War II. Crows Nest, NSW: Allen & Unwin. ISBN 1741141842. OCLC 156678255.
- Winter, Barbara (1984). H.M.A.S. Sydney: Fact, Fantasy and Fraud. Spring Hill, QLD: Boolarong Publications. ISBN 0908175728. OCLC 11783441.
- Reports
- Cole, Terence (July 2009). The Loss of HMAS Sydney II (3 volumes). Canberra: Department of Defence. ISBN 9780642297136. OCLC 432200965. http://www.defence.gov.au/sydneyii/finalreport/index.html. Retrieved 9 November 2009.
- Joint Standing Committee on Foreign Affairs, Defence and Trade (JCFADT) (22 March 1999). Report on the Loss of HMAS Sydney. Canberra: The Parliament of the Commonwealth of Australia. ISBN 0642258724. OCLC 42768622. http://www.aph.gov.au/house/committee/jfadt/sydney/Reportinx.htm. Retrieved 9 November 2009.
- News articles
- Australian Associated Press (15 March 2011). "HMAS Sydney makes heritage list". Australian Geographic. http://www.australiangeographic.com.au/journal/hmas-sydney-wreck-makes-heritage-list.htm/. Retrieved 23 March 2011.
Further reading
- Detmers, Theodor.The raider Kormoran 2nd ed. London England: William Kimber, 1959.
- W. A. Jones: Prisoner of the Kormoran, Australasien Publishing, Sydney
- Paul Schmalenbach: German Raiders 1895-1945 (1977)ISBN 0 850593514
External links
HMAS Sydney, German auxiliary cruiser Kormoran, their battle and the searches for themThe Royal Australian Navy in World War II · Raider ships · German naval activity off Australia · Sydney · Kormoran ·
Battle · Search · Unidentified body on Christmas IslandGerman auxiliary cruisers of the Second World War Categories:- World War II cruisers of Germany
- Shipwrecks of Western Australia
- World War II shipwrecks in the Indian Ocean
- World War II commerce raiders
- 1938 ships
- Australian National Heritage List


Wikimedia Foundation. 2010.